Showing: 1 - 38 of 38 RESULTS

Meygoo Dopiyazeh (Persian Prawn, Pepper & Onion Curry)

Prawns are cooked in a spicy and fragrant sauce to create this curry-style dish heralding from Shiraz in the South of Iran.

What are Dopiyazeh Dishes?

You may be familiar with dopiaza dishes from South Indian cuisine where this curry-style dish made with lots of onions commonly features. This dish actually originates from  Khorasan (in present-day covering the East of Iran and the West of Afghanistan).  It was apparently introduced to South Asia by the Mughals. It apparently then spread to countries with a South Asian diaspora. Regional variants have evolved in locales such as Hyderabad, India and several regions of Pakistan. The name Dopiyazeh translates into two onions (‘do’ meaning two in Persian; and ‘piyaz’ meaning onion) which makes reference to the amount of onions used in this dish.

Dopiayzeh is now firmly established as a traditional dish from Shiraz. It can be made with cubed or ground lamb/beef, chicken, shrimp, potatoes, and a copious amount of sliced onions.  My recipe is made with prawns (‘meygoo’) and takes both the Persian origins and the South Asian development of this dish with a few extra additions of my own. There is a slight heat to my recipe, which you can leave out if you prefer.

How to Serve this Dish

This dish pairs well with my Sambuseh-e Sabzijaat (vegetable samosas) recipe, rice and some delicious pickles and chutneys such as mango chutney and turmeric pickle as pictured above. The rice I have made is Persian-style rice with naan tahdig but I have flavoured it with turmeric, cardamom pods, some cloves and cinnamon to make it a pilau-style rice.


Meygoo Dopiyazeh

Prawn, pepper & onion curry
Prep Time20 minutes
Cook Time1 hour
Total Time1 hour 20 minutes
Course: Main Course
Cuisine: Persian, Iranian, Inspired by....
Keyword: curry, seafood, prawns
Servings: 4
Author: Mersedeh Prewer

Ingredients

  • 3 tbsp vegetable oil
  • 1 tsp cumin seeds
  • 2 tsp black mustard seeds
  • 1 tsp coriander seeds
  • 1 large brown onion (finely sliced)
  • 6 cloves garlic (minced or crushed)
  • 1 thumb size fresh ginger (grated)
  • 1 tsp turmeric
  • 1/2 tsp dried red chilli flakes
  • 1 tsp ground coriander
  • 3 tbsp tomato purée
  • 1 red pepper (finely sliced)
  • 1 red onion (finely sliced)
  • 800 ml water mixed with 1/8 tsp of ground saffron
  • Juice 1 fresh lemon
  • 1/2 tsp garam masala
  • 800 g frozen shelled tiger prawns (defrosted)
  • Salt and Pepper (to taste)
  • A small bunch of fresh coriander (finely chopped)

Instructions

  • Place a large casserole pan or skillet on medium-high heat and add oil. Add cumin seeds, coriander seeds and mustard seeds and heat until they sizzle. Then add finely sliced brown onion and cook until they start to caramelise.
  • Add garlic, then ginger and stir into the onion mixture. Follow with turmeric, red chilli flakes, ground coriander and stir until evenly distributed into the mixture.
  • Add tomato purée and stir into the mixture. Then add sliced red peppers and red onion and stir until softened. Add saffron water, lemon juice and garam masala and stir. Bring to a boil and then turn heat down to allow the sauce to simmer gently for 30 mins.
  • Add prawns to the sauce and stir. Add chopped fresh coriander and cook for a further 10 mins. Turn the heat off and serve the Meygoo Dopiyazeh with fresh chopped coriander sprinkled on top accompanied with rice and / or naan.

Khoresh Kadoo ba Aloo (Chicken, Courgette & Sour Plum Stew)

This sweet and sour chicken, courgette and plum stew, flavoured with cardamom, turmeric and saffron is a great addition to your catalogue of weekday meals. Ready to eat in an hour for you and your family.

Coming to the end of the Summer

Khoresh (Persian stew) season is awakening from it’s summer slumber after an array of kebabs, kuku and salads in my household.

I love this season with the deeply comforting stews to warm us through the colder months and, of course, any excuse to eat more Persian rice and Tahdig. I appreciate that cooking Persian food can appear daunting to some, but as with any recipe after you have cooked the dish say about 3 times, added your own little bit of magic to it too, the whole process is familiar and fairly swift. With all that said I am always looking for ways to produce delicious Persian food for weekday meals at a shorter time than sometimes prescribed for our dishes, particularly our slow-cooked stews.

AKA the 1 hour Stew

Let me introduce you to Khoresh Kadoo ba Aloo (chicken, courgette & sour plum stew). This khoresh is ready to eat about an hour from when you start chopping all the ingredients. The use of chicken breast means it doesn’t need to slow-cook and the meat remains juicy. Courgettes (‘kadoo‘) cook in no time at all and a few little tricks with additional spices / condiments means it is perfectly balanced and feels like the khoresh has fallen into place with its flavours (as if it has been simmering for hours). This dish is a great transition dish from summer to autumn as it uses courgettes which are still in season to October.

What is Aloo?

Aloo is the name we give to the dried sour plums (Aloo Bukhara) you can buy them from Asian (for example Indian and Pakistani) supermarkets. If you don’t use all the packet in one go then put the remaining plums in the freezer and they keep for ages until you want to cook this recipe again or try out my other recipe featuring them Khoresh-e Beh ba Aloo (chicken stew with quince, sour plums and apricots). Remember that the sour plums have pips in them which you can remove while you are eating – the plums will fall apart easily once cooked and you can remove them with your spoon and fork while eating.

How to Serve this Dish?

Serve Khoresh Kadoo ba Aloo with kateh (Persian easy cook rice) for dinner to be ready within an hour.

How to Store Leftovers?

Once cooled, store in an airtight container in the fridge up to 3 days. Gently reheat in a saucepan on the stove or in the microwave.


Khoresh Kadoo ba Aloo

Persian Chicken, courgette and sour plum stew (aka the 1 hr stew)
Prep Time15 minutes
Cook Time45 minutes
Total Time1 hour
Course: Main Course
Cuisine: Persian, Iranian
Keyword: easy recipe, stew, Middle-Eastern Food, khoresh, weekday meal
Servings: 4
Author: Mersedeh Prewer

Ingredients

  • 3 tbsp vegetable oil
  • 3 medium courgettes (quartered and then halved)
  • 1 large brown onion (finely diced)
  • 4 cloves garlic (crushed)
  • 1 tsp turmeric
  • 4 medium chicken breast (cut into bite size pieces)
  • 1 tbsp tomato purée
  • 3 cardamom pods
  • 1 bay leaf
  • 500 ml vegetable stock plus 1/4 tsp ground saffron dissolved in the stock
  • 15 to 20 Aloo Bukhara (dried sour plums)
  • Juice of 1/2 lime
  • 1 tbsp honey
  • Salt and pepper to season

Instructions

  • Take a large non-stick casserole pan / skillet with a lid and place over high heat. Add 3 tablespoons oil. Fry the courgette on all sides until browned and golden. Remove and place on a kitchen towel on a plate.
  • Add diced onions to pan and cook until golden. Add garlic and stir in, followed by turmeric. Stir until evenly distributed in the pan and you can smell the aromas.
  • Add chicken and stir until the chicken pieces turn white (from pink). Then add tomato purée and stir until the chicken mixture is coated evenly.
  • Throw in cardamom pods and bay leaf and then pour in the saffron infused stock. Add the Aloo Bukhara plums. Season with salt and pepper, squeeze in the juice of 1/2 lime and add honey. Stir the mixture.
  • Gently place the fried courgettes in the stew so they are part submerged. Bring the stew to a boil and then turn the heat down to allow the khoresh to simmer with the lid on (approx 30 mins).
  • Serve with Persian rice and salad.

Kuku Loobia Sabz (Persian Green Bean Frittata)

A delicious summer frittata made with eggs, green beans, caramelised onions and flavoured with turmeric, saffron and Persian mixed spice (advieh).

What is Kuku?

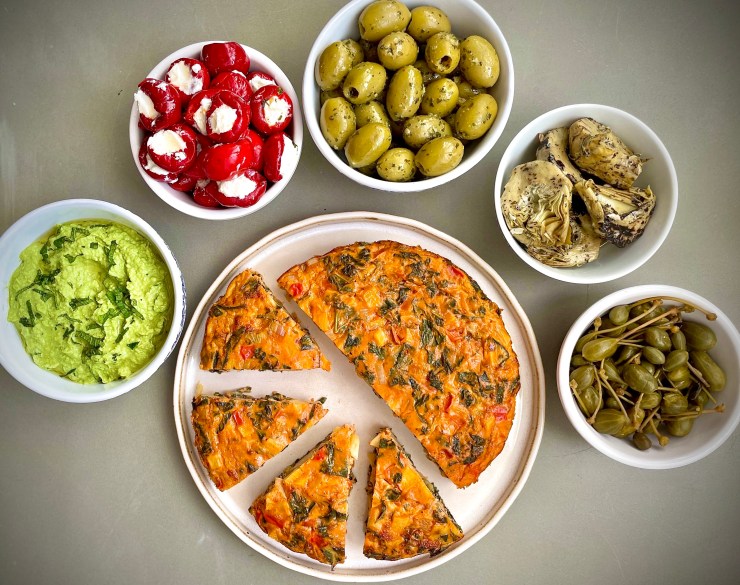
Kuku is an Iranian frittata-style dish. It is often vegetarian and is made with beaten eggs and various herbs and / or vegetables folded in. The main difference between kuku and its western counterparts is the ratio of egg to vegetables, with kuku favouring the latter. It is served either hot or cold as a starter, side dish or a main course, and is accompanied with bread or rice and either yoghurt or salad.

The two most well known kuku recipes are Kuku Sabzi (made with herbs and barberries and / or walnuts); and Kuku Sibzamini (made with potatoes). We also have Kuku Kadoo (made with courgettes). Ultimately there are no hard and fast rules about what you should put in your kuku – I have made ones with potatoes, feta and beetroot; curried mushrooms; kale and red pepper; bacon, cheese and tomatoes and the list goes on…

Origins of Kuku Loobia Sabz

This Kuku recipe hails from Tabriz, a city in northwestern Iran, serving as the capital of East Azerbaijan Province. It is the fifth most populated city in Iran and the largest economic hub and metropolitan area in northwest Iran. The population is overwhelmingly Azerbaijani who speak the Azerbaijani language, though Persian is spoken by residents as a second language.

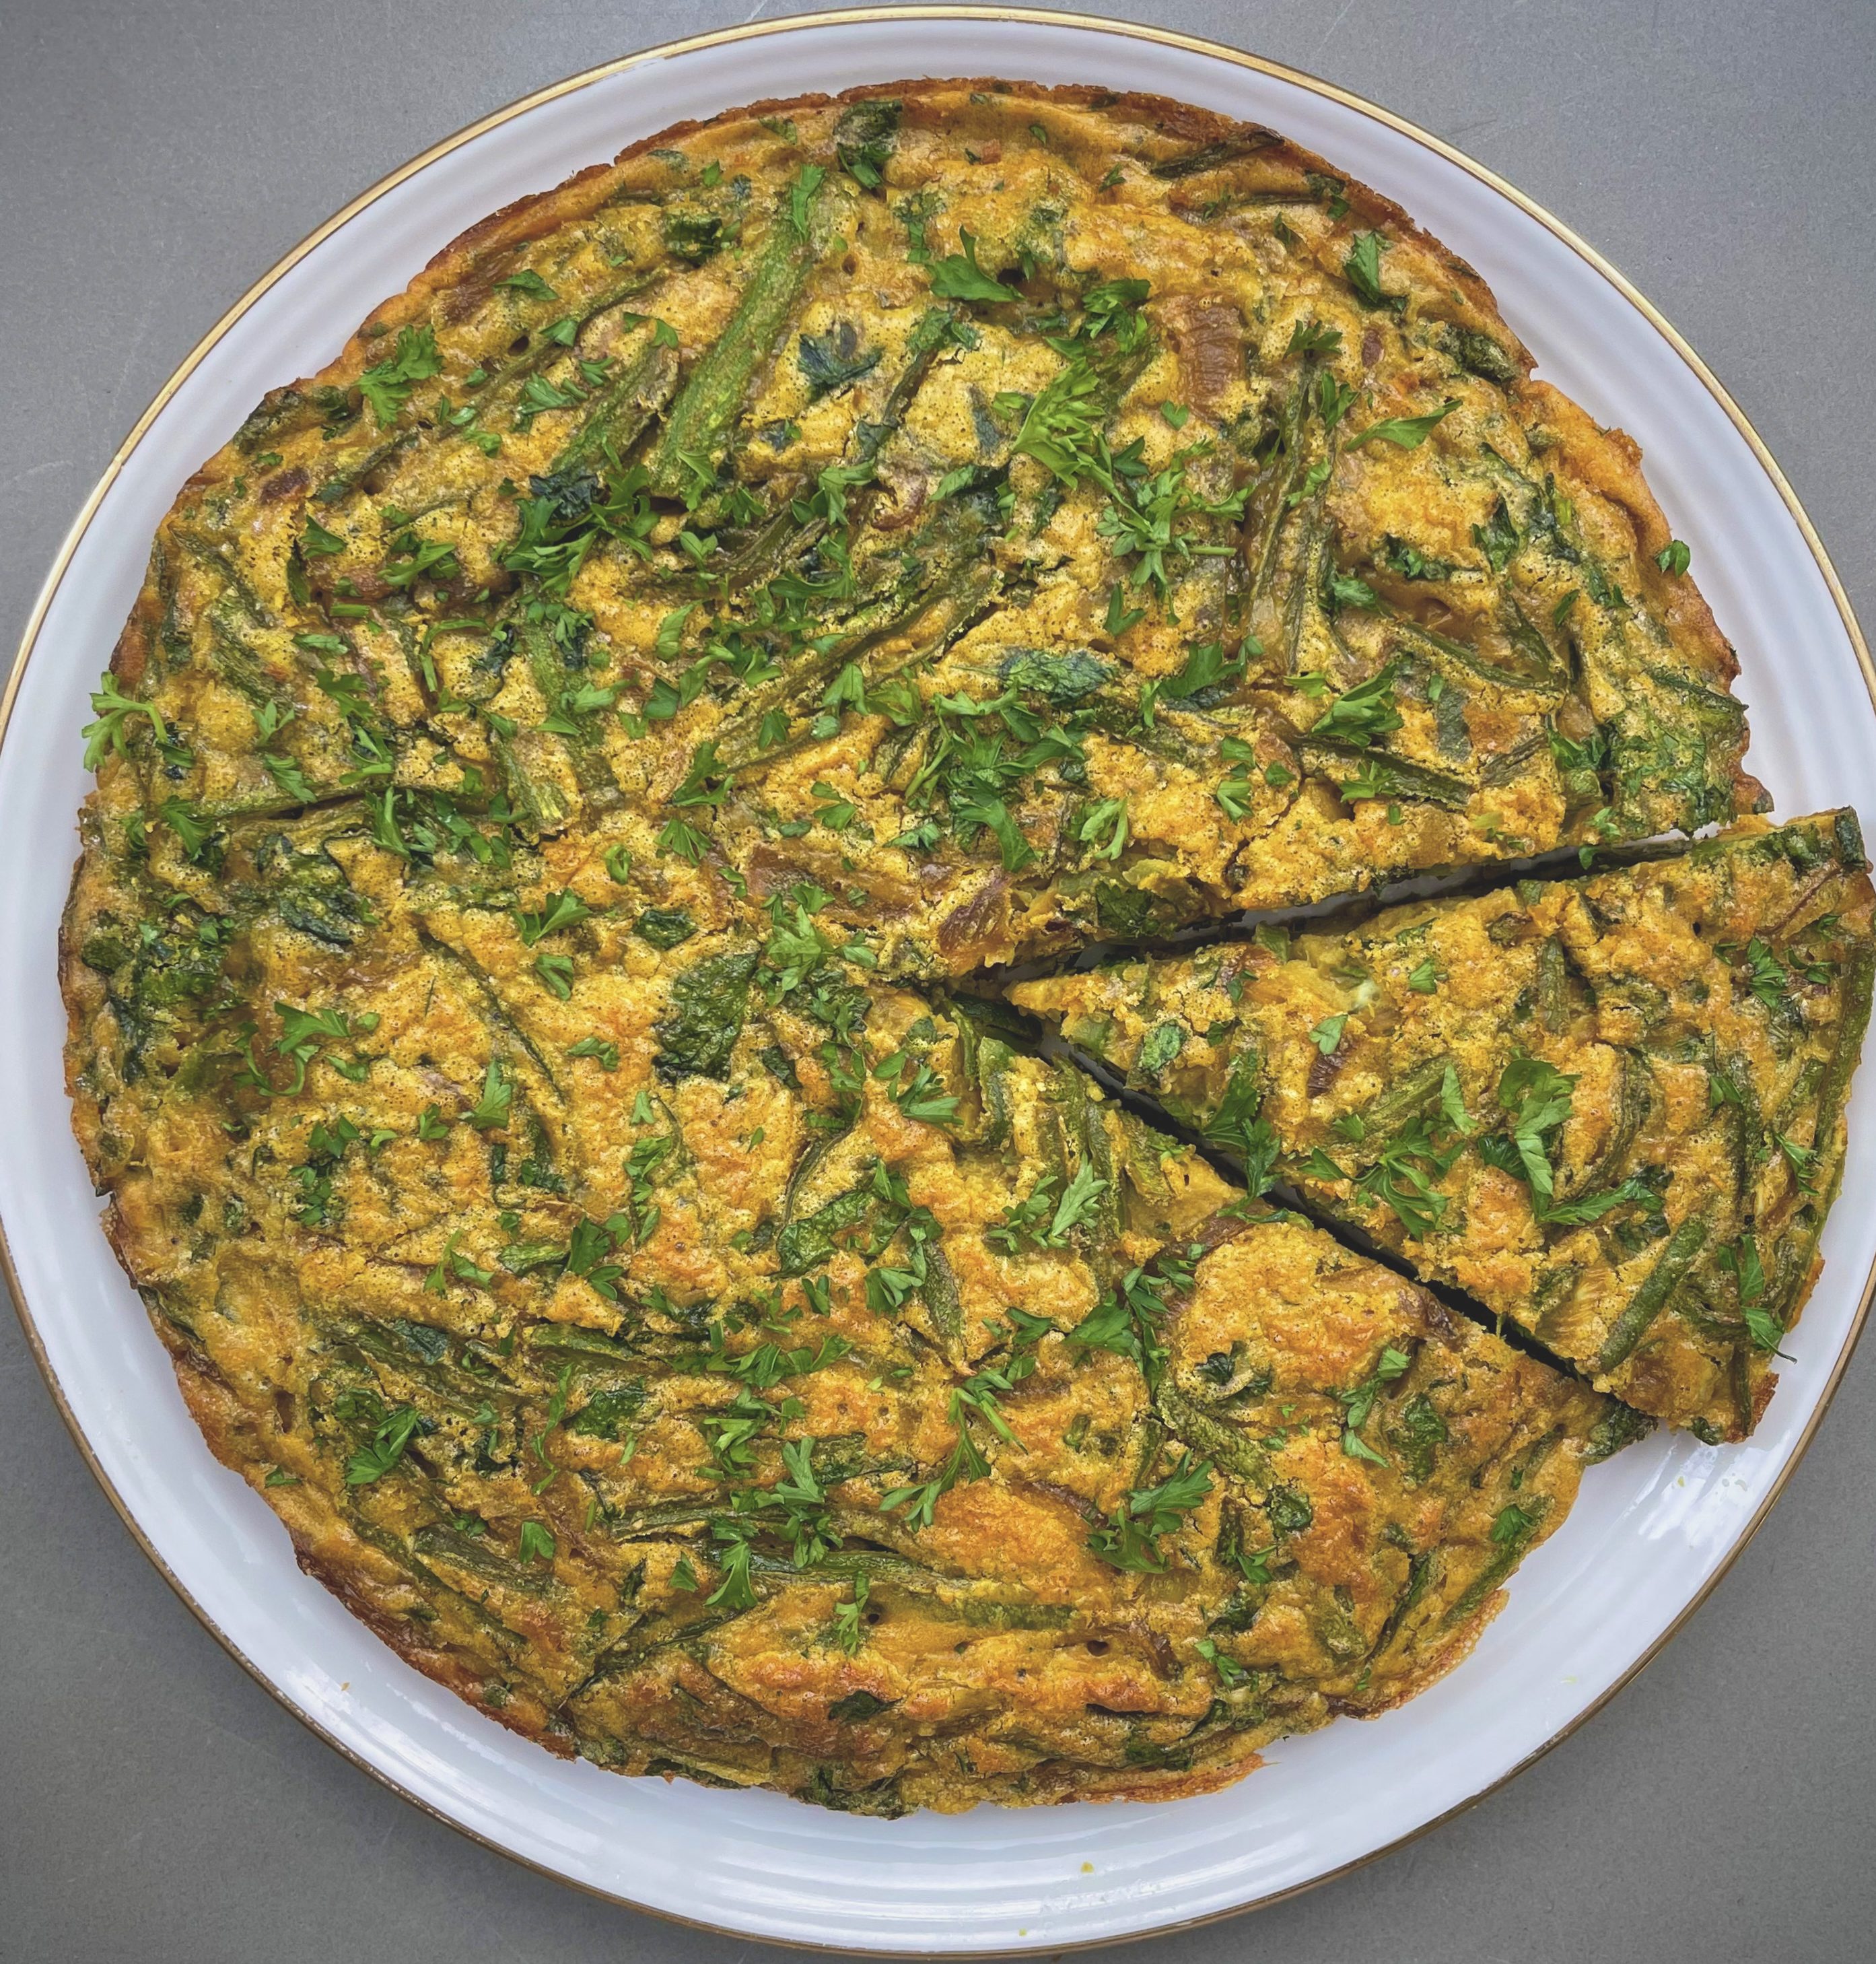
This dish is a gorgeous addition to the summer catalogue of recipes as it is light and easy to prepare. some variations of this recipe include potatoes but the version I prefer is with caramelised onions and sliced green beans as set out in the recipe below. I use garlic, saffron, turmeric and advieh as the aromatics for the dish. You can buy the advieh I use for this recipe and others here.

How to Serve Kuku Loobia Sabz

Serve this dish with a salad like cherry and feta salad, hummus such as beetroot hummus and flatbread.

Leftovers

Store leftovers in the fridge in an airtight container up to 3 days. Cool the kuru down completely before refrigerating.


Kuku Loobia Sabz

Green Bean Frittata
Prep Time15 minutes
Cook Time40 minutes
Total Time55 minutes
Course: Main Course, lunch, Appetiser, Accompaniment
Cuisine: Iranian, Middle-Eastern
Keyword: vegetarian, frittata, Green beans
Servings: 4 (to 8)
Author: Mersedeh Prewer

Ingredients

  • 3 tbsp vegetable oil
  • 1 medium red onion (finely sliced)
  • 4 garlic cloves (minced or crushed)
  • 1 tsp turmeric
  • 250 g green beans (sliced)
  • 1.5 tsp Advieh (persian mixed spice)
  • 1/3 cup saffron water (bloom 1/8 tsp of ground saffron in the water)
  • Juice of half a lime
  • 20 g fresh coriander plus a bit extra for garnishing the kuku before serving (finely chopped)
  • 50 g plain flour
  • 1 tsp baking powder
  • 8 large eggs
  • 1 tsp salt
  • 1/2 tsp ground black pepper

Instructions

  • Preheat oven to 160°C (fan) / 180°C (conventional) / Gas mark 4.
  • Place a non-stick skillet or frying pan which can be placed in an oven on medium-high heat on the stove (size of pan anything between approx 10" and 12" i.e. 25 to 30 cm).
  • Add 2 tbsp oil and heat until it glistens. Then add finely sliced onion and cook until golden and caramelised. Stir in garlic, turmeric and advieh.
  • Add sliced green beans, the lime juice and saffron water and stir until the beans have wilted and the liquid has cooked off. Lower the heat if required. Stir in the freshly chopped coriander. Turn off the heat while you prepare the egg mixture.
  • Add flour and baking powder to a bowl. Crack in one egg and whisk until all the flour is incorporated and no flour lumps remain. Then add remaining eggs, the salt and pepper and whisk. Pour in the bean mixture and stir until fully incoprated with the egg mixture.
  • Turn the heat to medium-high on the stove. Place the skillet on the heat and add 1 tbsp oil. Pour the kuku mixture in and tip the pan gently side to side to make sure it is evenly distributed across the pan. Heat on the stove for approximately 3 minutes. Then place in the preheated oven and bake for a further 20 to 25 mins. To check the kuku is done, use a thin skewer and gently poke the middle of the kuku. It should come out clean.
  • Remove the kuku from the pan and serve with a sprinkle of freshly chopped coriander alongside a salad, flatbread and yoghurt-style dip and / or mezze-style dishes. Kuku can be served hot, warm or cold. Leftover kuku is a great sandwich filler too!

Persian Fried Chicken Burger aka PFC Burger

This crispy Middle Eastern inspired fried chicken burger is marinated in a turmeric and saffron infused buttermilk and then dredged with flour, Persian mixed spice and za’atar to create a real treat that’s finger licking good!
Jump to Recipe

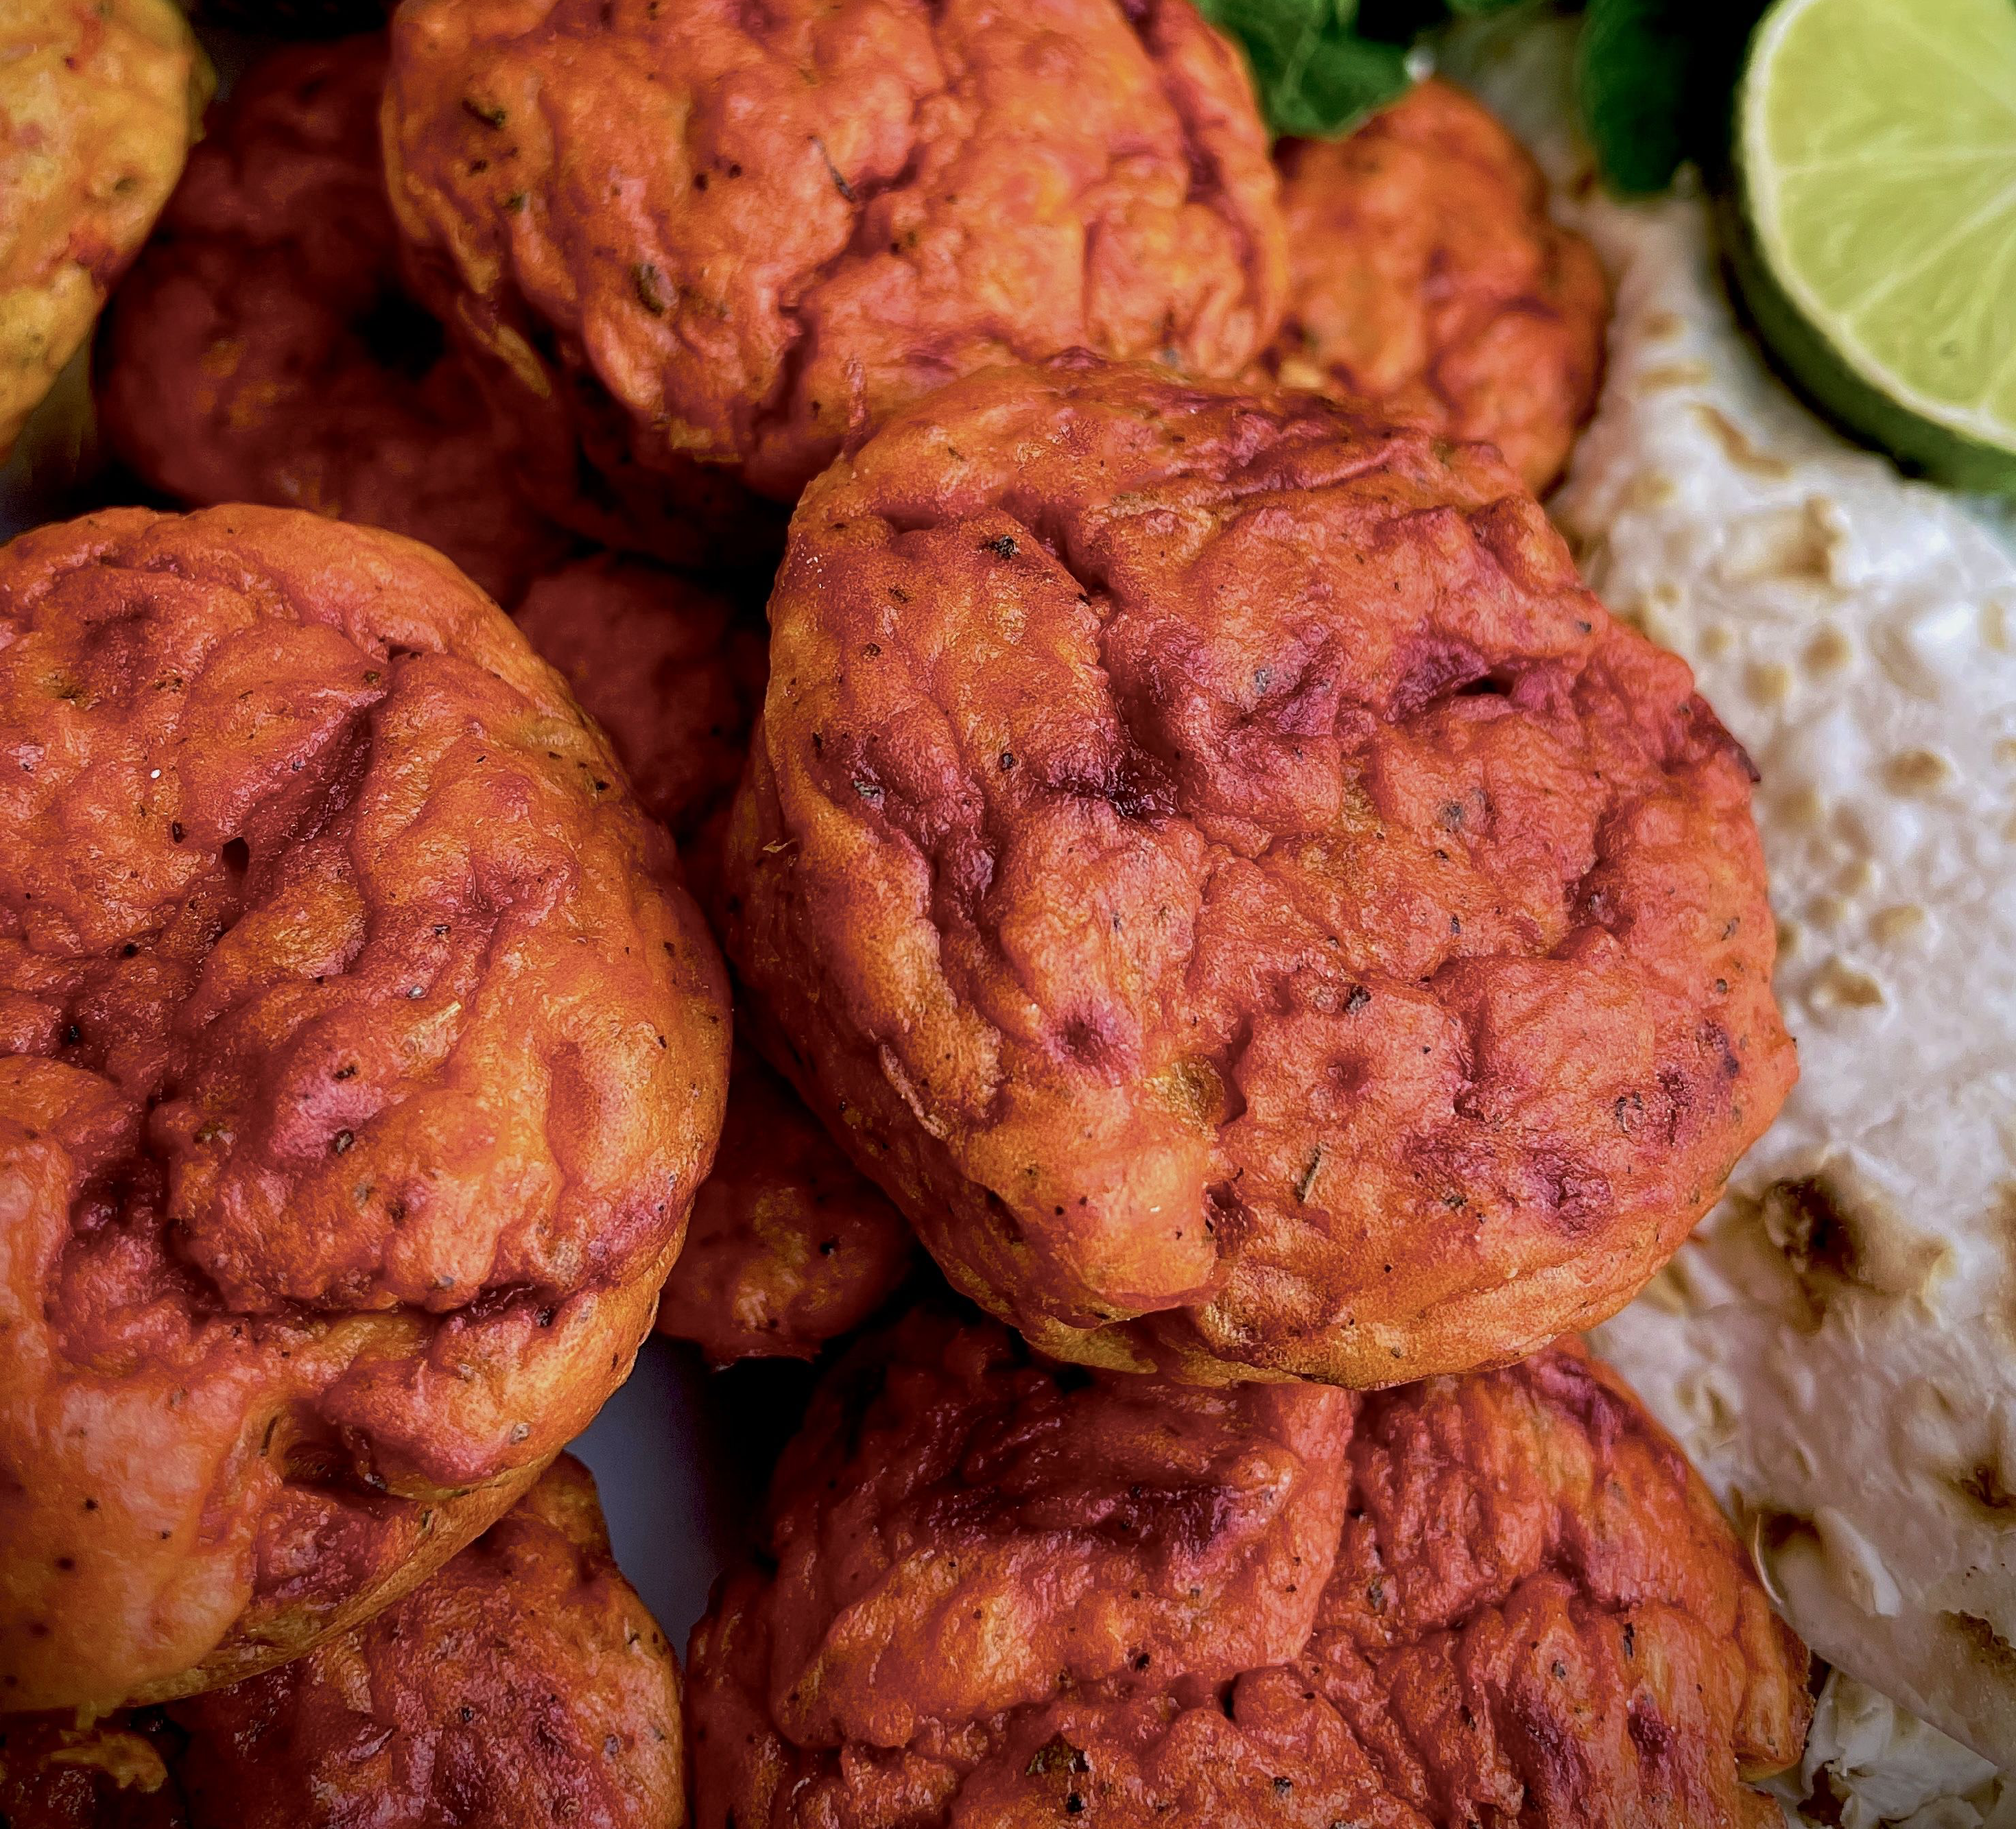
Fried chicken in any form has a special place in my heart (and my belly)! I am continuously looking for ways to bring new joy to me eating crispy fried chicken, from my curried chicken schnitzel recipe to my shwarama flavoured crispy goujons, it was only a matter of time before I found a way to make a Persian version of a fried chicken burger and here it is in all its glory.

What makes PFC so special?

Chicken thighs marinated in a blend of buttermilk, saffron, turmeric, chili sauce, onions and garlic. Then coated with flour flavoured with Persian mixed spice (Advieh), Za’atar, onion and garlic powder and then deep fried to perfection. Served in a toasted brioche bun with lashings of moosir mayonnaise, crispy onions, Persian pickled cucumbers, Thai basil, tomato and lettuce. This amazing variation to the classic crispy chicken burger really is worth going the extra mile to get your hands on three Persian elements which are not readily available in your local supermarket.

Advieh

The Persian equivalent of mixed spice. It is used in many dishes with the combination of spices varying from region to region in Iran. Advieh is a fragrant mix of spices and can be compared in use to garam masala in Indian cooking, whereby its addition seasons the dish and adds a further layer of aromatics. It can simply be sprinkled on a plain rice dish, added to stews and marinades for meat. The one I use is a mixture of nutmeg, rose petals, cumin, cardamom, coriander, cinnamon and black pepper.

I buy it online from a supplier on Etsy. However, advieh can also be picked up from most Iranian or Middle Eastern food shops. This spice forms part of the flour dredge for the chicken thighs and takes the flavour profile to another level of delicious.

Moosir

Described in English as a Persian shallot, it is similar to a Solo or Elephant garlic. It has a flavour profile similar to garlic but slightly sweeter and softer in its spiciness. They grow wild in the foothills of the Zagros Mountains, and have to be found and dug out of the earth – a similar process to truffles. It adds an amazingly distinctive flavour to dishes.

You can buy moosir from most Middle Eastern food shops or online. It is available in its dried form and needs to be rehydrated by soaking in water overnight. Whilst we usually use this for our yogurt dip Maast O’Moosir, I started adding it to my mayonnaise and have not looked back. It is so delicious. I am pretty sure once you try it, you will also never want to have mayonnaise any other way. The Moosir Mayo compliments this chicken burger brilliantly.

Khiarshoor

They are baby cucumbers pickled in salt, vinegar and flavoured with tarragon. Our pickled cucumbers are not sweet like British pickled cucumbers and they really compliment this burger. You can buy them online or in most Middle Eastern supermarkets, but if you cannot get your hands on them then normal dill pickles usually used in burgers are absolutely fine.

With the exception of three items above, you should be able to source all the other ingredients from your local supermarket. Both Tescos and Waitrose now have Thai basil available but if you can’t get your hands on Thai basil, then Italian basil is totally fine.

How to Serve this Dish

Serve this burger with some french fries for the perfect fakeaway!


See my how to reel on instagram via the link below


Persian Fried Chicken Burger aka PFC Burger

Prep Time45 minutes
Cook Time15 minutes
Total Time1 hour
Course: Main Course
Cuisine: Inspired by....
Servings: 4
Author: Mersedeh Prewer

Ingredients

Buttermilk Marinade

  • 500 ml buttermilk
  • 1/8 tsp ground saffron
  • 1/2 tsp turmeric
  • 1 tbsp chilli sauce
  • 1 tsp salt
  • 1/2 tsp ground black pepper
  • 4 cloves garlic (crushed or minced)
  • 1 onion (medium sliced)
  • 4 chicken thighs (skinless and boneless)

Moosir Mayonnaise

  • 8 discs dried moosir
  • 1/2 cup mayonnaise

Flour Coating

  • 250 g plain flour
  • 2 tbsp advieh (Persian mixed spice - Cardamom, Black Pepper, Dried Rose Petals, Cinnamon, Nutmeg)
  • 2 tbsp Za'atar spice blend
  • 2 tsp garlic powder
  • 2 tsp onion powder
  • 1 tsp salt
  • Vegetable oil (for deep frying)

To serve

  • 4 Burger Baps (such as Brioche buns)
  • Lettuce
  • Tomatoes
  • Thai Basil
  • Pickled cucumbers

Instructions

Marinade the Chicken Thighs

  • Take a large bowl, add buttermilk, ground saffron, turmeric, chill sauce, salt, pepper, garlic, onion and mix with spoon. Add the chicken thighs and ensure they are full submerged in the marinade. Cover and leave in the fridge to marinade anything between 8 hrs to 24 hrs.

Rehydrate the Moosir

  • Rehydrate the moosir by placing n a bowl and adding boiling water. Cover and leave overnight.

Moosir Mayo

  • Drain the rehydrated moosir discs and rinse. Mince finely with a sharp knife, discarding any tough parts. Take a bowl, add mix the moosir and mayo. Cover the bowl and leave in the fridge for the flavour of the moosir to permeate through the mayo (no less than 3 hours before you want to eat your burger).

Prepare the Flour Coating and Fry the Chicken

  • Make the coating by combining the flour, advieh, za'atar, garlic and onion powder, salt and pepper.
  • Drain the chicken thighs and sliced onion, reserving the marinade. One by one, dredge each thigh in the flour, then dip in the reserved marinade, then dredge again in the flour, pressing on as much as you can to coat. Transfer the coated thighs to a large plate. Do the same with the sliced onions.
  • Heat a 20cm depth of oil in a saucepan or deep-fat fryer until it reaches 175C (please be careful with the hot oil and do not leave unattended). Lower two of the thighs in at a time and fry undisturbed for 3 mins, making sure the temperature doesn’t drop below 160C (it should stay at about 170C). Fry until deeply golden and crisp on both sides. Lift the chicken out and transfer to a tray lined with kitchen paper to drain, then put on a rack and keep warm in a low oven while you fry the remaining thighs and sliced onions. When all the chicken and onions have been fried get ready to build your burger!

Serving the Chicken Burgers

  • Lightly toast your burger buns. Spread the Moosir Mayo on both ends of the buns, layer with lettuce, sliced tomates, Perisan pickled cucumbers, the fried chicken thigh, ketchup, the crispy fried onions and Thai Basil. Pop the top of the bun on and tuck in! A side of fries go very well with this burger and hoepfuly there will be some of the Moosir Mayo left to dip into.


Adasi (Persian Lentil Stew)

This traditional Persian breakfast dish is made with lentils slow-cooked with fresh aromatics and spices to create a stunning wholesome dish.

What is Adasi?

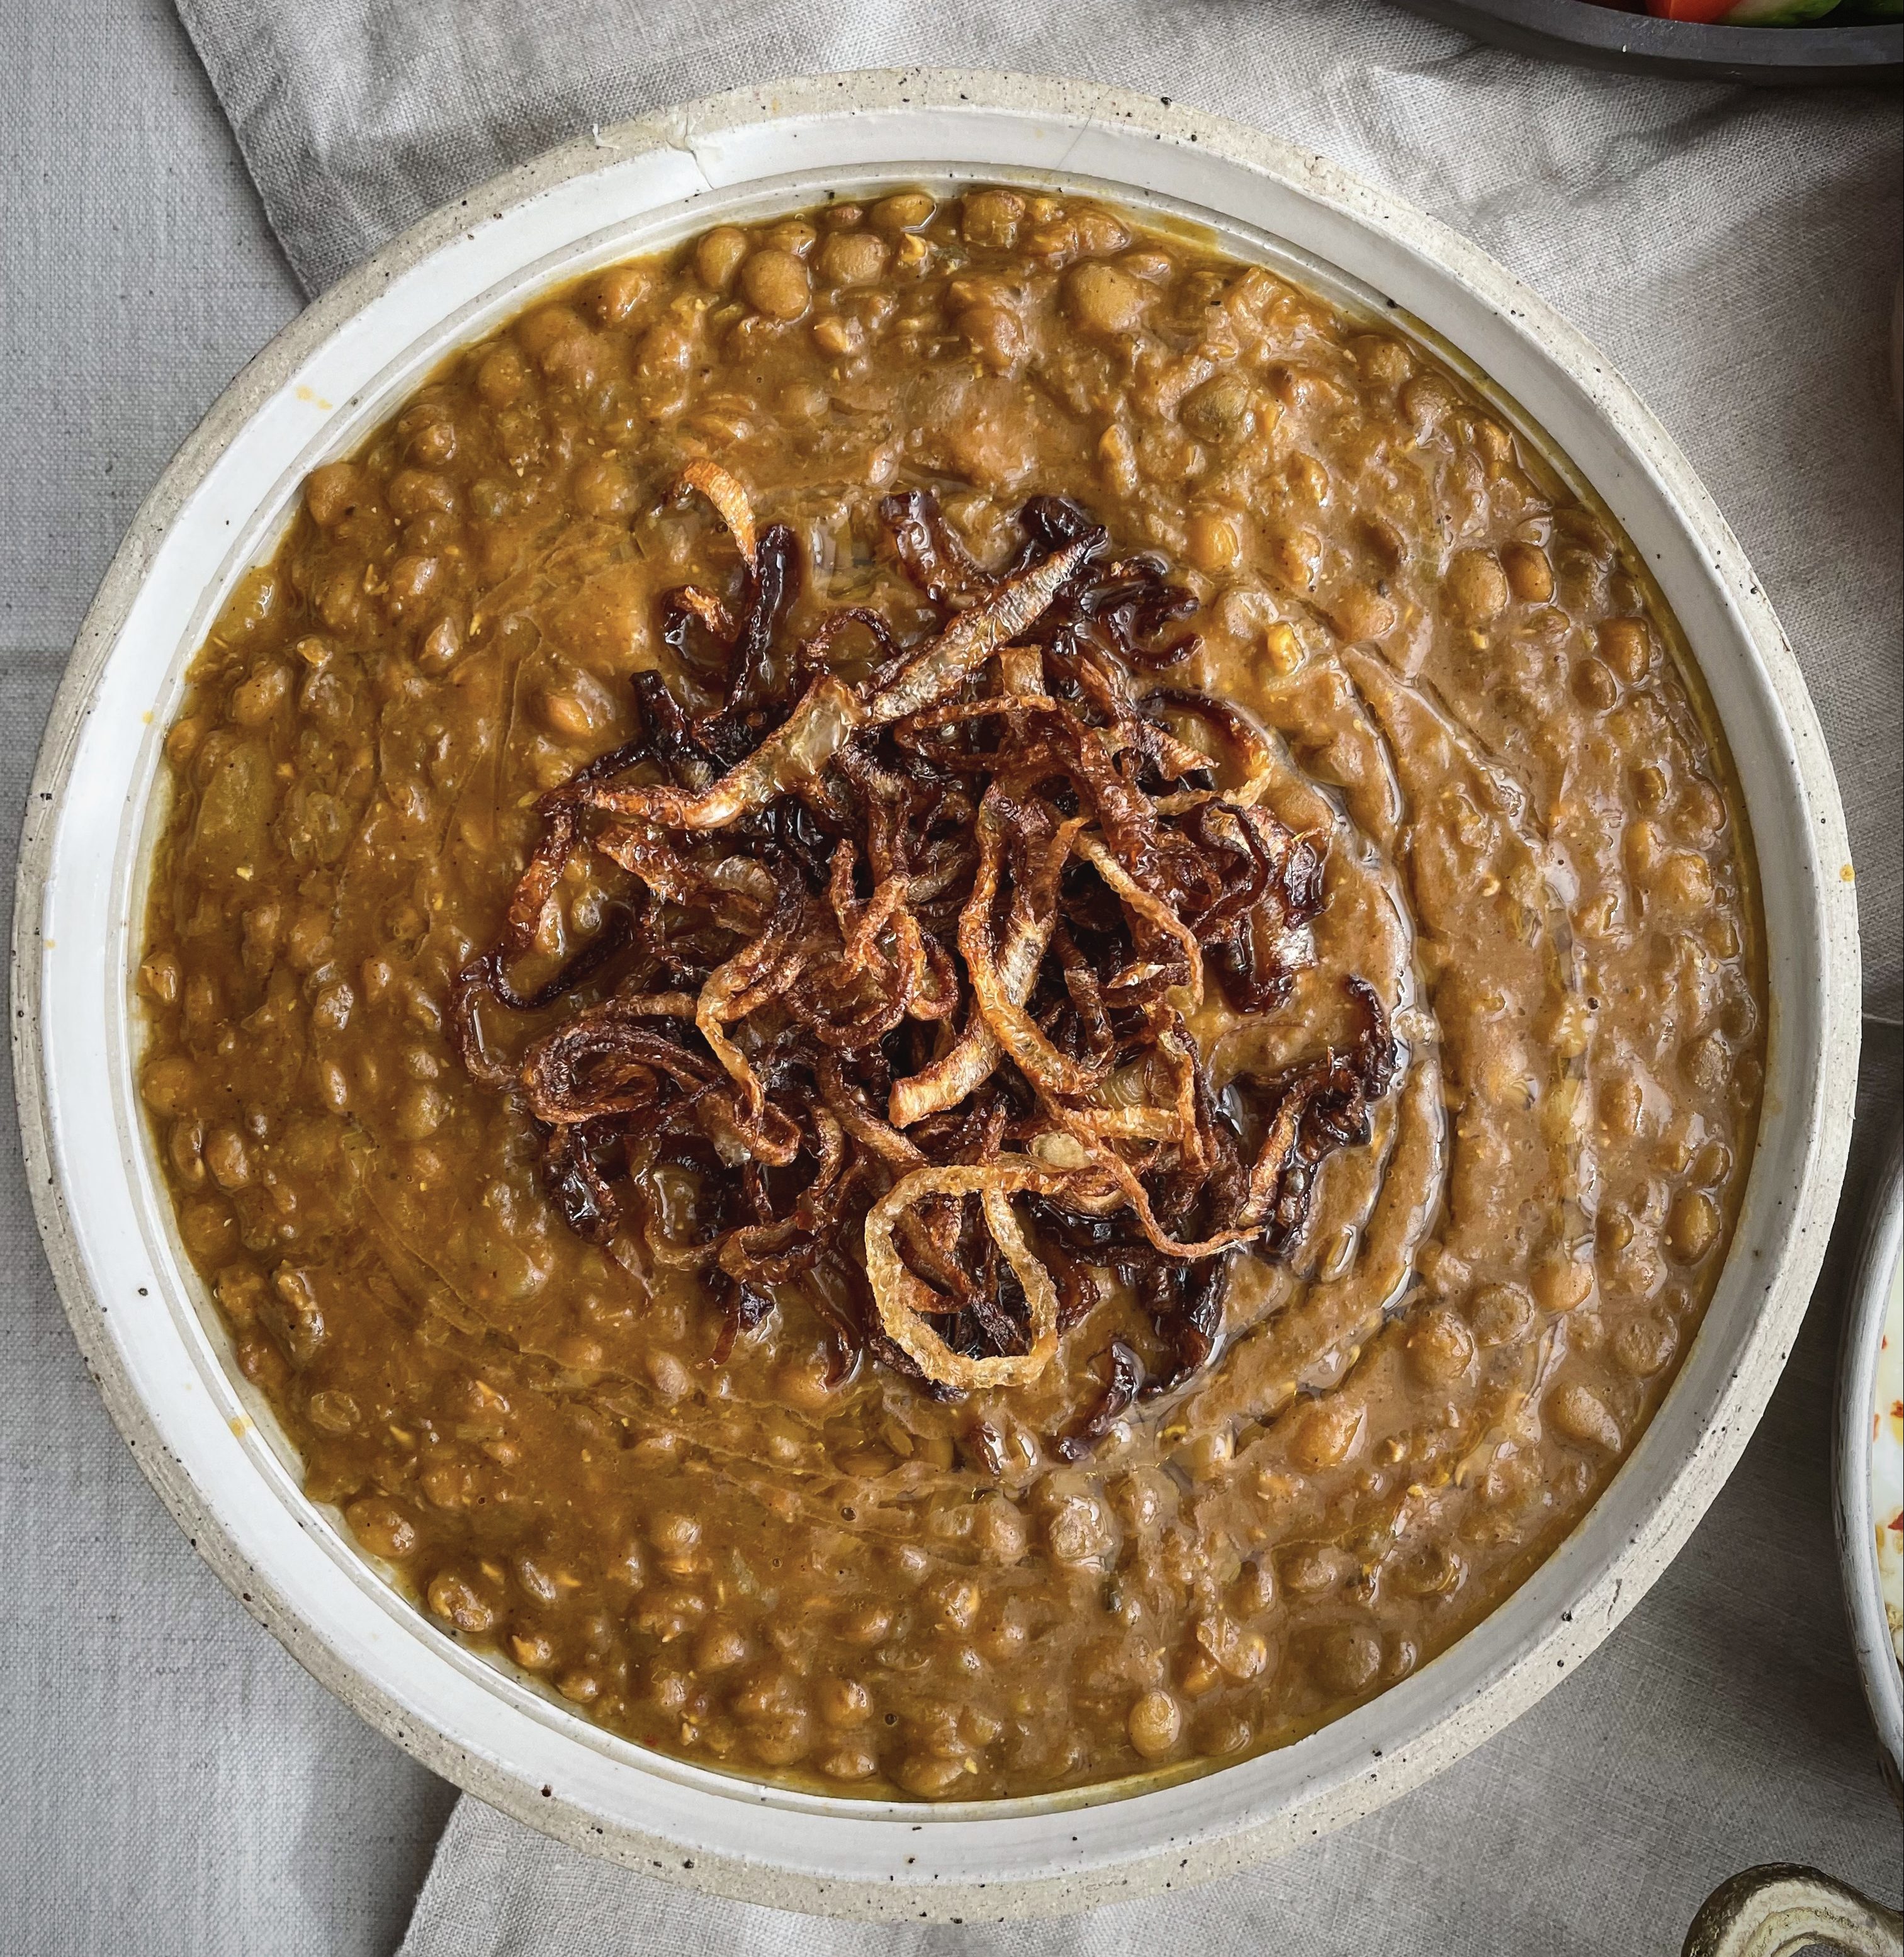
Adasi is a wholesome vegan dish, commonly eaten for breakfast in Iran. It is made with green lentils, onions and spices and is often described as a soup by Persians. I personally consider it is closer to the dal recipes from the Indian sub-continent but to compromise between the two I have called it a stew. Some add cubed potatoes to make it heartier but the version below excludes, but feel free to add them after step 1 below.

It is often topped with fried onions and a ground spice called Golpar or Persian Hogweed or Angelica.

Ingredients in this Recipe?

You will require the following ingredients for this recipe.

  • Dried Green Lentils. You can find large bags at a reasonable price form most supermarkets.
  • Olive Oil. Use extra virgin olive oil to cook the stew with and to drizzle over the final dish.
  • Onions. Used both in the lentil stew and as a garnish for the final dish. Adds depth to the lentils.
  • Garlic and Ginger Paste. Fresh aromatics to complement the flavours of this dish. They add both a sweet, zesty and spicy tone to the dish.
  • Turmeric, Cumin, Cinnamon and Bay. The spices used for this dish. They add a warming, woody, peppery and musky tones to the dish.
  • Tomatoe Purée. Thickens the stew and adds a mild tomato flavour to the dish.
  • Vegetable Stock. The cooking liquid. You can also use plain water in the alternative.
  • Lime. Lifts and complements the flavour profile of the Adasi by adding citrus notes.
  • Salt & Pepper. Seasoning for the dish.
  • Ground Golpar. An unsual spice which add a gorgeous depth of muskiness to this dish. Totally optional if you cannot find it. You can usually find it in Middle Eastern food shops or online.
  • Vegetable Oil. To fry the onions for the garnish.

I cook this recipe  the day before I want to eat it as the flavours intensify overnight. The recipe below yields a big batch (up to 8 people) and lasts up to 5 days if refridgerated, so it is a great dish to make and dip in and out of for various meals during a working week.

How to Serve Adasi

Serve  with flatbread such as Persian Noon-e-Sangak or Sesame and Nigella Seed Flatbread. Pairs well with eggs (poached, boiled or fried) and some fresh herbs as set out in the picture above. It can also be served with rice (chelo or kateh) for a heartier meal.
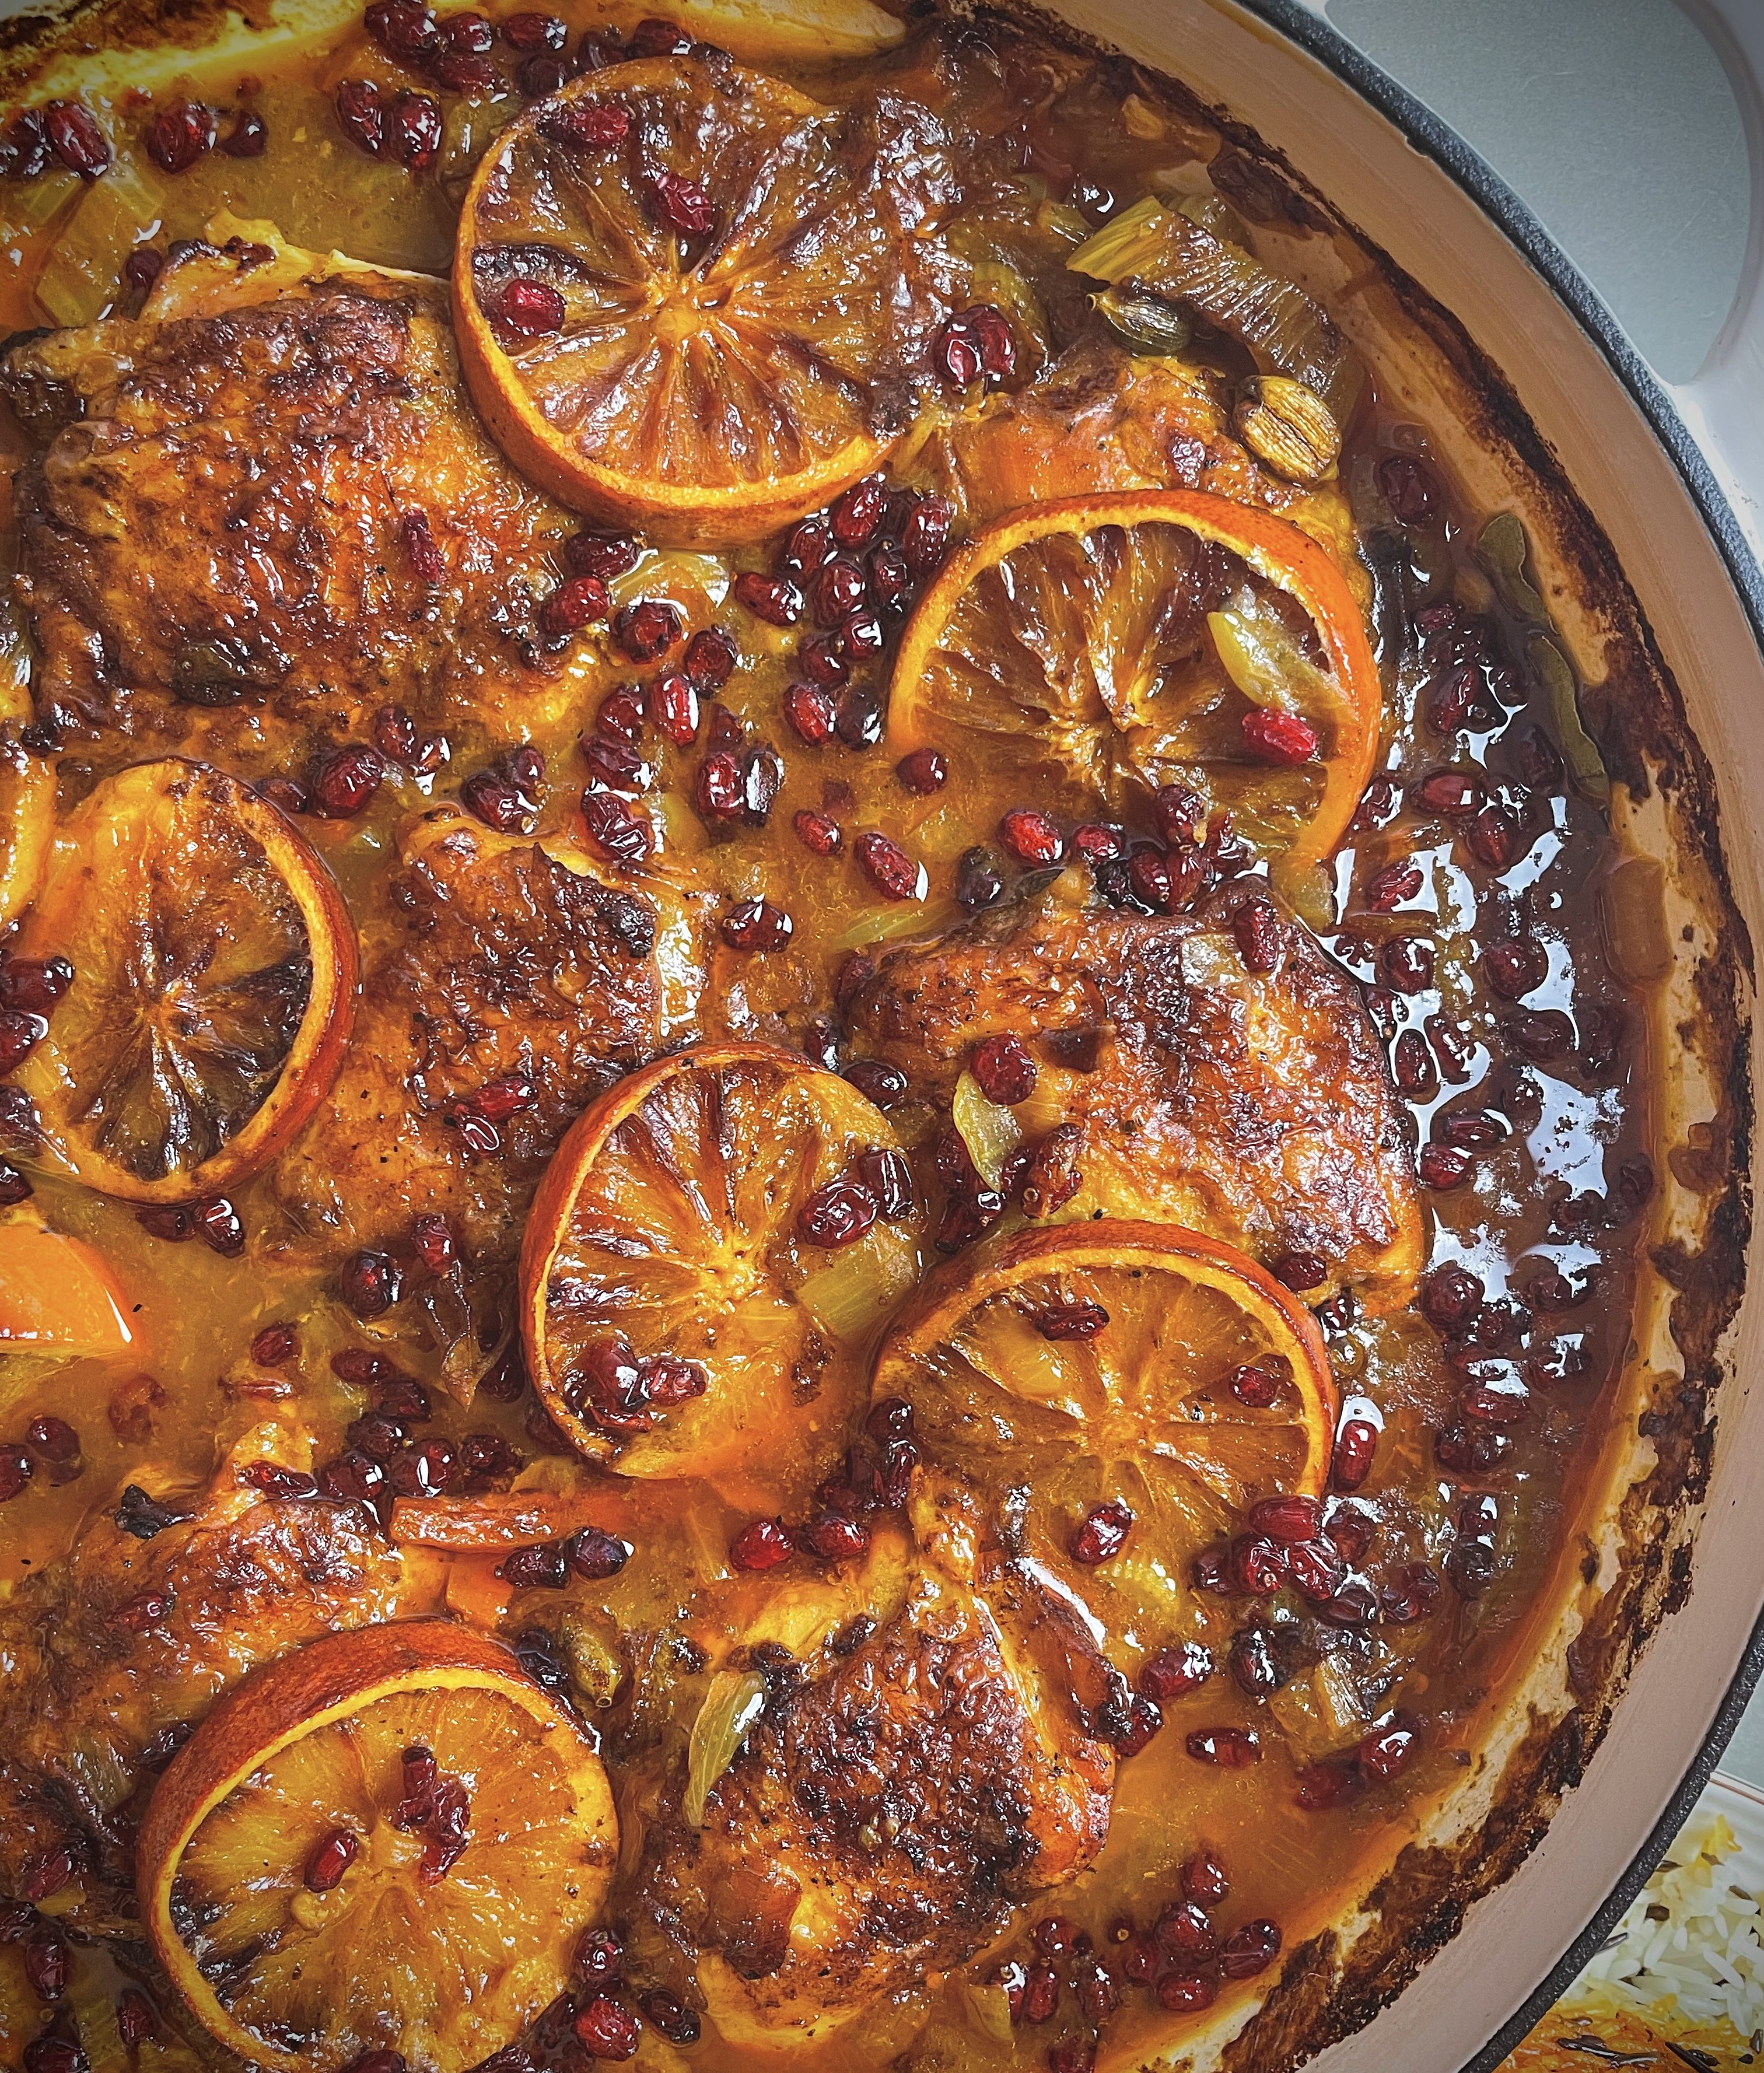

Adasi

Persian Lentil Stew
Prep Time15 minutes
Cook Time1 hour 15 minutes
Total Time1 hour 30 minutes
Course: Breakfast, Main Course, Brunch, lunch
Cuisine: Persian
Keyword: vegetarian, vegan
Servings: 6 (to 8)
Author: Mersedeh Prewer

Ingredients

For the Adasi

  • 400 g dried green lentils (washed and soaked in water for 2 hours)
  • 2 tbsp olive oil
  • 1 large brown onion (finely diced)
  • 1 tbsp garlic and ginger paste
  • 1 tsp turmeric
  • 1 tsp ground cumin
  • 1 tsp cinnamon
  • 2 tbsp tomato purée
  • 1.2 litres vegetable stock
  • Juice of 1 lime
  • 1 bay leaf
  • Salt and pepper (to taste)

For the Garnish

  • 1 large brown onion (finely sliced)
  • Vegetable oil (to fry the onions)
  • Ground golpar (Persian hogweed - optional)
  • Olive oil (to drizzle on top)

Instructions

  • Place a large saucepan over a medium-high heat. Add olive oil and heat until it glistens. Then add onions and cook, stirring regularly until they start to turn golden.
  • Add garlic and ginger paste, followed by turmeric, ground cumin, cinnamon and stir until evenly distributed into the onion mixture. Then stir in tomato purée.
  • Drain and add in pre-soaked lentils and stir until evenly mixed with the onion mixture.
  • Pour in the stock, lime juice and bay leaf and bring to a boil. Then turn heat down, put the lid of the saucepan on and let the Adasi simmer for approximately an hour or until the lentils are tender.
  • Whilst the Adasi is cooking fry finely sliced onion in vegetable oil over a high-medium heat until crispy.
  • When the Adasi is cooked take a stick blender and blitz some of the lentil mixture to thicken (about 1/3). Taste and season as required with salt and pepper (stock usually has salt in it so further salt may not be necessary). Squeeze some more lime juice if desired. Then ladle into a bowl, top with the crispy onions, a sprinkling of ground golpar and a drizzle of olive oil.

Harissa and Lime Chicken Kebabs

Chicken kebabs marinated in harissa & lime

Simple yet delicious, this marinade for chicken can be used whether you are cooking on the BBQ, roasting in the oven, under the grill, on a griddle, in an air fryer or just frying the chunks of chicken in a pan. Either way the result is a powerhouse of flavour with very little effort required.

One of my favorite ways to eat this chicken is an element to a salad bowl (kind of like a Buddha Bowl) with the fragrant and smokey flavors from North Africa and the Middle-East, as pictured below. But it can be eaten with anything or any way you want, whether you want to eat it as a kebab roll with the chicken wrapped in some flatbread with salad, pickles and some garlic and / or chili sauce alongside some chips; or with some rice or Tabouleh or other healthy grain based salad.

The ingredients are simple – chicken breasts, harissa paste (any variety – I use Rose Harissa by Belazu but apricot or just the plain one is absolutely fine); crushed garlic, dried za’atar leaves or oregano and fresh lime juice. Leave the chicken to marinate for a minimum of 4 hours but for best results overnight and you will not be disappointed.

For those of you who may not be familiar with za’atar, it is a herb grown in some Middle-Eastern countries, like Lebanon, with a flavour like a cross between thyme and oregano. It is also the name for a spice and herb mixture used like a condiment.

Harissa originates from North Africa. While every region has its own variation and take on the paste, it’s particularly associated with Tunisia. It is a hot chilli pepper paste, the main ingredients of which are roasted red peppers, Baklouti peppers, spices and herbs such as garlic paste, caraway seeds, coriander seeds, cumin and olive oil. Rose harissa contains dried rose petals, and, usually, rosewater too. This softens the heat and adds a subtle floral note to the dishes it is added to. The use of yoghurt in the marinade also tempers the heat a little further making this a recipe that can be enjoyed by the whole family. Using a shop bought paste like this really helps to reduce thinking and preparing time so I welcome these shortcuts. A little addition of extras like lime, garlic and yogurt make it more personal.

On a side note – I am slowly putting together recipes for all the other elements of the pictures as they are all too delicious not to share with you so please watch this space!


See my how to reel on instagram via the link below…


Harissa & Lime Chicken Kebabs

Chicken kebabs marinated in harissa & lime
Prep Time10 minutes
Cook Time25 minutes
Total Time35 minutes
Course: Main Course
Cuisine: Cross-cultural
Keyword: chicken, kebabs, harissa
Servings: 4 (to 6)
Author: Mersedeh Prewer

Ingredients

  • 1.2 kg chicken breasts (about 4 to 5 large chicken breasts)
  • 4 tbsp harissa paste (I use Belazu Rose Harissa)
  • 4 tbsp Greek yoghurt
  • 4 cloves garlic (crushed or minced)
  • Juice of 1 large lime
  • 2 tsp dried za'atar leaves or oregano
  • Salt and Pepper
  • 1 to 2 tbsp butter and / or olive oil (Melted - to baste the chicken while cooking)

Instructions

  • Chop your chicken into chunks (fairly large as they will shrink when cooking). Put the chicken pieces into a bowl and then add all the ingredients except the butter and massage into the chicken until all the marinade is mixed in and evenly distributed amongst the chicken pieces. It will be a bright red / orange colour.
  • Cover and leave in the fridge for the flavours to develop for a minimum of 4 hrs but best left overnight. Take the chicken out of the fridge about 30 mins before you want to cook to bring up to room temperature.
  • When you are ready to cook the chicken (either on your bbq or under the grill on the highest setting), divide the chicken on to about 4 / 6 skewers and cook, basting with the butter and / or olive oil and turning the skewers until the chicken is a little charred. It takes roughly 15 to 25 minutes on a bbq or grill (depending on how hot your bbq / grill is).
  • Serve alongside chips, rice or lavash bread / flatbread, salad, mezze-style dishes including hummus and yoghurt dips.


Coconut and Herb Chickpea Curry

This recipe came about one evening when I had a jar of chickpeas, a can of coconut milk and a pillow of herbs starting to look a little pathetic in my fridge. The resulting dish totally bowled my family over and is now in the top 5 of our go to vegan dishes.

The spices used for this curry are turmeric and coriander seeds with the addition of red chilli, garlic, ginger and coconut milk to give those familiar aromatic curry notes. The use of herbs such as dill, parsley, coriander and fenugreek bring a about a flavour profile more common to Middle-Eastern cuisine. This dish is deeply savoury but with a kick of citrus from the use of fresh lime juice to make it an all-round delightful meal.

The recipe below yields enough to feed 4. If you have fewer people to feed, honestly, don’t revise the measurements down! As with most curry-style or Persian khoresh (stew) dishes, leaving it a day for the flavours to intensify by the ingredients getting to know each other better makes the experience of eating leftovers even more spectacular than your first bite of this dish straight after cooking!

Other than the amazing herbs and spices, the real key to this dish is the type of chickpeas you can get your hands on. I always find that the chickpeas that are available in jars are larger and more buttery than tinned chickpeas. So I recommend finding a good deli or  posh shop somewhere to buy these. I actually buy mine from Amazon – a little pricey but hands down worth it!


Coconut and Herb Chickpea Curry

Prep Time10 minutes
Cook Time50 minutes
Total Time1 hour
Course: Main Course
Cuisine: Cross-cultural
Keyword: chickpeas, curry, vegetarian, vegan
Servings: 4
Author: Mersedeh Prewer

Ingredients

  • 2 tbsp vegetable oil
  • 1 large onion (finely diced)
  • 4 cloves garlic (crushed or minced)
  • 1 tsp turmeric
  • 2 tsp coriander seeds (crushed in a pestle and mortar)
  • Thumb size ginger (grated)
  • 2 tsp dried fenugreek
  • 1 bay leaf
  • 400 ml coconut milk
  • 720 g jar of chickpeas (drained weight aprox. 420g)
  • 1 vegetable stock cube (dissolved in 250ml water)
  • 30 g fresh dill (finely chopped either by hand or in a food processor)
  • 30 g fresh parsley (finely chopped either by hand or in a food processor)
  • 30 g fresh coriander (finely chopped either by hand or in a food processor)
  • Juice of 1 largish lime
  • 1 red chilli (sliced finely and diagonally along the chilli - remove seeds for a milder version)
  • Salt and Pepper (to taste)
  • Some extra fresh herbs and / or sliced red chilli to garnish (coriander or parlsey or dill or mint - or a sprinkling of all of them)

Instructions

  • Place a medium-sized pan on medium / high heat and add 2 tbsp of oil. Add finely diced onion and cook until it starts to caramelise.
  • Add garlic and turmeric and stir into mixture until the aromas are released. Then add crushed coriander seeds, followed by grated ginger and stir in.
  • Stir in the dried fenugreek and place bay leaf into the pan. Then pour in coconut milk and stir (lower the heat if required to get it to a gentle simmer).
  • Leave to simmer for 5 minutes and then add drained chickpeas and stock. Simmer for a further 10 minutes.
  • Add chopped fresh herbs, lime juice and sliced red chilli and stir the curry until evenly distributed. Place a lid on the curry and let simmer for a minimum of 20 mins.
  • Taste the curry and adjust seasoning and / or lime juice. Garnish with some more sliced chilli and / or fresh herbs. Serve with rice and / or naan.

Sweet Potato & Leek Bolani with Coriander Chutney

Afghan flatbread filled with sweet potato & leek, served with a coriander chutney

Bolani (also called Periki) is a stuffed flatbread from Afghanistan. It is commonly cooked by frying and it has a thin crust, which can be filled with a variety of ingredients, such as potatoes, lentils, leeks or minced meat. It is usually served with a yoghurt and / or a coriander chutney. Bolani is made for special occasions but is also a popular street food available in Afghanistan.

It can be eaten as an appetiser, accompany a main meal or eaten as a snack. If you have ever eaten a stuffed Indian paratha or a Mexican quesadilla, then you will be familiar with the presentation of this dish. The main differences being that the Bolani is not flaky and layered like a paratha and not cheesy like a quesadilla, however the premise of of a stuffed type of flatbread is the same.

This recipe is one of a series of recipes posted which forms an element of a larger family meal for my lot.  The others are Qorma-e-Lubia (Afghan red kidney bean curry) which I serve with rice, and  Maast O’Khiar (a yoghurt dip made with cucumber, mint and garlic). Whilst Maast O’Khiar is the Persian name for this dip, you may be familiar with the Mediterranean versions such as Tzatziki (Greek version), Cacik (Turkish version), Talattouri (Cypriot version). The Afghan version is called Jaan-e-ama and often eaten with Bolani.

The recipe below is vegan and, despite having to make the dough yourself, is relatively quick and easy. I have developed my Bolani recipe to include sweet potato, leek and coriander for the filling (see picture below). It is flavoured with dried red chillies, garlic, turmeric, ground coriander, cinnamon and fresh lime juice. Although not the traditional filling, the combination of the ingredients for the mixture is delicious and one that I am sure you will love. I have also made Bolani in the past with the more traditional fillings such as (1) leeks, spring onion, chilli and coriander; and (2) potato, spring onions, coriander and chili and you should feel free to experiment with yours.


Sweet Potato & Leek Bolani with Coriander Chutney

Afghan flatbread filled with sweet potato & leek, served with a coriander chutney
Prep Time45 minutes
Cook Time45 minutes
Resting time for dough30 minutes
Total Time2 hours
Course: Appetizer, Main Course, Side Dish, lunch, Accompaniment
Cuisine: Middle-Eastern, Afghan
Keyword: vegetarian, vegan
Servings: 4 (to 6)
Author: Mersedeh Prewer

Ingredients

Coriander Chutney

  • 1 bunch fresh coriander (about 100 grams)
  • 3 cloves garlic (crushed or minced)
  • The green ends of 4 spring onions
  • 1 to 2 green chilli peppers
  • 1/3 cup walnuts
  • 1/2 cup apple cider vinegar
  • 1 tbsp olive oil
  • 1/2 tbsp sugar
  • 1 tsp salt
  • 1/2 tsp pepper

Bolani Filling

  • 2 medium sweet potatoes (peeled and chopped into medium sized chunks)
  • 3 tbsp vegetable oil
  • 2 medium leeks (quartered and sliced)
  • 3 cloves garlic (crushed or minced)
  • 1 tsp turmeric
  • 1 tsp ground coriander
  • 1/2 tsp dried red chilli flakes
  • 1/4 tsp cinnamon
  • Juice of 1 lime
  • 3 tbsp chopped fresh coriander
  • Salt and Pepper (to taste)

Bolani Dough

  • 200 g plain flour
  • 100 g atta (chapati flour) (you can use wholemeal flour instead)
  • 1/2 tsp salt
  • 1 tbsp vegetable oil (plus extra to fry the Bolani)
  • 180 ml water

Instructions

Coriander Chutney

  • Make the chutney ahead (minimum 2 hrs before eating) to let the flavours settle.
  • Add coriander, garlic, walnuts, chillies and scallion ends to a food processor and pulse until finely chopped.
  • Add the vinegar and pulse a few more times - the chutney should have a coarsely chopped appearance. Add olive oil, sugar, salt and pepper and taste. Adjust seasoning if necessary. Pour chutney into a sterilised jar with a lid. Place in the fridge until you are ready to use. Any left over chutney keeps for 2 months in the fridge and can be used for other dishes including grilled meats, roast vegetables or curries.

Bolani Filling

  • Steam or boil the sweet potatoes until cooked / soft.
  • Add 3 tbsp of vegetable oil to a large frying pan / skillet and place over a medium / high heat. Add leeks and cook until softened. Add garlic and turmeric and stir into the leeks until evenly distributed and aroma released.
  • Add ground coriander, dried red chilli flakes and cinnamon and stir.
  • Add sweet potato and mash into the mixture until the leek mixture is fully integrated into the mashed sweet potato.
  • Add fresh lime juice and the finely chopped fresh coriander leaves. Add salt and pepper and taste, adjust seasoning if required. Take off the heat and set aside to cool until you are ready to stuff the Bolani dough.

Bolani Dough

  • Stir flours and salt together in a large mixing bowl. Make a well in the center and add the vegetable oil and water. Form a shaggy dough with your hands, then turn out onto a clean work surface. Knead the dough for 5-10 minutes until you have a smooth dough. Place the dough in the mixing bowl and cover. Set aside to rest for 30 mins,
  • Divide the dough into 6 equal pieces. Roll one piece of dough on a clean surface until the dough is 15cm in diameter.
  • Divide the sweet potato filling into six and fill half of the round of dough by spreading into a thin layer, leaving a 1cm empty space around the edge. Fold the empty top half of the dough over the filling and press down to seal, stretching parts of the dough to create an even crescent shape. Place on baking paper until ready to cook.
  • Heat a large non-stick frying pan or skillet over medium-low heat. Add 1 tsp of vegetable to the pan. When the oil is hot, add 1 Bolani and fry for about 2 minutes on each side until golden brown. Then place on a paper towel to soak up oil while the others fry. Feel free to keep the cooked Bolani in a low / medium heat oven to keep warm while you fry the others.
  • Serve the Bolanis warm / hot with the coriander chutney and / or yoghurt based (or non-dairy yoghurt) dip.


Qorma-e-Lubia

Afghan Kidney Bean Stew

This vegan stew heralding from Afghanistan is a gorgeous dish full of goodness and one that I am sure will become a firm favourite in your household, as it has in mine. With simple ingredients (kidney beans, onions, tomatoes and some herbs and spices), this dish is easy to prepare (especially if you use canned kidney beans as opposed to dried ones).

Afghan cuisine includes dishes and cooking techniques also seen in Persian, Central Asian and Indian cuisines due to Afghanistan’s close proximity and historical cultural connections. As neighboring countries with cultural ties, there has been a long history of population movements between Iran and Afghanistan, indeed parts of Afghanistan formed part of the Persian Empire, which lasted from approximately 559 B.C.E. to 331 B.C.E. Sadly modern day Iran has not treated Afghan immigrants well, with widespread reports of Iranian mistreatment of Afghan migrants and their human rights – the community is very marginalized in Iran. 

The two official languages spoken in Afghanistan are Dari and Pashto. Dari is the official name of the variety of Persian language spoken in Afghanistan. It is often referred to as Afghan Persian. Although still widely known as Farsi (the official language of Iran) to its native speakers, the name was officially changed to Dari in 1964 by the Afghan government. Pashto is an Eastern Iranian language of the Indo-European family. It is also the second-largest provincial language of Pakistan, spoken mainly in the northwestern province of Khyber Pakhtunkhwa and the northern districts of the Balochistan province.

I remember the first time I heard someone speaking Dari (1980 something). I asked my mother why I could understand a language which seemed familiar but unfamiliar at the same time. The words made sense to me but the rhythm the language was being spoken in was different to the Farsi I had grown up with. And that is when I learnt about Afghanistan, their languages and the relationship with Iran. My journey into Afghan cuisine came later in my life but as with learning about our connections in language, their cuisine has brought me great joy and continues to do so. There are many Afghan dishes that feel familiar to me due to my Persian background, but there are also a huge amount of dishes new to me which I have loved learning to cook! And the first I am introducing to you is my version of Qorma-e-Lubia. For those of you familiar with Indian cuisine, you will note this recipe is very similar to the North Indian dish Rajma Masala. Pakistan and Nepal also have a version of this dish.

So what is Qorma? Qorma is the Afghan name given to an onion and tomato-based stew or casserole, usually served with rice (challow, Persians call their rice chelow). First, onion is caramelized, for a richly colored stew. Then tomato is added, along with a variety of meat, lentils, spices, and vegetables, depending on the recipe. The main ingredient, which can be meat, beans or vegetables, is usually added last. There are many different qormas including:

  • Qorma e gosht  – a meat stew usually served at gatherings;
  • Qorma e nadroo – lamb or veal, yogurt, lotus roots and coriander;
  • Qorma e alou-bokhara wa dalnakhod – veal or chicken, sour plums, lentils and cardamom;
  • Qorma e sabzi – lamb, sautéed spinach and other greens;
  • Qorma e lawand – chicken, lamb, or beef, plus yogurt, turmeric and coriander;
  • Qorma e shalgham – a sweet and sour qorma made with lamb, turnips and sugar.

Qorma-e-Lubia is simply made with red kidney beans as the protein element and cooked with an onion and tomato base flavored with garlic, turmeric, coriander, cumin and dried mint. I also add a little garam masala to mine. Serve it with flatbread, rice (kateh or chelow), a nice crunchy salad with a citrus dressing and / or a yoghurt or non-dairy dip (I have served mine with Maast O’Khiar, the Persian yoghurt and cucumber dip, as pictured below).

The flavour of this qorma (as with many stew style dishes) gets better if eaten the day after cooking. Therefore, I recommend making it a day before you want to serve it and then heating it up. The flavours really fuse together brilliantly with a little more time to get to know each other.

Just as a side note, if you are using dried kidney beans you will need approximately 250 grams. Remember to wash, soak, drain and then cook the beans before adding them at step 7 below. Kidney beans are toxic if not prepared properly when starting with the dried form and can cause tummy upsets, so make sure you follow the instructions on the packet or google it.

The flatbread pictured below is Bolani, an Afghan stuffed flatbread and the recipe will be posted soon – so watch out for it!


Qorma-e-Lubia

Afghan Kidney Bean Curry
Prep Time20 minutes
Cook Time1 hour 15 minutes
Total Time1 hour 35 minutes
Course: Main Course
Cuisine: Afghan
Keyword: vegetarian, vegan
Servings: 4
Author: Mersedeh Prewer

Ingredients

  • 3 tbsp vegetable oil
  • 2 tsp coriander seeds
  • 1 tsp cumin seeds
  • 1 large onion (finely diced)
  • 3 cloves garlic (crushed or minced)
  • 1 tsp turmeric
  • 1/2 tsp dried red chilli flakes
  • 1 tsp dried mint
  • 3 medium tomatoes (roughly chopped)
  • 3 tbsp tomato purée
  • 600 ml vegetable stock
  • 2 x 400 g cans of kidney beans (or 250 grams of dried kidney beans cooked in accordance with package instructions)
  • 1/2 tsp garam masala
  • Juice of 1 lime or half a lemon
  • Salt and Pepper (to taste)
  • Chopped fresh coriander leaves and sliced sping onions (to stir through / garnish before serving)

Instructions

  • Place a medium to large saucepan (which has a lid) on a medium / high heat and add the oil.
  • Bash the coriander and cumin seeds in a pestle and mortar and then add to the saucepan. Cook for about a minute. Keep a close eye on them so they don't burn. Lower the heat to medium, if necessary.
  • Then add chopped onions and cook until they brown / caramelise.
  • Add the garlic and turmeric and stir to distribute evenly into the onions. Then add dried mint and dried chilli flakes (feel free to exclude chilli or revise chilli levels down if half a teaspoon feels a bit too much for you).
  • Add the chopped tomatoes and stir now and again until they break down (roughly 5 to 10 minutes).
  • Add the tomato purée and stir until evenly distributed and follow with the vegetable stock. Give the mixture a good stir and let it come to a boil and then reduce the heat to low / medium to allow to simmer. Place the lid on the saucepan and let the sauce simmer for a minimum of 30 min or longer - ideally when you start to see the oil form a little round the edges of the sauce.
  • Then add your cooked kidney beans, garam masala, the lime (or lemon) juice, salt and pepper and stir. Leave to simmer with the lid on for a further 15 to 30 mins.
  • Taste and adjust seasoing if required. Before serving, stir through some fresh chopped coriander. Spoon the Qorma into your serving dish and sprinkle with the sliced spring onions. Serve with flatbread and / or rice, yoghurt-style dip and / or salad and pickles (torshi).


Advieh Kabab

Grilled Beef Kebabs with Persian Spices

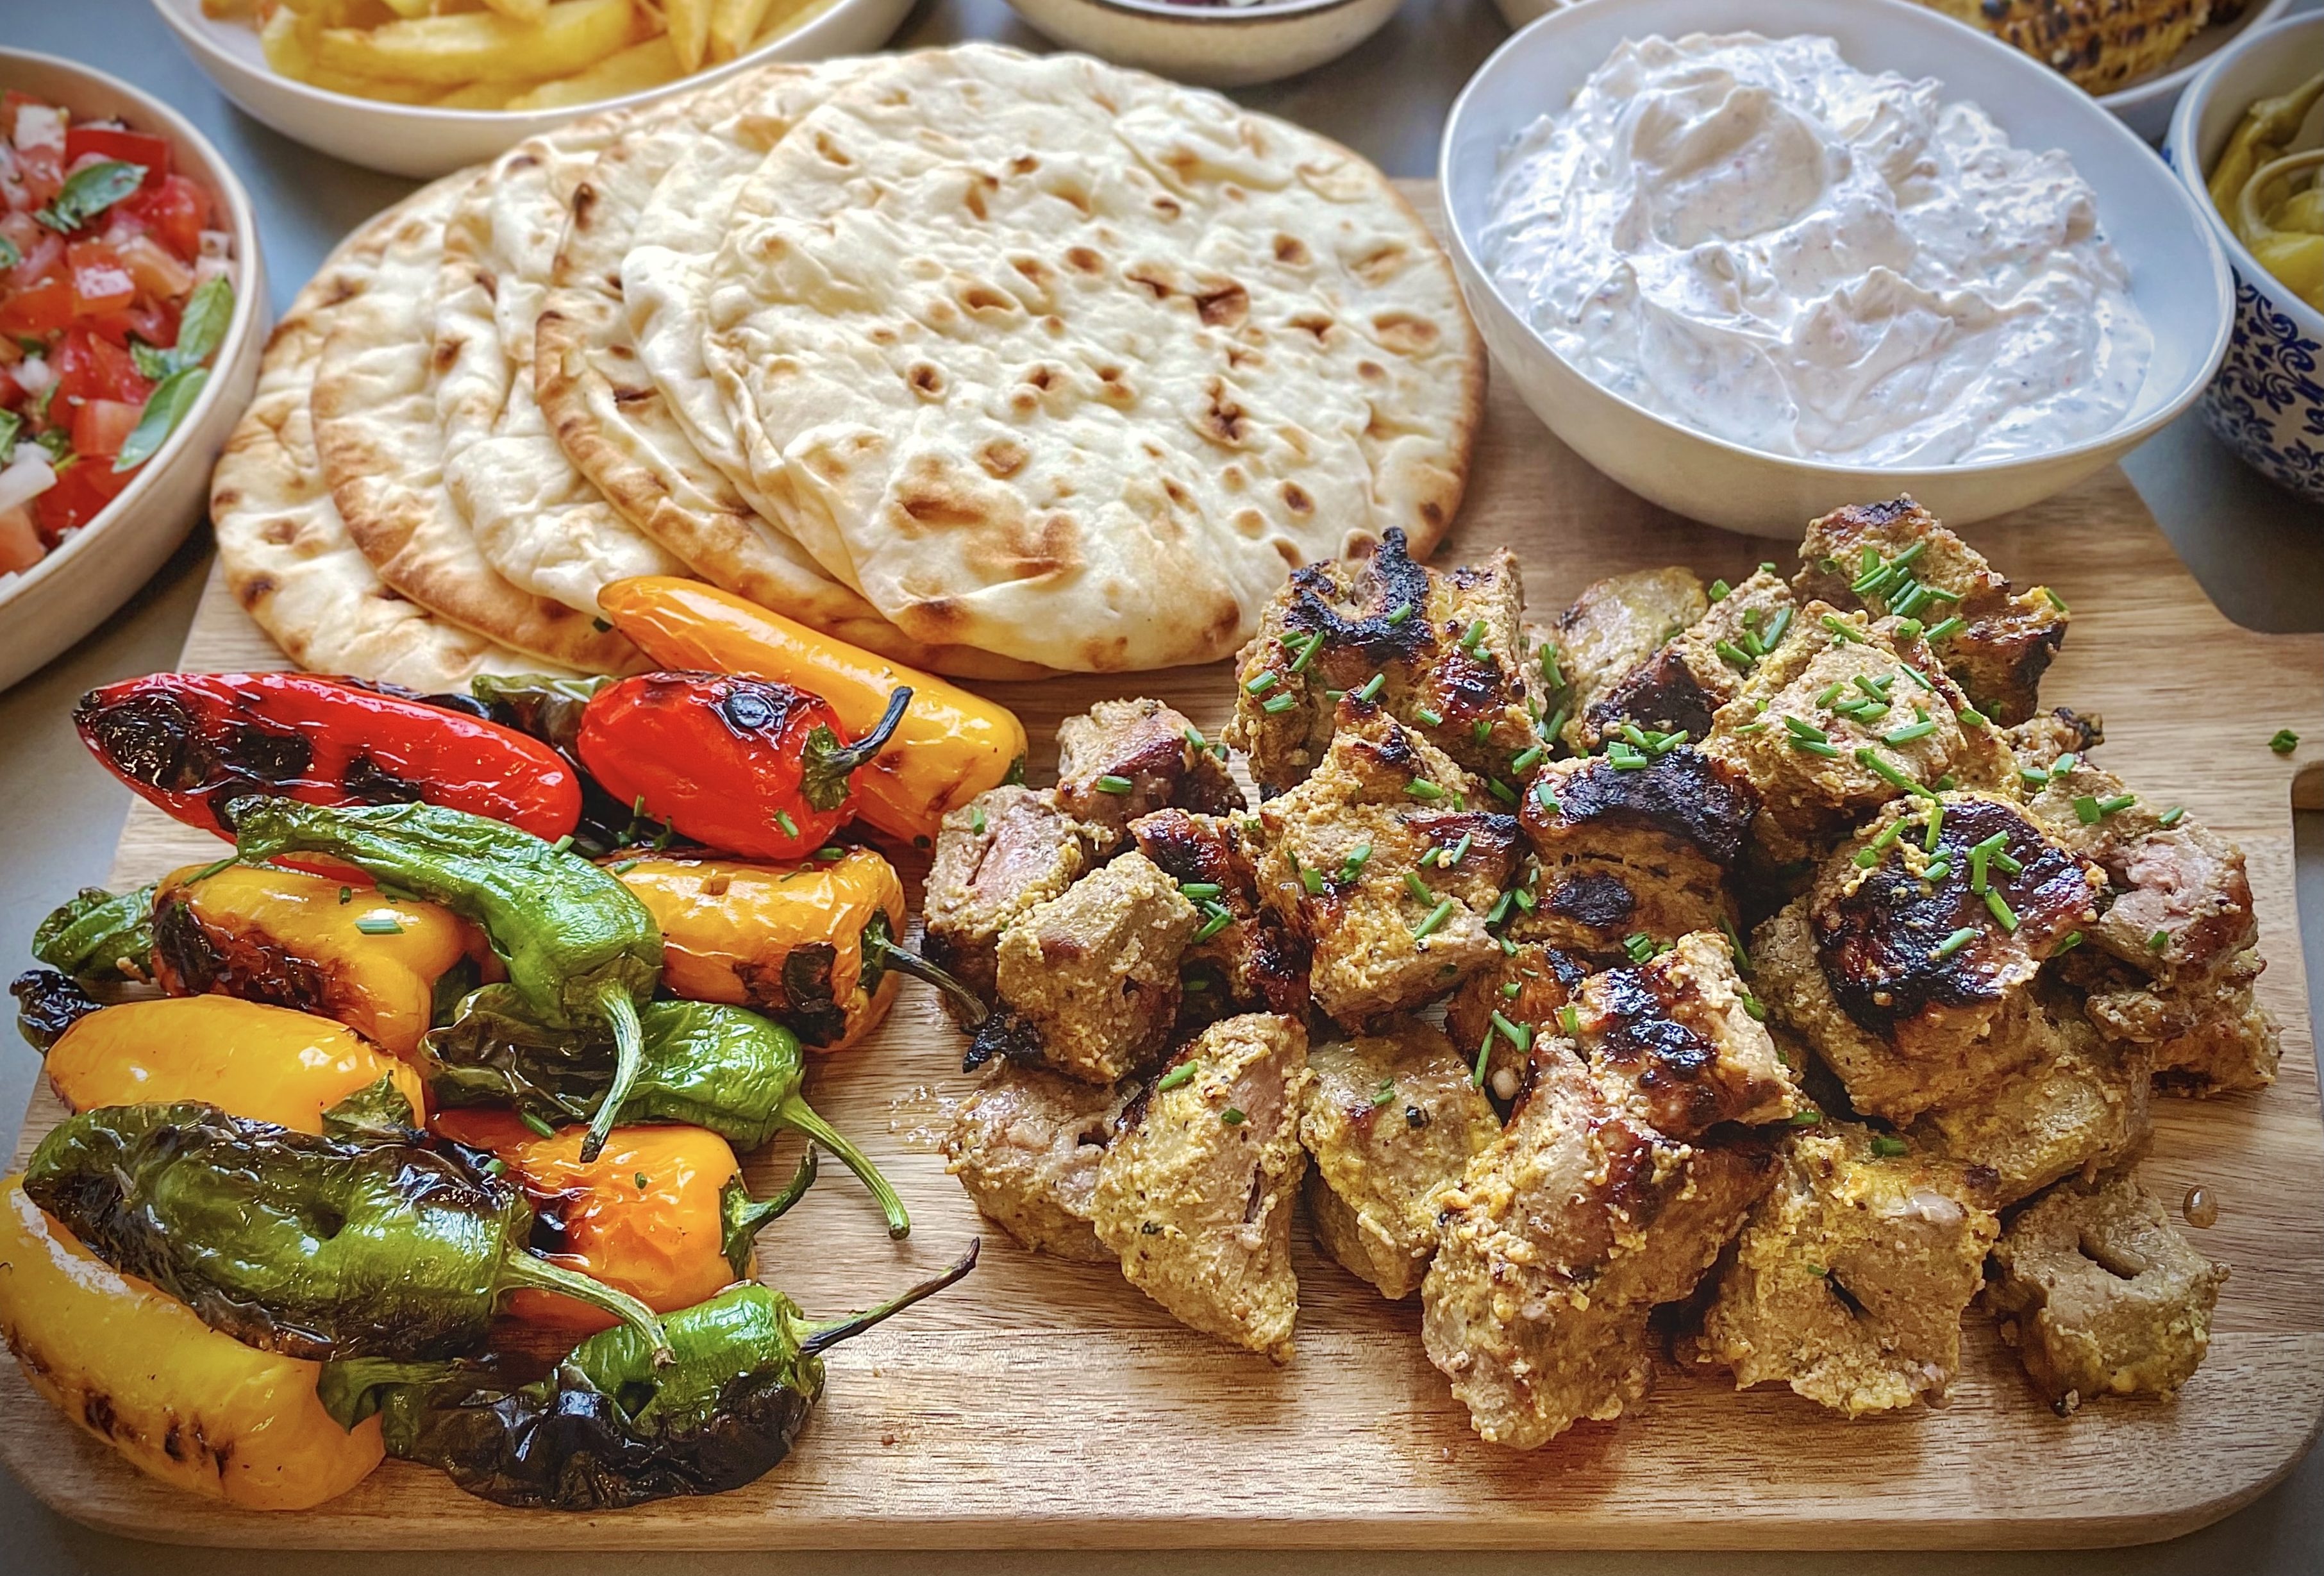
This is a recipe inspired by Persian flavours and one I developed by throwing various things together as a marinade for some cubed rump steak. With echoes of the Levantine shawarma, by using the Persian mixed spice advieh (a mix of nutmeg, rose petals, cardamom, cumin, black pepper, coriander, cinnamon), this kabab will not disappoint. You can use lamb or chicken as an alternative and you can cook it under your grill as opposed to on a BBQ.

The marinade combines yoghurt, garlic, olive oil, onion, lime juice, advieh, saffron, turmeric, sumac and chilli sauce. The meat is marinated for a minimum of 12 hrs to let the flavours fully intensify and be absorbed into the meat. You can get your hands on saffron from most supermarkets and advieh can be bought from most Middle-Eastern food shops – I buy mine online from Freshly Spiced on  Etsy.

I serve this kabab as pictured with flatbreads filled with the meat; lettuce; chopped tomatoes with Thai basil; chopped onion and parsley; pickled chillies; bbq/grilled peppers; and a dollop of Greek yoghurt mixed with dried mint, Aleppo pepper, garlic, a squeeze of lime and a little sea salt. On the side we have home-made fried chips and bbq corn-on-the-cob with a butter, chilli and chive drizzle.


Advieh Kabab

Grilled Beef Kebabs with Persian Spices
Prep Time15 minutes
Cook Time20 minutes
(Marinating Time)12 hours
Total Time12 hours 35 minutes
Course: Main Course
Cuisine: Persian, Iranian, Middle-Eastern
Keyword: kebabs, advieh, bbq
Servings: 4
Author: Mersedeh Prewer

Ingredients

  • 1 - 1.2 kg cubed lamb or beef (I've used beef rump steak)

Marinade

  • 1 large brown onion
  • 3 cloves garlic
  • 2 tbsp olive oil
  • Juice of 1 lime
  • 1 tbsp Greek yoghurt
  • 1/8 tsp ground saffron (bloomed in 50 ml of water)
  • 2 tbsp advieh
  • 1/2 tsp turmeric
  • 1 tbsp chilli sauce ( I use habanero)
  • Salt and Pepper (to taste)

To baste while cooking

  • 2 tbsp butter (melted)

Instructions

  • Place the beef (or any other cubed meat you fancy) into a large bowl or tupperware box.
  • Place all the ingredients for the marinade in a blender and blitz until all the onion and garlic is blended. Pour over the meat and rub in until evenly coated. Cover and place in the fridge to marinate for a minimum of 12 hrs.
  • Remove the meat from the fridge about 30 mins before cooking to bring to room temperature.
  • Divide the meat on to about 4 skewers and cook on your BBQ or under your grill (on the highest setting). Baste with the melted butter, turning the skewers until the meat is a little charred. It takes roughly 15 to 25 minutes on a bbq (depending on how hot your bbq is).
  • For serving inspiration either serve alongside rice and grilled tomatoes or with flatbreads; lettuce; chopped tomatoes with Thai basil; chopped onion and parsley; pickled chillies; bbq/grilled peppers; Greek yoghurt mixed with dried mint, Aleppo pepper, garlic and a little sea salt; chips; and bbq corn with a butter, chilli and chive drizzle.

Summer Kuku served with a Pea, Mint and Feta Dip

Kale and red pepper kuku with a pea, mint & feta dip

This recipe is pure summer on a plate! A light and easy meal – I often cook it the night before we want to eat it and store it in the fridge. It can be eaten warm or cold and it is a great way to get a hit of goodness into you.

Kuku (also spelled ‘kookoo’) is an egg-based, vegetarian dish from Iran made with beaten eggs, folding in various ingredients. It is similar to the Italian frittata, the French quiche or an open-faced omelette, but it typically has more vegetables than its Western counterparts. It is served either hot or cold as a starter, side dish or a main course, and is accompanied with bread and either yogurt, salad and / or rice. The two most well known kuku recipes are Kuku Sabzi (made with herbs and barberries and / or walnuts); and Kuku Sibzamini (made with potatoes). Ultimately, you can make kuku with any vegetables you like.

This kuku recipe materialised after an Oddbox delivery. Oddbox is a wonderful company that rescues surplus or imperfect vegetables and fruit, which would otherwise not make it to the shopper, and offers it by way of a home delivery subscription services. My medium-sized box of delights is delivered fortnightly. It’s a fantastic initiative that helps me to eat more vegetables and fruit, while helping to save our planet. It is also been great for challenging my recipe ideas as sometimes I can fall into the routine of buying the same ingredients and cooking the same recipes.

One of my Oddbox deliveries had some kale and red peppers, which lead me down the path of experimenting with the medium of kuku. Kale has become very popular in the UK due to the health benefits. Our supermarkets are always well-stocked with kale and red peppers, potatoes and red onions – the vegetables used to cook this dish. I use garlic, smoked paprika and chillies for the aromatic notes, which results in a smoky and gently warming feel to eating this even when eaten cold.

Traditionally kuku is fried and flipped over to brown on the other side, but I prefer to oven bake mine so the recipe below is geared towards baking but feel free to fry it if you prefer, either omelette-style or like fritters.

The beauty of kuku is that you can make a batch one evening and have it as a quick lunch on your working days. It is also a well-loved addition to a mezze-style meal or served with bowls filled with lots of antipasti (as pictured) in my family.

I have paired this kuku recipe with a pea, mint and feta dip, making the overall experience fresh, light and summery.


Summer Kuku served with a Pea and Mint Dip

Prep Time20 minutes
Cook Time1 hour
Total Time1 hour 20 minutes
Course: Main Course, lunch
Cuisine: Persian, Iranian, Fusion
Keyword: light lunch, mezze, frittata, kookoo
Servings: 2 (to 4 people)
Author: Mersedeh Prewer

Ingredients

Kuku

  • 2 tbsp olive oil (and a little to grease your tin)
  • 200 g potatoes (diced into 1 cm cubes)
  • 1 medium / large red onion (finely diced)
  • 1 red pepper (medium diced)
  • 75 g kale (removed from stalks, washed and roughly chopped)
  • 2 cloves garlic (crushed)
  • 1 tbsp tomatoe purée (dissolved in 100ml of water)
  • 1 tsp smoked paprika
  • 1 small red chilli (minced)
  • 6 large free range eggs (cracked and beaten in a bowl)
  • Salt and pepper (to taste)

Pea and mint dip

  • 2 cups peas (frozen is fine - blanch them in boiling water before blending into the dip)
  • 1 clove garlic
  • 40 g feta
  • 2 tbsp olive oil (plus extra to drizzle on top)
  • 10 leaves fresh mint (plus extra to chop and garnish the dip with)
  • Salt and Pepper (to taste)

Instructions

  • Pre-heat the oven to 160°C (fan) / 180°C (conventional) / Gas Mark 4.
  • Take a cake tin (20 cm diameter) (preferably one without a loose base as the egg is likely to seep out unless you properly cover the gaps with baking paper). Grease and line the tin with baking paper. Place the tin in the oven to heat up.
  • Take a frying pan, place on a medium / high heat and add 2 tbsp of oil.
  • Add the potatoes and cook until the potatoes start to turn golden and little crispy.
  • Add the peppers and onions and cook until they soften.
  • Add the garlic, smoked paprika, chilli and stir until evenly distributed.
  • Add the tomato purée and water to the mixture.
  • Then add the kale and cook until wilted and the mixture has little or no liquid. then turn off the heat and let cool for 10 mins.
  • Take the beaten egg mixture and add the vegetable mixture and stir. Season with salt and pepper.
  • Remove the tin from the oven and pour the mixture in. Then place in the oven to cook for about 30 to 40 mins (or until a knife poked into the middle of the kuku comes out clean)
  • To make the dip, blend all the dip ingredients in a food processor and pour into a serving bowl. Feel free to adjust seasoning and lemon juice to taste. Scatter a little finely chopped mint on top and drizzle with a little olive oil.
  • Serve the kuku warm or cold with the dip, flatbreads and other antipasti type dishes or as part of a mezze-style meal.

Spicy Halloumi Pasties served with Borani Esfenaj

Spicy halloumi handmade pies served with a spinach and yoghurt dip

Borani Esfenaj is a delicious Persian dip made simply with yoghurt and spinach and flavoured with garlic, a little lemon or lime juice and some salt and pepper.

I have fond memories of this dip as my khaleh (maternal aunt) would make it regularly when I was a child. This dish and Nargessi (a Persian breakfast / brunch dish made with garlicky spinach and eggs) are the reasons I love spinach so much. Spinach cooked with lots of garlic is a perfect combination and, with the addition of thick creamy yoghurt, makes this dip a lovely addition to a table full of appetisers for your guests to dip in and out of or a mezze-style offering.

Borani Esfenaj can either be made with frozen or fresh spinach. If you are making it with frozen spinach use 500g for the recipe below. Using frozen spinach creates a creamier dip and is perfect if you are serving it alongside crisps or other crudites for people to dip in and out of.  If you are serving it as part of a meal, as in this recipe, then the chunkier dip with fresh spinach works well both in texture and aesthetics.

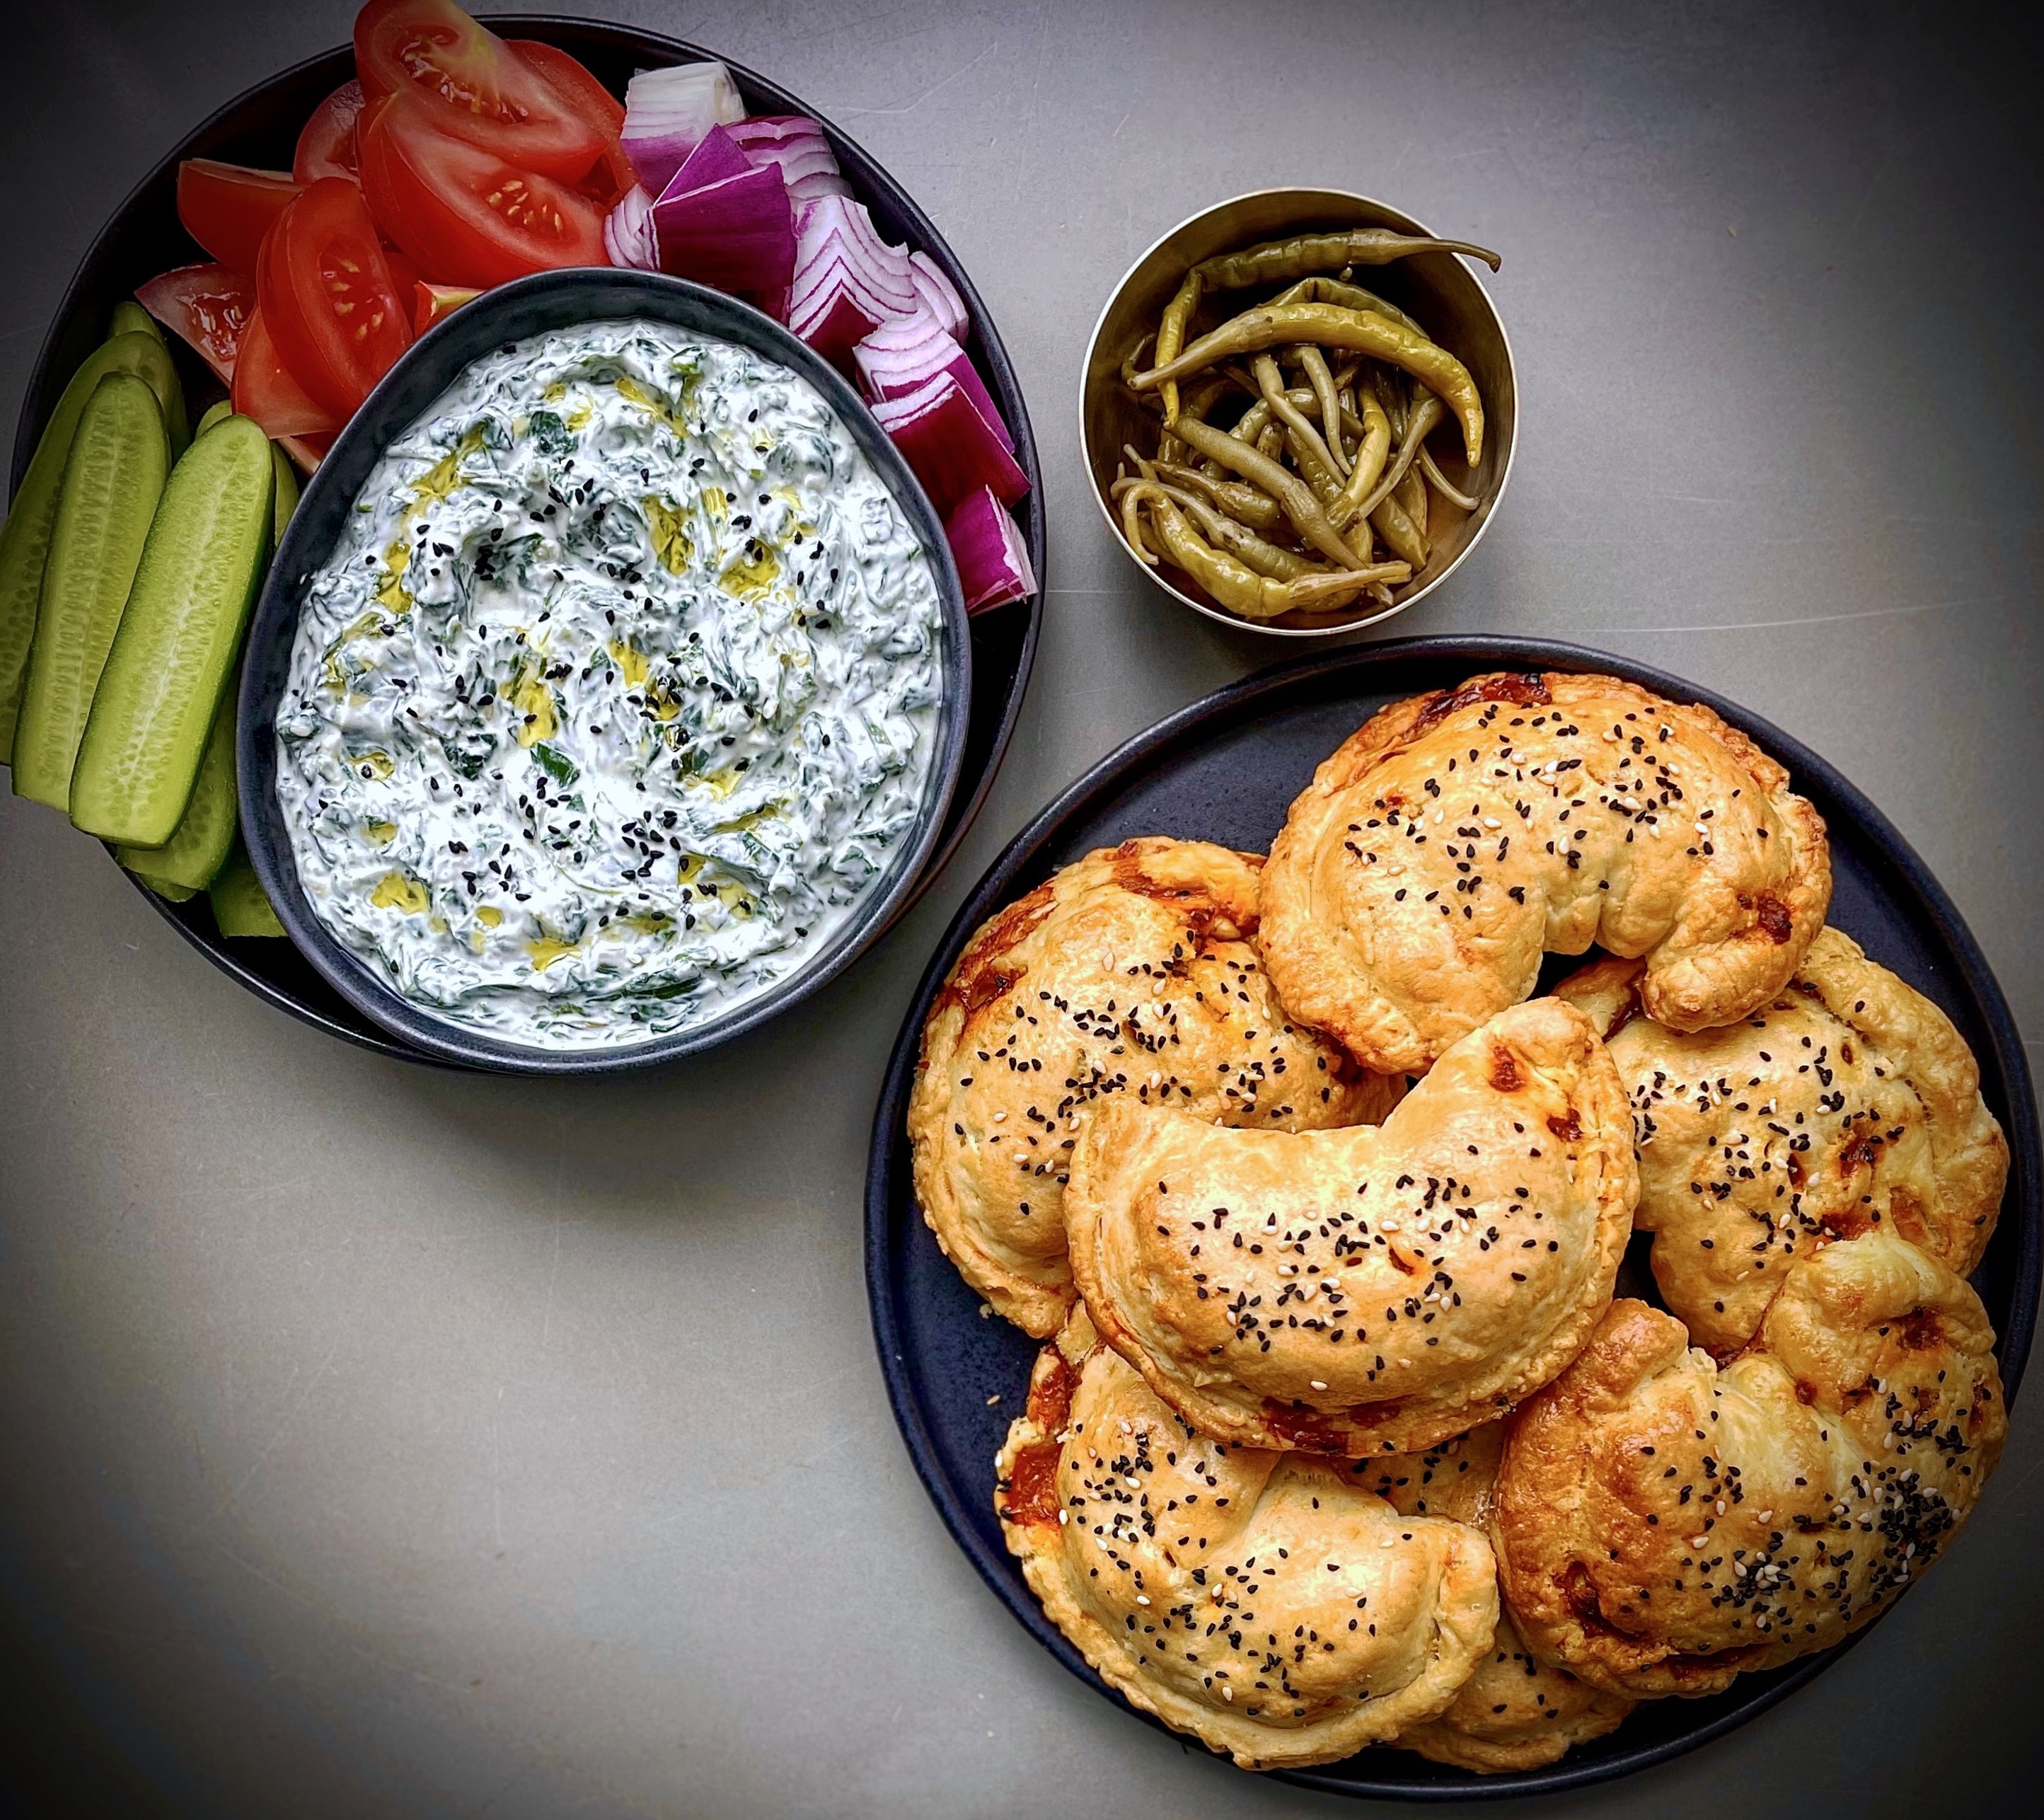
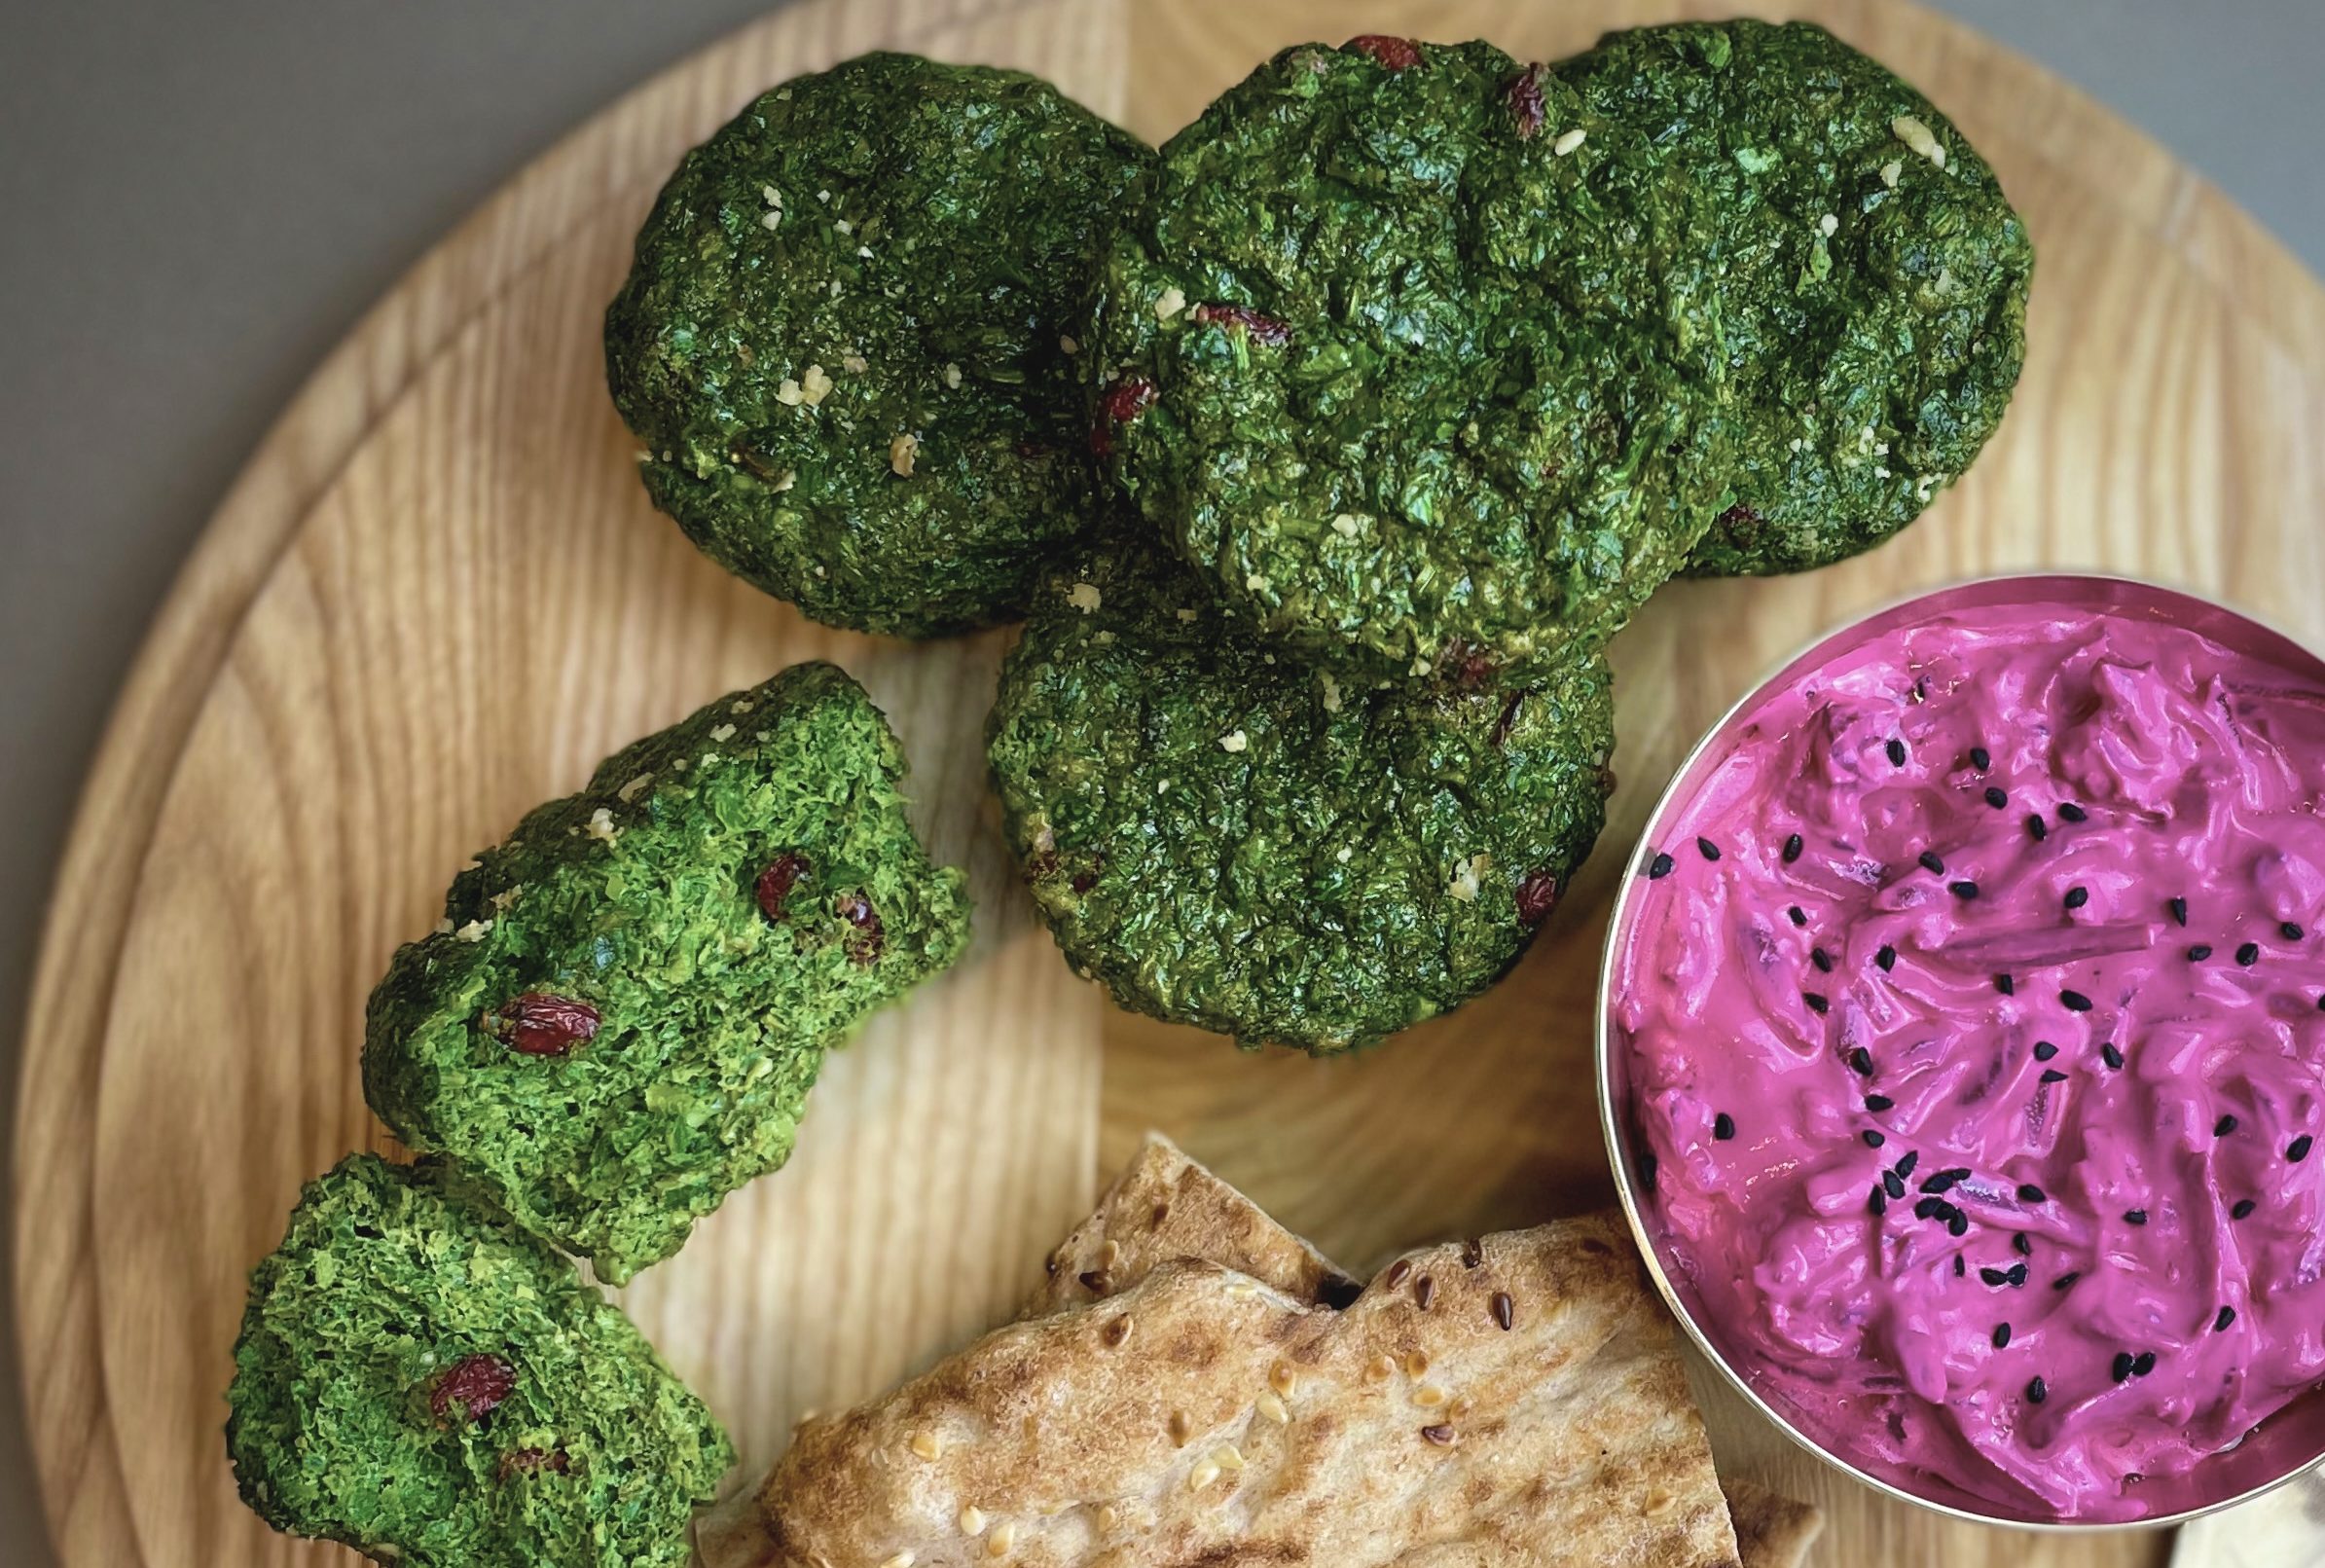
For the purposes of my recipe offering to you, I have paired the borani with some spicy halloumi pasties. The use of pre-made shortcrust pastry makes this a really simple meal to knock up but with maximum taste. The feel of this meal is very much Mediterranean-inspired and we happily eat this in the warmer seasons for either lunch or dinner. The pasties fare well eaten cold and we often eat the leftovers for our packed lunches on ensuing work days.

The recipe below yields about 8 pasties which, depending on your appetite, could feed between 4 and 8 people with 2 to 4 tablespoons of the borani each. I love serving these two dishes with pickles, olives or salad-type ingredients to pick at too. I have separated the two recipes below in case you want to prepare one of the dishes only and for ease of reference.  If you want some extra carbs with this dish, then roasted sweet potato wedges work really well and can be dipped into the borani as well.

I like to make the borani the day before so the flavours can intensify. The pasties can also be made in advance and reheated in the oven.


Spicy Halloumi Pasties

Prep Time15 minutes
Cook Time1 hour 15 minutes
Cooling time for pasty filling1 hour
Total Time2 hours 30 minutes
Course: Main Course
Cuisine: Mediterranean, Cross-cultural
Keyword: vegetarian, pasties, halloumi
Servings: 8 medium sized pasties
Author: Mersedeh Prewer

Ingredients

Spicy Halloumi Pasties

  • 2 tbsp olive oil
  • 2 medium potatoes (about 250 g - peeled and medium diced)
  • 2 large cloves garlic (crushed or minced)
  • 1 medium red onion (finely diced)
  • 1 green pepper (medium diced)
  • 1 tsp turmeric
  • 1 tsp dried orgeano
  • 2 tbsp biber salçası (Turkish tomato and red pepper paste)
  • 200 ml water
  • 1 tbsp balsamic vinegar
  • 40 g fresh coriander (chopped finely including stalks)
  • 250 g halloumi (chopped into 1 cm chunks)
  • Salt and Pepper (to taste)
  • 2 packs pre-rolled shortcrust pastry (2 x 320g sheets)
  • 1 egg (beaten)
  • A mix of nigella and sesame seeds to sprinkle on top of the pasties

Instructions

  • Take a large frying pan, add the olive oil and place on a medium heat. Add the chopped potatoes and cook until they start to crisp, stirring occasionally.
  • Add the garlic and stir until the aroma is released. Then add the onions and green pepper and cook until softened. Stir in the turmeric and oregano.
  • Then add the biber salçası, water and balsamic vinegar and stir. Then add the chopped coriander and stir until the water has been absorbed into the mixture. Turn off the heat and leave to cool. Once cooled, add the chopped halloumi and season to taste with salt and pepper.
  • While your pasty mixture is cooling, take your pre-rolled pastry out of the fridge and leave (as per packet instructions) at room temperature for approximately 45 mins.
  • Preheat the oven to 200°C (180°C in a fan oven)/ Gas mark 6. Unroll your pastry and using a small side plate or pastry cutter 5 inches in diameter cut 8 discs. You may need to take remaining pastry and roll to make further discs.
  • Place 1/8th of the filling on one side of one of the circles. Brush the edge of half the circle with beaten egg, then fold over the other half to make a D shape. Crimp the edge using a fork or the back of a knife. Then gently push the tips towards each other to create more of a crescent shape. Make a hole in the top to allow some air to escape and place on a lined baking tray. Repeat with the other 7 circles. Brush with the beaten egg, sprinkle with nigella and sesame seeds and bake on a baking tray for 30 to 40 minutes or until they are golden.
  • Leave to stand for 10 minutes before eating. Serve with the Borani Esfenaj and other mezze-style dishes.

Borani Esfenaj

Persian spinach and yoghurt dip
Prep Time10 minutes
Cook Time10 minutes
Total Time20 minutes
Course: Appetiser
Cuisine: Persian, Iranian
Keyword: dip
Servings: 4 (to 8)
Author: Mersedeh Prewer

Ingredients

  • 1 tbsp olive oil
  • 4 large cloves garlic (crushed or minced)
  • 400 g baby spinach (roughly chopped)
  • 500 g Greek Yoghurt
  • Juice of half a lime
  • Salt and Pepper (to taste)
  • Drizzle of olive oil and nigella seeds for topping / garnish

Instructions

  • Take a large frying pan, add the olive oil and place on a medium heat. After a minute add the garlic and stir untill the aromas are released. Then add the spinach and stir until wilted and it is coated in the garlic infused olive oil. Remove from the heat and place the spinach in a colander over a bowl to drain excess liquid and to cool. Allow all the excess water to run out, pressing it with the back of a spoon or underside of a ladle will help force excess water out of the spinach through the colander.
  • Place the spinach in a serving bowl, add the Greek yoghurt and mix. Add the juice of half a lime and season with salt and pepper.
  • Drizzle a little olive oil on top of the borani and sprinkle some nigella seeds as a garnish. Serve with the spicy halloumi pasties or as an appetiser or as part of a mezze-style spread with flat-breads (or anything else you want to dip into it).


Soupe Jo – Persian Cream of Barley and Chicken Soup

This soup is my medicine. When I am feeling under the weather or need a hug in food form, this is what I cook. Many Iranians are more familiar with our turnip soup for illnesses (Ash-e Shalgham) but for me it will always be our version of the classic concept of chicken soup that I turn to when in need. Creamy, hearty and comforting which is the prerequisite for a medicinal chicken soup – am I right?

I was introduced to this soup during a visit to a ‘Khaleh’ (Persian name for aunt on your mother’s side – ‘Ammeh’ for your dad’s side), who lived in Bognor Regis, a town and seaside resort in West Sussex, on the south coast of England. I loved visiting her for two main reasons: the first being that she lived beside the seaside (where the brass bands play ‘Tiddely-om-pom-pom!‘); and the second being this soup, which she would cook for me as she knew I loved it. In Farsi ‘Jo’ (pronounced ‘joh’) means barley – we like to keep our dish names simple.

This soup is super easy to cook. Unlike most our recipes, it does not include turmeric or saffron. The ingredients, as you can see below, can be easily sourced from most local supermarkets. If you are not a fan of coriander, then replace with parsley, which is the herb more commonly used in this recipe.

You can convert this into a vegetarian recipe by using vegetable stock and using mushrooms as an alternative to the chicken. I recommend frying the mushrooms in a little butter and garlic and then adding them to the soup for the last 10 mins of simmering and before serving. 

Traditionally this soup is thickened with a bechamel, which I feel is unnecessary and makes the soup too thick and gloopy. With the availability of the handy stick-blender you don’t need to use a bechamel and can thicken the soup by blending a little bit of it. Also cream makes for a luxurious addition to the soup so my variations to the traditional recipe actually results in a velvety and lighter soup. It is such a  hearty soup you don’t need to have bread with it but do feel free to have a buttered crusty roll or whatever you fancy to dip into the soup.
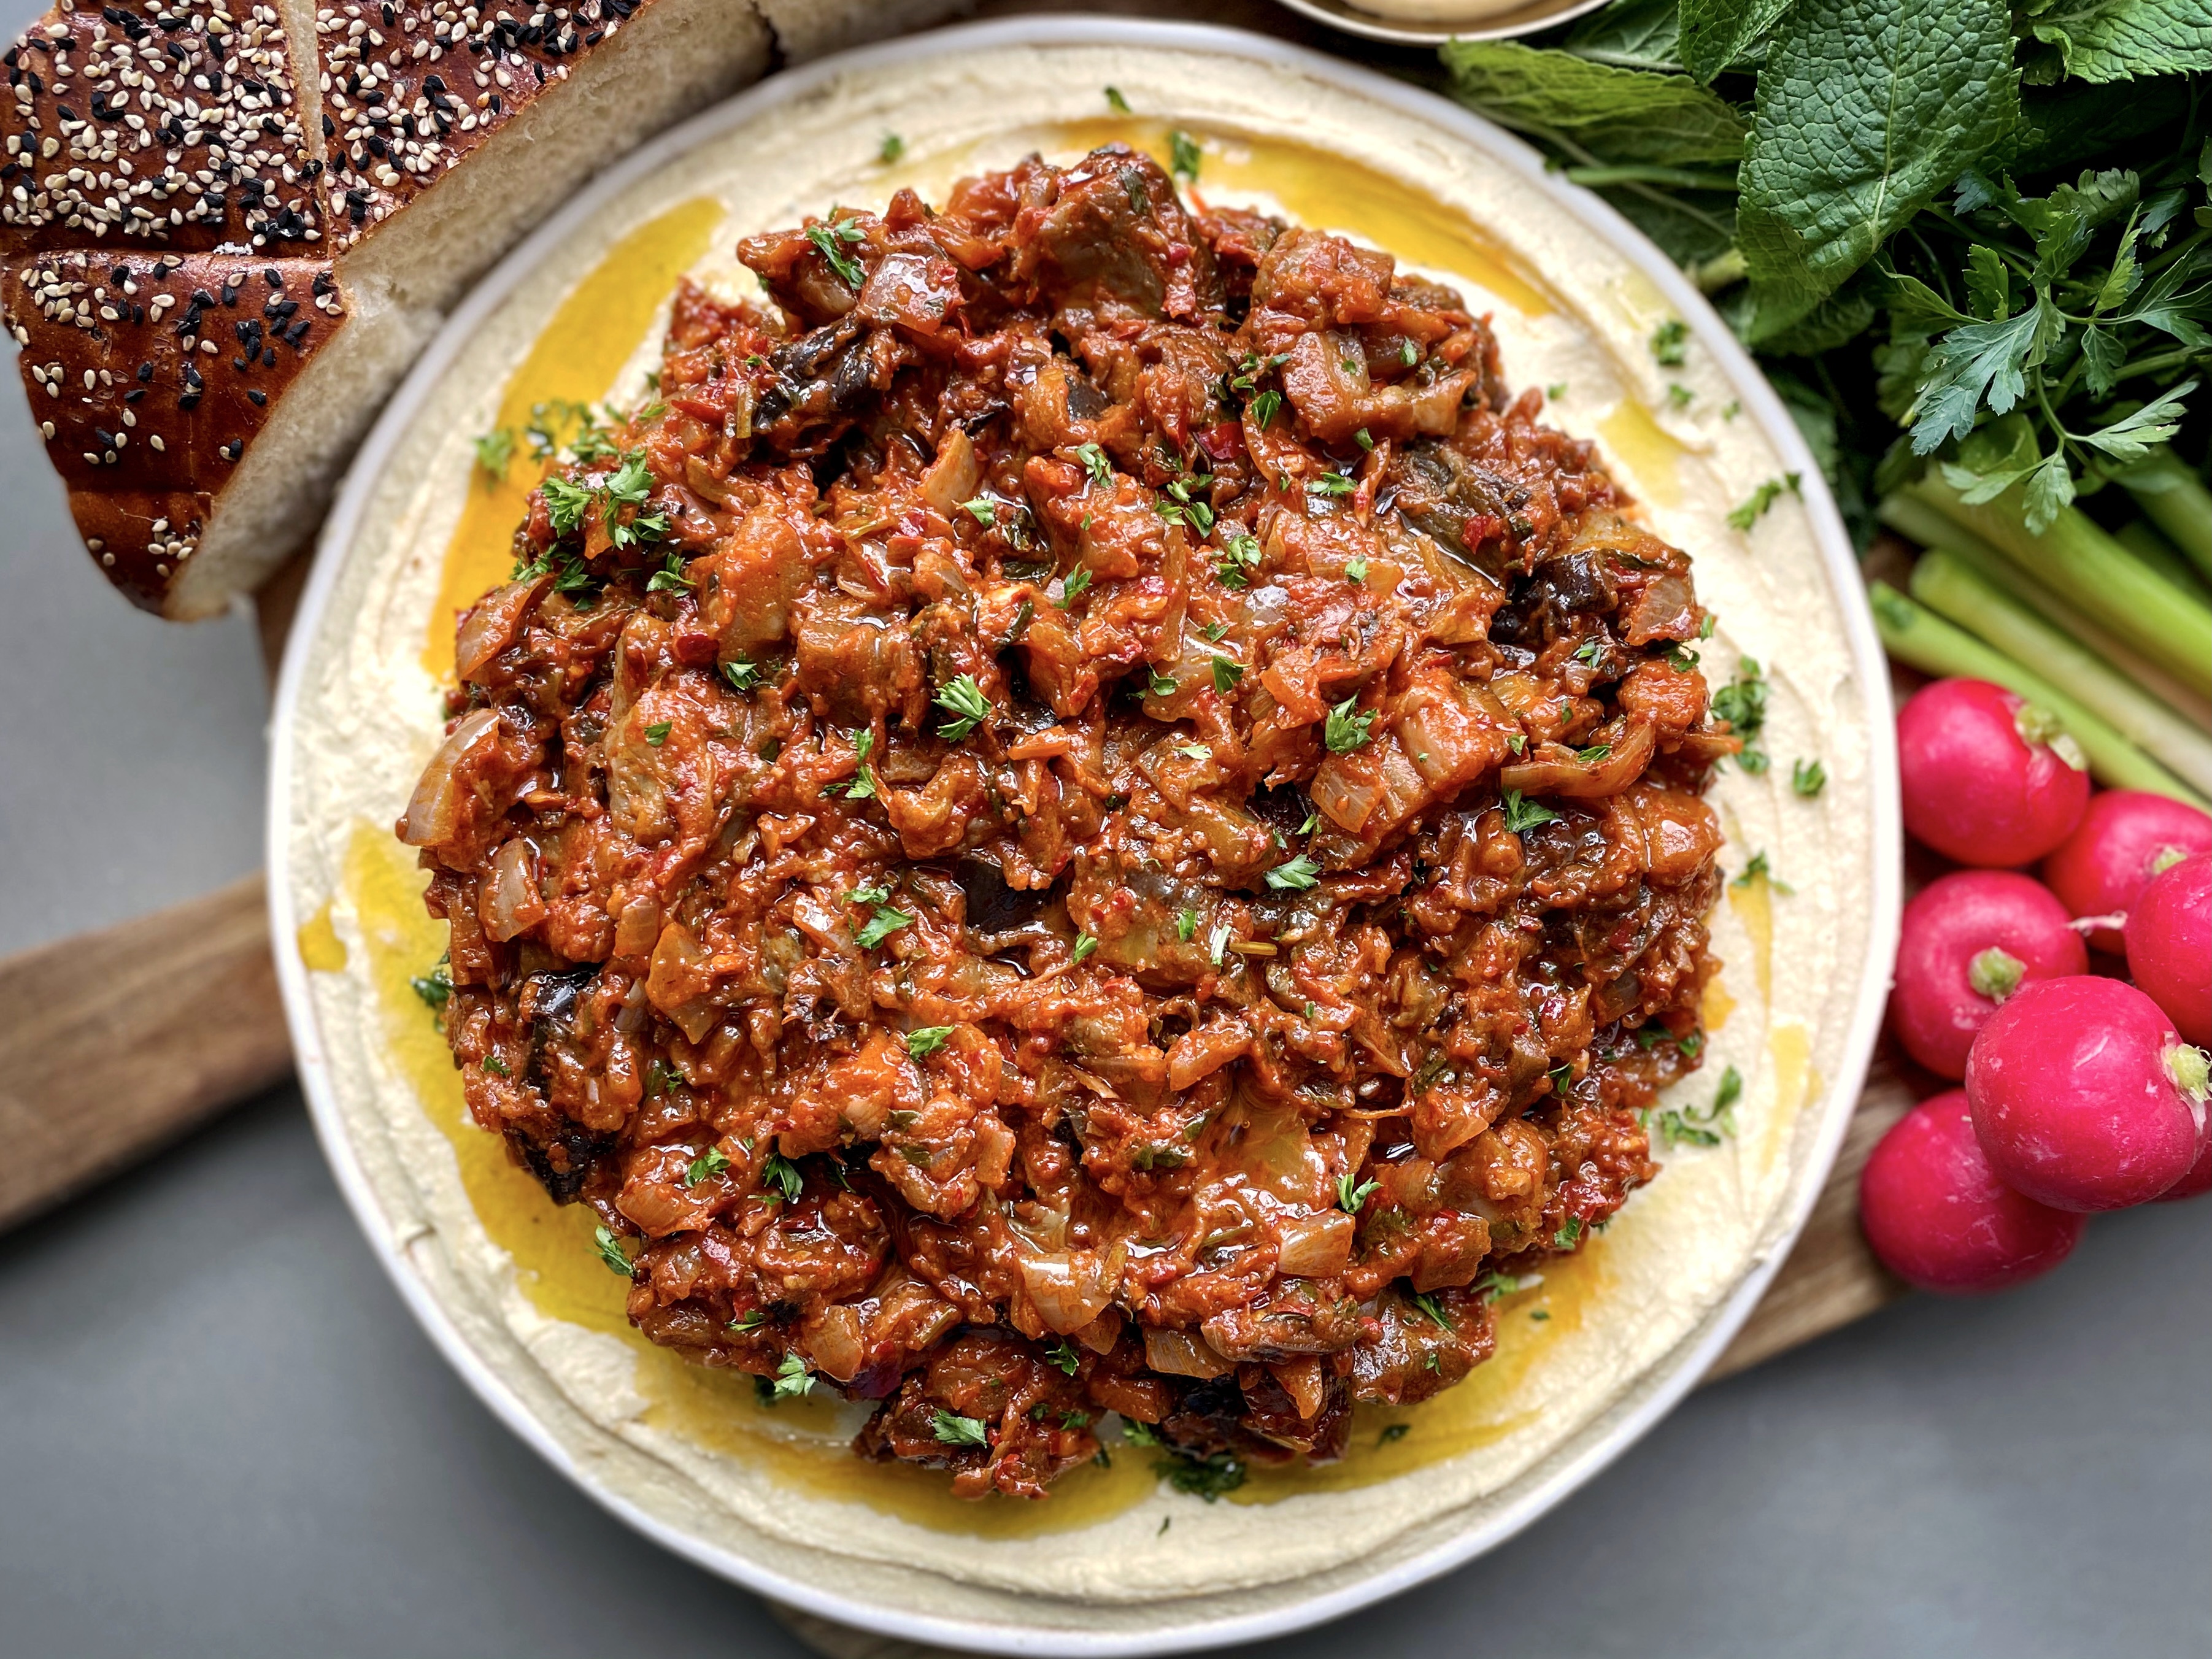

Soupe Jo

Persian cream of barley soup with shredded chicken
Prep Time20 minutes
Cook Time1 hour
Total Time1 hour 20 minutes
Course: Soup, Main Course, lunch
Cuisine: Persian, Iranian
Keyword: chicken soup
Servings: 6
Author: Mersedeh Prewer

Ingredients

  • 2 tbsp olive oil
  • 1 onion or medium leek (finely diced)
  • 3 cloves garlic (crushed or minced)
  • 2 celery sticks (finely diced)
  • 1 large carrot (or 2 medium carrots grated)
  • 200 g pearl barley (washed and then soaked in cold water for a minimum of 1 hr)
  • 2 Bay leaves
  • 1.8 litres chicken stock
  • 2 chicken breasts
  • Juice of 1 lemon
  • 3 tbsp single cream
  • Small bunch of fresh coriander (finely chopped)
  • Salt and pepper (to taste)

Instructions

  • Take a large stock pot or saucepan and place on a medium / high heat. Add the olive oil and follow with the onion and cook until it turns golden.
  • Add garlic, the celery and 1/2 the grated carrot to the pan and stir. Cook for 5 mins, stirring occasionally to ensure it doesn't stick to the pan.
  • Drain the pearl barley and add to the pan with the bay leaves and the stock. Bring to the boil and then lower the heat to allow the soup to simmer.
  • Add the chicken breast to the soup and place a lid on the pan. Poach for approximately 15 mins, or until the juices run clear in the thickest part of the breast. Remove the chicken breasts from the soup and set aside to cool. Once cooled, shred the chicken and put to one side.
  • Add the juice of a lemon to the soup and leave to simmer for a further 30 mins or until the pearl barley has cooked with the lid of the pan partially off. Check and stir the soup on occasion.
  • Take a stick-blender and blend a little of the soup on one side of the pan to thicken. Then add the cream, the shredded chicken breast, the remaining grated carrot, the chopped fresh coriander and season to taste. Simmer the soup for a few minutes to ensure the shredded chicken is warmed through.
  • Ladle into bowls and drizzle with a little more cream, chopped fresh coriander and olive oil to serve.

Rose Harissa Aubergines & Hummus

This is one of my ‘inspired by…’ recipes. In other words it is dish I have developed but one that has been inspired by all that I have learnt from the rich tapestry of living in a time where we can tap into many different cultures across the world by the people we meet, the restaurants we have eaten at, the ever expanding offerings from supermarkets, and / or the information and education we can access.

It is a really easy dish to prepare and one that can easily be cooked up after work. It is vegan so a great option for a ‘Meat Free Monday’ meal. Served with other mezze-style offerings such as bread, olives or, as pictured, a fresh herb and feta cheese platter, this dish can generously feed 4 people and more if offered up as a dip. It keeps well, if there are any leftovers, for a few days so we often make wraps or sandwiches with it too.

The aubergine mixture is simply aubergines and onion cooked in vegetable oil with the addition of rose harissa, garlic, tomato purée, balsamic vinegar and fresh coriander to create an aromatic dish with a little heat. The aubergine mixture, which you can either have cold or warm, is then layered on hummus and served with some bread to dip into it. You can buy your favourite brand of hummus as opposed to making it from scratch but the recipe for hummus below is so easy, resulting in a beautifully creamy and smooth hummus, I can’t recommend it enough.

For those of you who may not know, harissa originates from North Africa, while every region has its own variation and take on the paste, it’s particularly associated with Tunisia. It is a hot chilli pepper paste, the main ingredients of which are roasted red peppers, Baklouti peppers, spices and herbs such as garlic paste, caraway seeds, coriander seeds, cumin and olive oil. Rose harissa contains dried rose petals, and, usually, rosewater too. This softens the heat and adds a subtle floral note to the dishes it is added to.

Hummus is a savoury Middle-Eastern dip made from cooked, chickpeas blended with olive oil, tahini (sesame paste), lemon juice, and garlic. It is difficult to pinpoint the exact origins of hummus as multiple different theories and claims of origins exist in various parts of the Middle-East but apparently the earliest known written recipes for a dish resembling hummus bi tahina are recorded in cookbooks written in Cairo, Egypt in the 13th century.

This dish is becoming one of our family favourites and I hope you find it as delicious as we do! Please do tag me in your Instagram pictures of this or any of my other recipes you cook.


Rose-Harissa Aubergines & Hummus

Prep Time20 minutes
Cook Time30 minutes
Total Time50 minutes
Course: Main Course, Appetiser
Cuisine: Middle-Eastern, Cross-cultural
Keyword: vegetarian, vegan
Servings: 4 (as part of a mezze-style meal or appetiser)
Author: Mersedeh Prewer

Ingredients

For the Rose Harissa Aubergines

  • 3 tbsp vegetable oil
  • 2 large aubergines (chopped into 2 inch chunks. If you have time salt them and leave them for 30 mins to extract water - this will reduce the amount of oil needed to cook them)
  • 1 large onion (finely diced)
  • 2 cloves garlic (crushed or minced)
  • 2 tbsp rose harissa paste
  • 2 tbsp tomato purée
  • 250 ml water
  • 20 g fresh coriander (finely chopped including stems)
  • 1 tbsp balsamic vinegar
  • Salt and Pepper (to taste)
  • Olive oil (to drizzle on top before serving)
  • Finely chopped fresh herbs (to garnish - you can use any herb you like including coriander or parsley)

For the Hummus

  • 720 g large chick peas in a jar (drained weight approx. 400g)
  • 2 cloves garlic
  • Juice of 1 lemon
  • 4 tbsp tahini
  • 40 ml olive oil
  • 40 ml ice cold water
  • Salt and Pepper (to taste)

Instructions

For the Rose Harissa Aubergines

  • Place a large frying pan on a medium / high heat and add 2 tbsp of oil. Add the aubergines and cook until soft all the way through. After 5 minutes of cooking the aubergine, add the remaining 1 tbsp of oil. Stir occasionally to ensure all sides of the aubergine cook through.
  • Add the onions to the pan. The pan may be dry as aubergine has a tendency to absorb oil. Do not be tempted to add more oil as the rose harissa paste contains oil. Stir and cook the mixture until the onions are translucent. Add the garlic and stir until evenly distributed.
  • Add the rose harissa and stir into the mixture. Then add the tomato purée and stir in. Follow with the water, then the fresh coriander and finally the balsamic vinegar. Cook and stir until the liquid reduces and you have a lovely sticky mixture - some of the aubergine chunks will be mashed into the mixture and that is absolutely fine. Reduce the heat to the lowest setting and season to taste. You can turn the heat off and leave in the pan until ready to serve the dish. Alternatively you can leave it on a low flame but make sure the mixture does not dry out / burn - add more water if necessary.

For the Hummus

  • Add all the hummus ingredients, except the water, salt and pepper to a food processor / nutribullet. Blend until it is smooth. Then add the water and blend further until you have creamy texture. Season to taste.
  • Spoon the hummus onto a serving dish and top with the rose harissa aubergine mixture. Drizzle with olive oil and a sprinkle of fresh herbs. Serve as part of a mezze-platter with bread.

Loobia Polo (Rice with Green Beans & Beef)

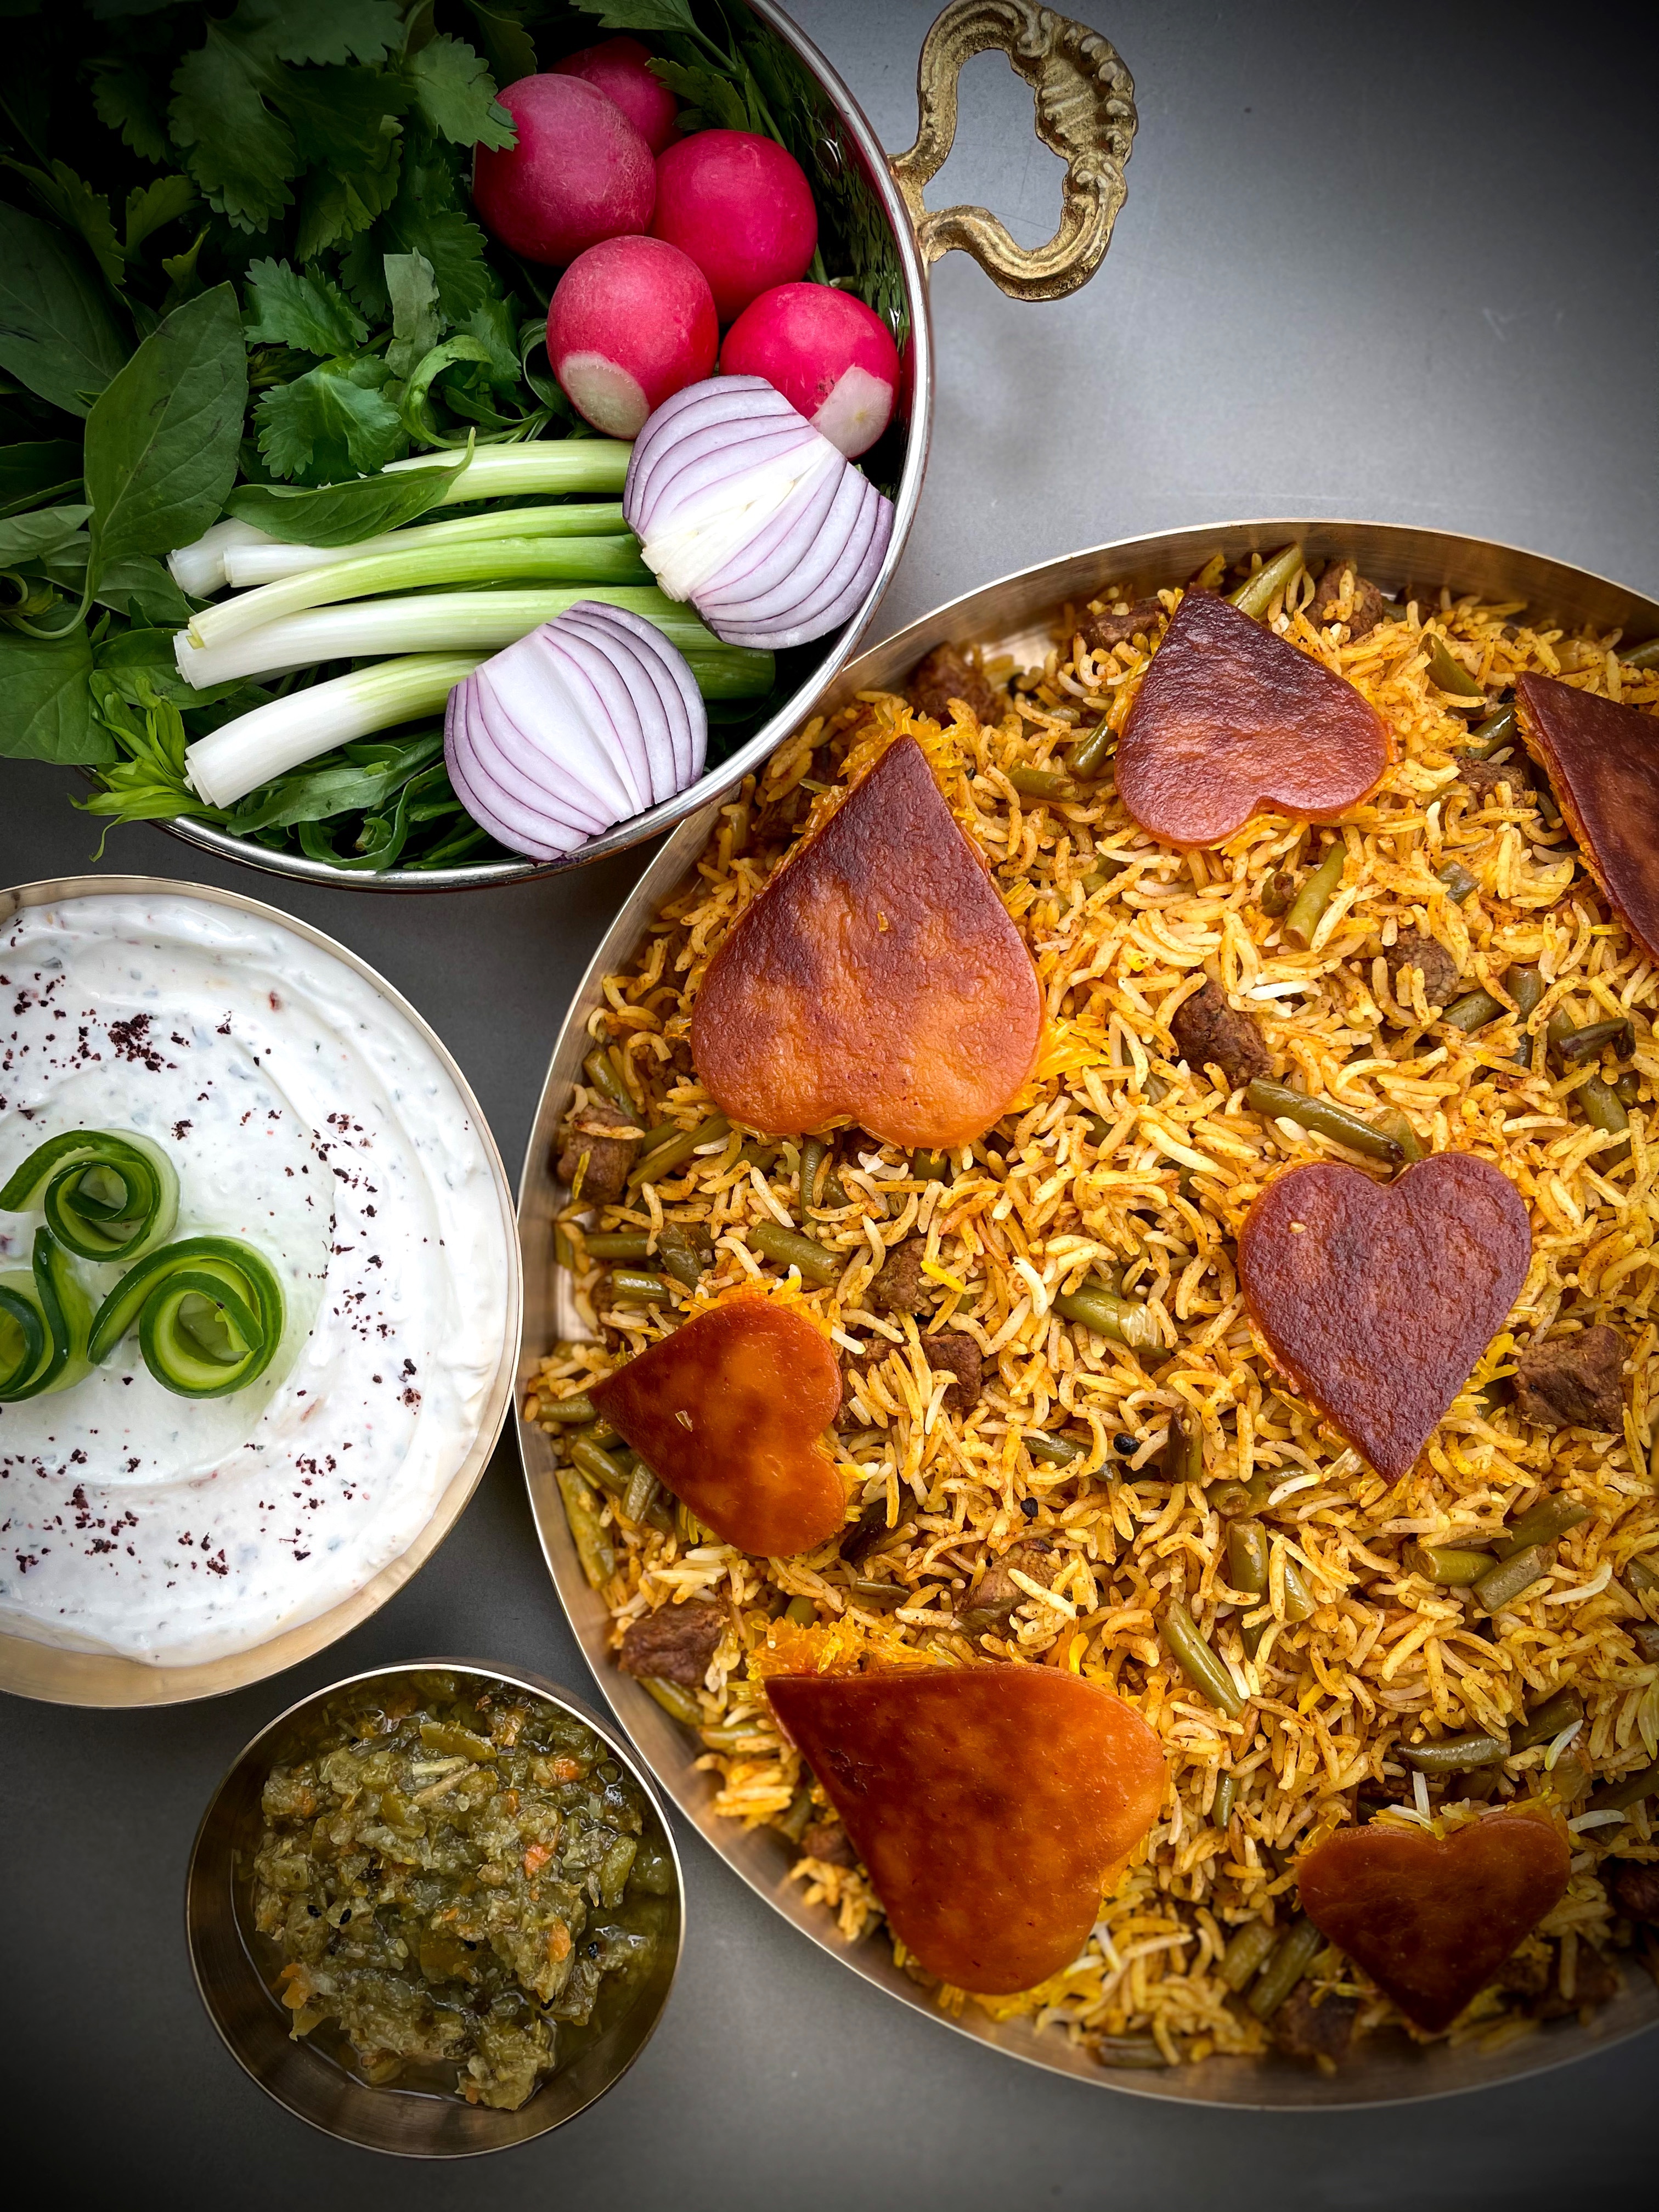
Loobia polo is an Iranian dish made with rice, green beans, and beef or lamb. Loobia means beans in Farsi and ‘polo’ indicates it is a rice-dish layered with meat and / or vegetables. Loobia polo can also be made by using chicken, turkey or without meat if you are vegetarian / vegan.

Think of that dish that represents the ultimate comfort food for you, Loobia Polo is the equivalent to that to most (if not all) Iranians. Even the fussiest of kids will love this dish and that stays with them through to adulthood. Everyone squeals with delight when Loobia Polo is served with its warming cinnamon notes, tomato flavour, chunks of meat and green beans. In light of the love for this dish, I felt it was apt to make tahdig (the crunchy bit at the bottom of the pot) with a tortilla wrap cut into the shape of hearts! 

The rice I use for Loobia Polo is Kamran Basmati Sella Rice as opposed to Tilda Basmati rice. Kamran rice is very forgiving as it is a thicker kernel and holds its integrity against the bean and tomato mixture, which releases liquid into the rice. For this reason, if you are using the more delicate Tilda grain you have to remove it from the parboiling stage a little earlier than you would with the normal Chelow recipe. Alternatively buy yourself a packet of Kamran rice and be less exact and turn out a perfect Loobia Polo each time you cook it.

The recipe below includes the steps to make flatbread tahdig (using a tortilla wrap) but you can make tahdig with rice or potato should you prefer. Just prepare a layer of saffron rice at the bottom of the pan at step 3 under the heading ‘For the rice’  below for rice tahdig; or layer your potato slices for potato tahdig.


Loobia Polo

Rice with green beans and beef
Prep Time20 minutes
Cook Time1 hour 30 minutes
Total Time1 hour 50 minutes
Course: Main Course
Cuisine: Persian, Iranian
Keyword: basmati rice, tahdig, Lubia Polo, Green beans, rice, comfort food
Servings: 4
Author: Mersedeh Prewer

Ingredients

For the loobia mixture

  • 3 tbsp vegetable oil
  • 500 g stewing steak (diced into 1 inch chunks)
  • 1 large onion (diced finely)
  • 1 large clove garlic (minced or crushed)
  • 1 tsp turmeric
  • 1 tsp cinnamon
  • 2 tbsp tomato purée (heaped tablespoons)
  • 500 g frozen runner beans (defrosted and sliced into 1 inch pieces)
  • 1/8 tsp ground saffron (bloomed in 200 ml of water)
  • Salt and Pepper (to taste)

For the rice

  • 500 g white basmati rice (rinsed until the water runs clear and soaked overnight in water plus 2 tbsp of salt - ensure the water covers the rice by a minimum of 2 inches)
  • 1 white tortilla wraps cut into heart shapes using a cookie-cutter or any other shape you prefer
  • 1 tbsp salt
  • Water (as directed below)
  • 2 tbsp vegetable oil (plus extra if you are making flatbread tahdig as pictured)
  • 1/4 tsp ground saffron (bloomed in 2 tbsp of water)
  • 2 tbsp melted butter or ghee

Instructions

For the loobia mixture

  • Place a large frying pan or equivalent on a medium / high heat and add 1 tbsp of vegetable oil. Seal the beef and them remove from the pan and set aside for now.
  • Add the remaining 2 tbsp of vegetable oil to the pan and add the onions. Cook until they turn golden. Then add the garlic, turmeric and cinnamon and stir until evenly distributed.
  • Add the beef back into the pan and the tomato purée and stir in. Add the green beans and bloomed saffron water and stir until everything is evenly distributed. Lower the heat and cook until most of the liquid has evaporated and the mixture has a stickier texture. Season with salt and pepper to taste and then turn the heat off and leave the mixture for when you are ready to mix with your rice.

For the rice

  • Fill a large non-stick saucepan with water and 1 tbsp of salt. Bring the water to a boil.
  • Drain the rice and then add to the saucepan. Gently stir the rice to make sure it does not stick to the pan. Every minute give the rice a gentle stir and take a grain of rice and check the texture – either between your fingers or using your teeth. What you want is the rice to be soft on the outer layer but still firm in the centre. It can take any time from 3 to 7 minutes with the quantity of rice in this recipe. Once the parboiled rice reaches the correct texture, turn your heat off and drain the rice in a colander or sieve. Sprinkle a little cold water on the rice to halt the cooking process. Taste the rice – if it is very salty then rinse the rice further with a little water.
  • Place the empty saucepan on the stove. Add 2 tbsp of oil and your bloomed saffron to the pan and give it a mix. Then arrange your oiled tortilla wrap shapes on the bottom of the pan making sure they do not overlap. Spoon about a 1-inch layer of rice into the saucepan.
  • Then layer your rice and loobia mixture and mix gently. Build up the layers into a pyramid shape away from the sides of the pot. Make 5 holes in the rice with the bottom of a spoon. Pour 2 tbsp of water and the melted butter / ghee over the rice. Cover the pot with a lid and cook on a high heat until the rice starts steaming. Then lower the heat to the minimum flame, wrap the lid of the pan with a tea towel and place on the pan and steam for another 45 minutes.
  • Once the rice is cooked, turn the heat off. Gently fluff the rice a bit to combine the loobia mixture and rice and spoon out onto a serving dish. Place the heart-shaped tahdig and and rice tahdig around the rice or on a separate dish. Pairs well with Salad Shirazi, fresh herbs and / or yoghurt or Torshi.

Khoresh Karafs – Ghermez (Chicken, Celery & Tomato Stew)

A Persian stew made with chicken thighs slow-cooked with celery in a tomato sauce. Wonderfully simple to prepare but with maximum flavour from the combination of garlic, turmeric and saffron with the tomato sauce.

A Familiar Stew

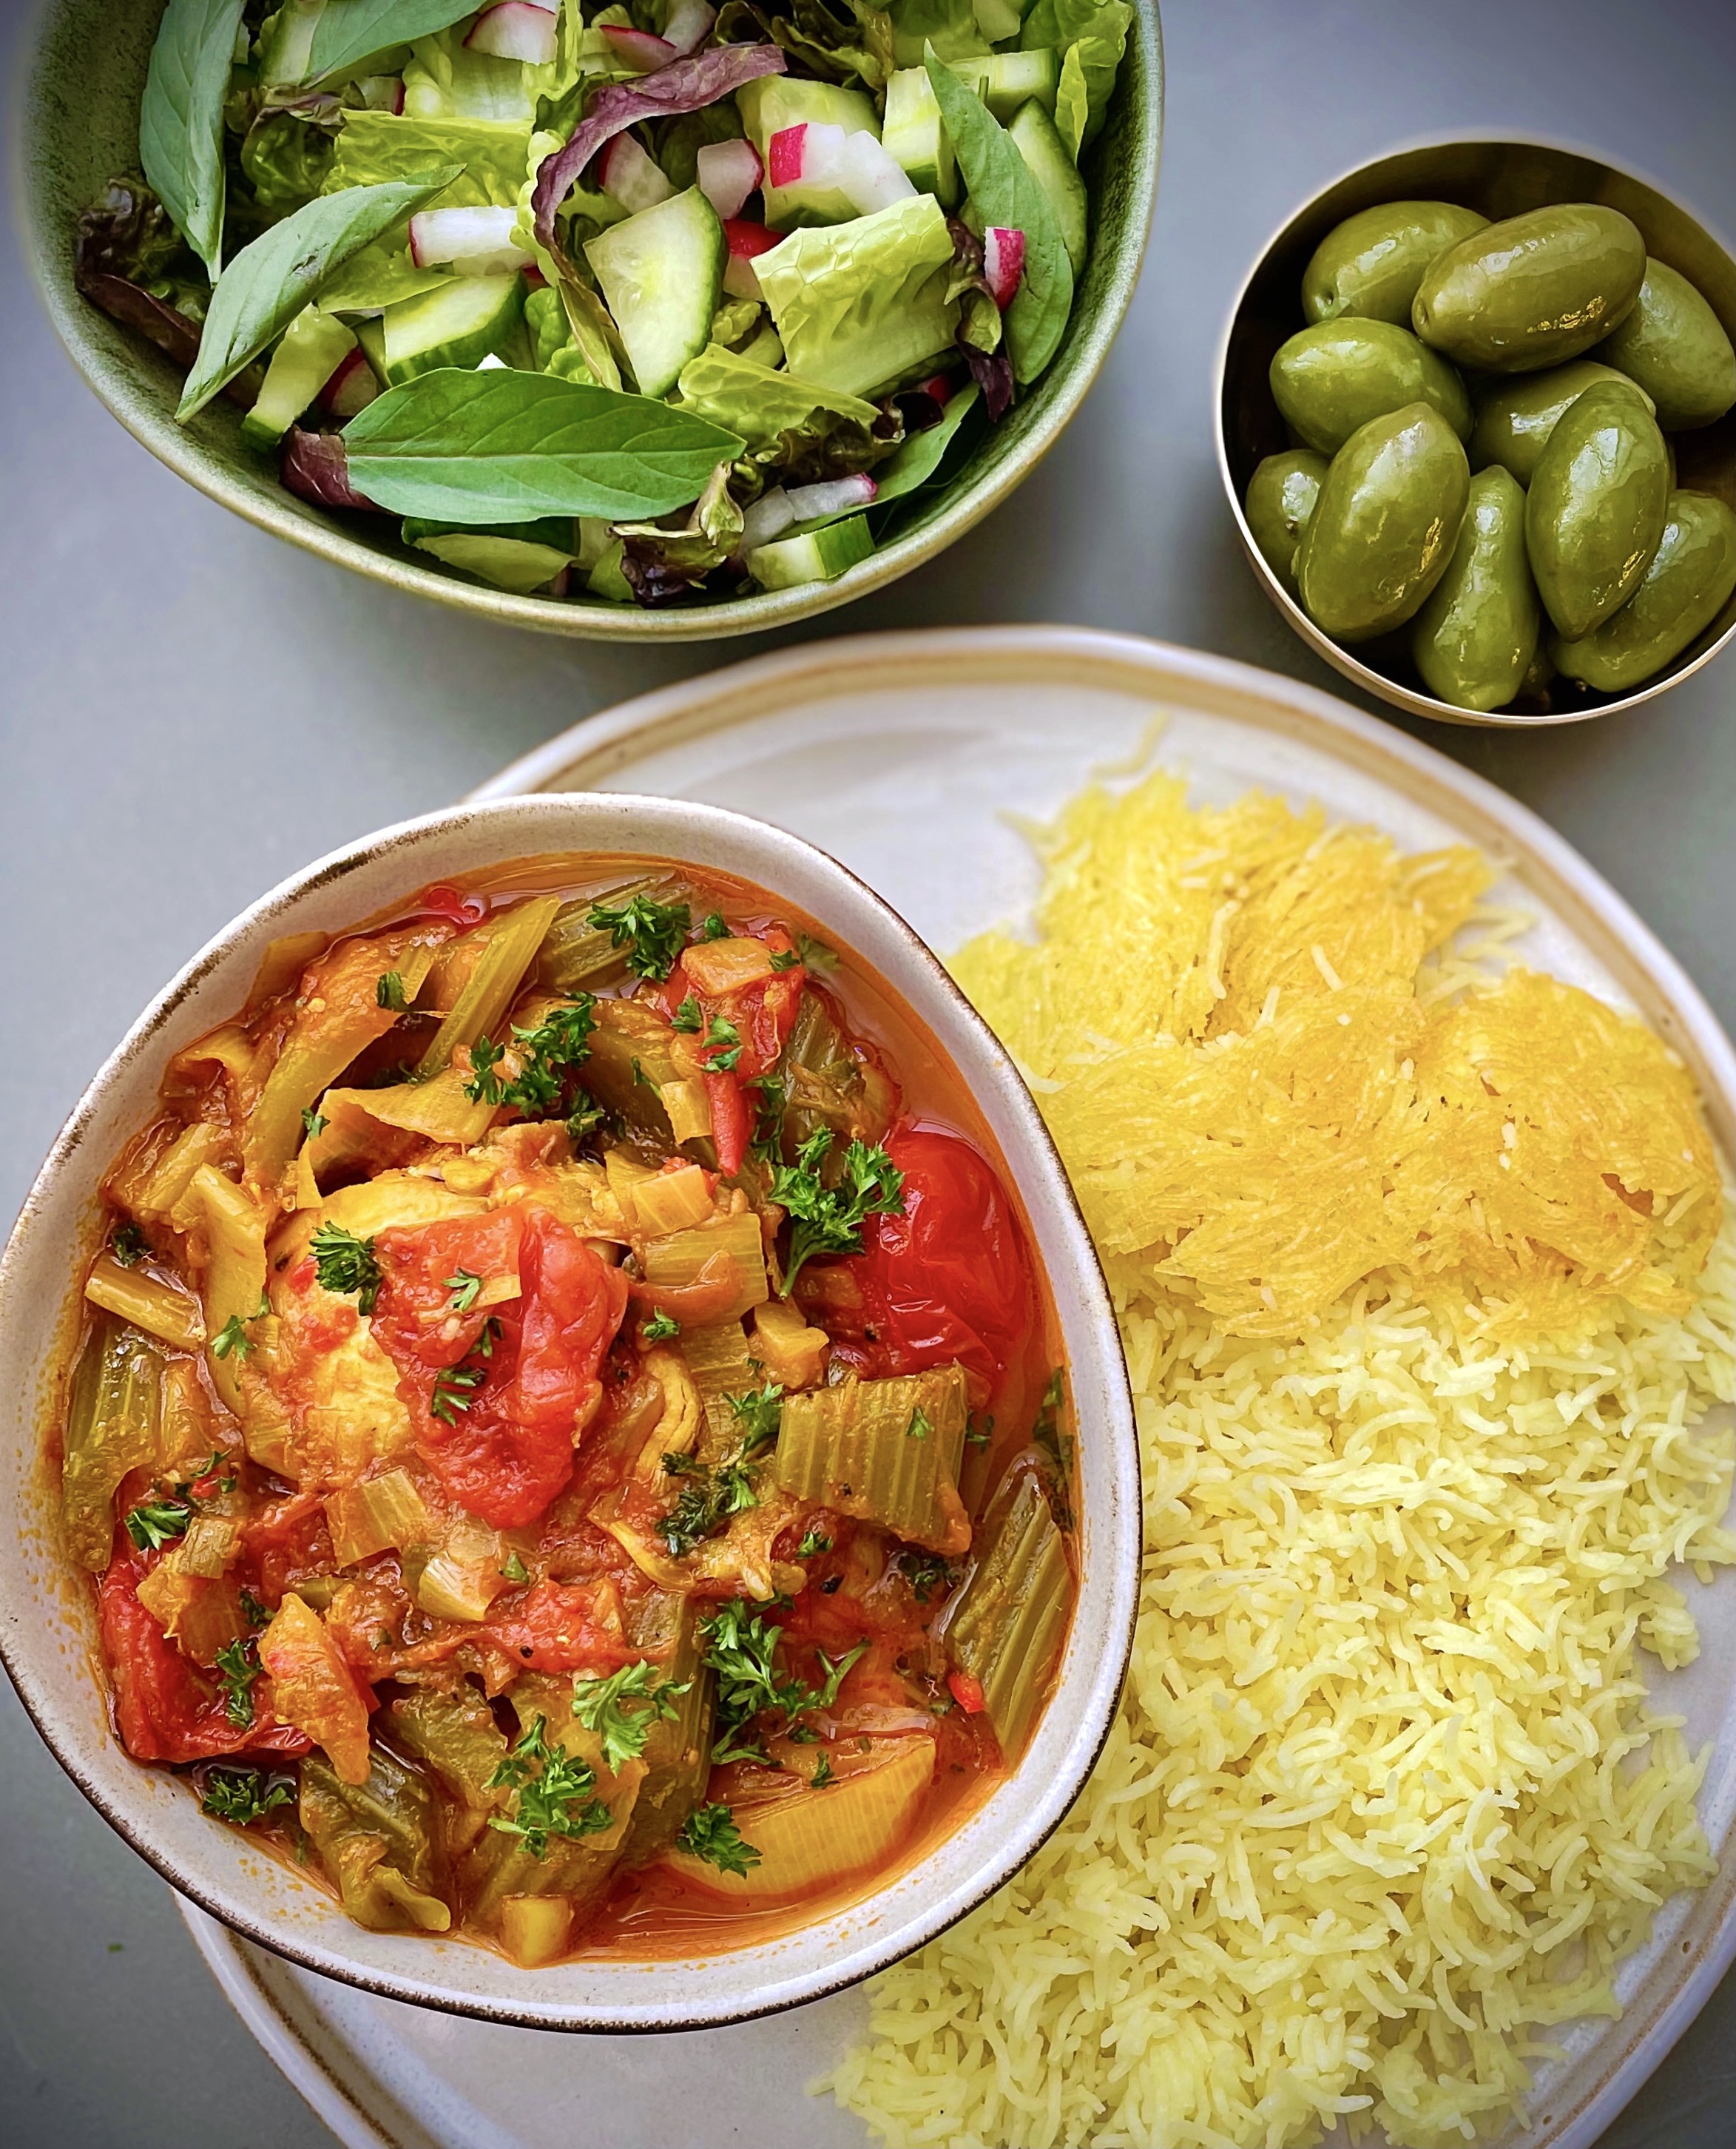
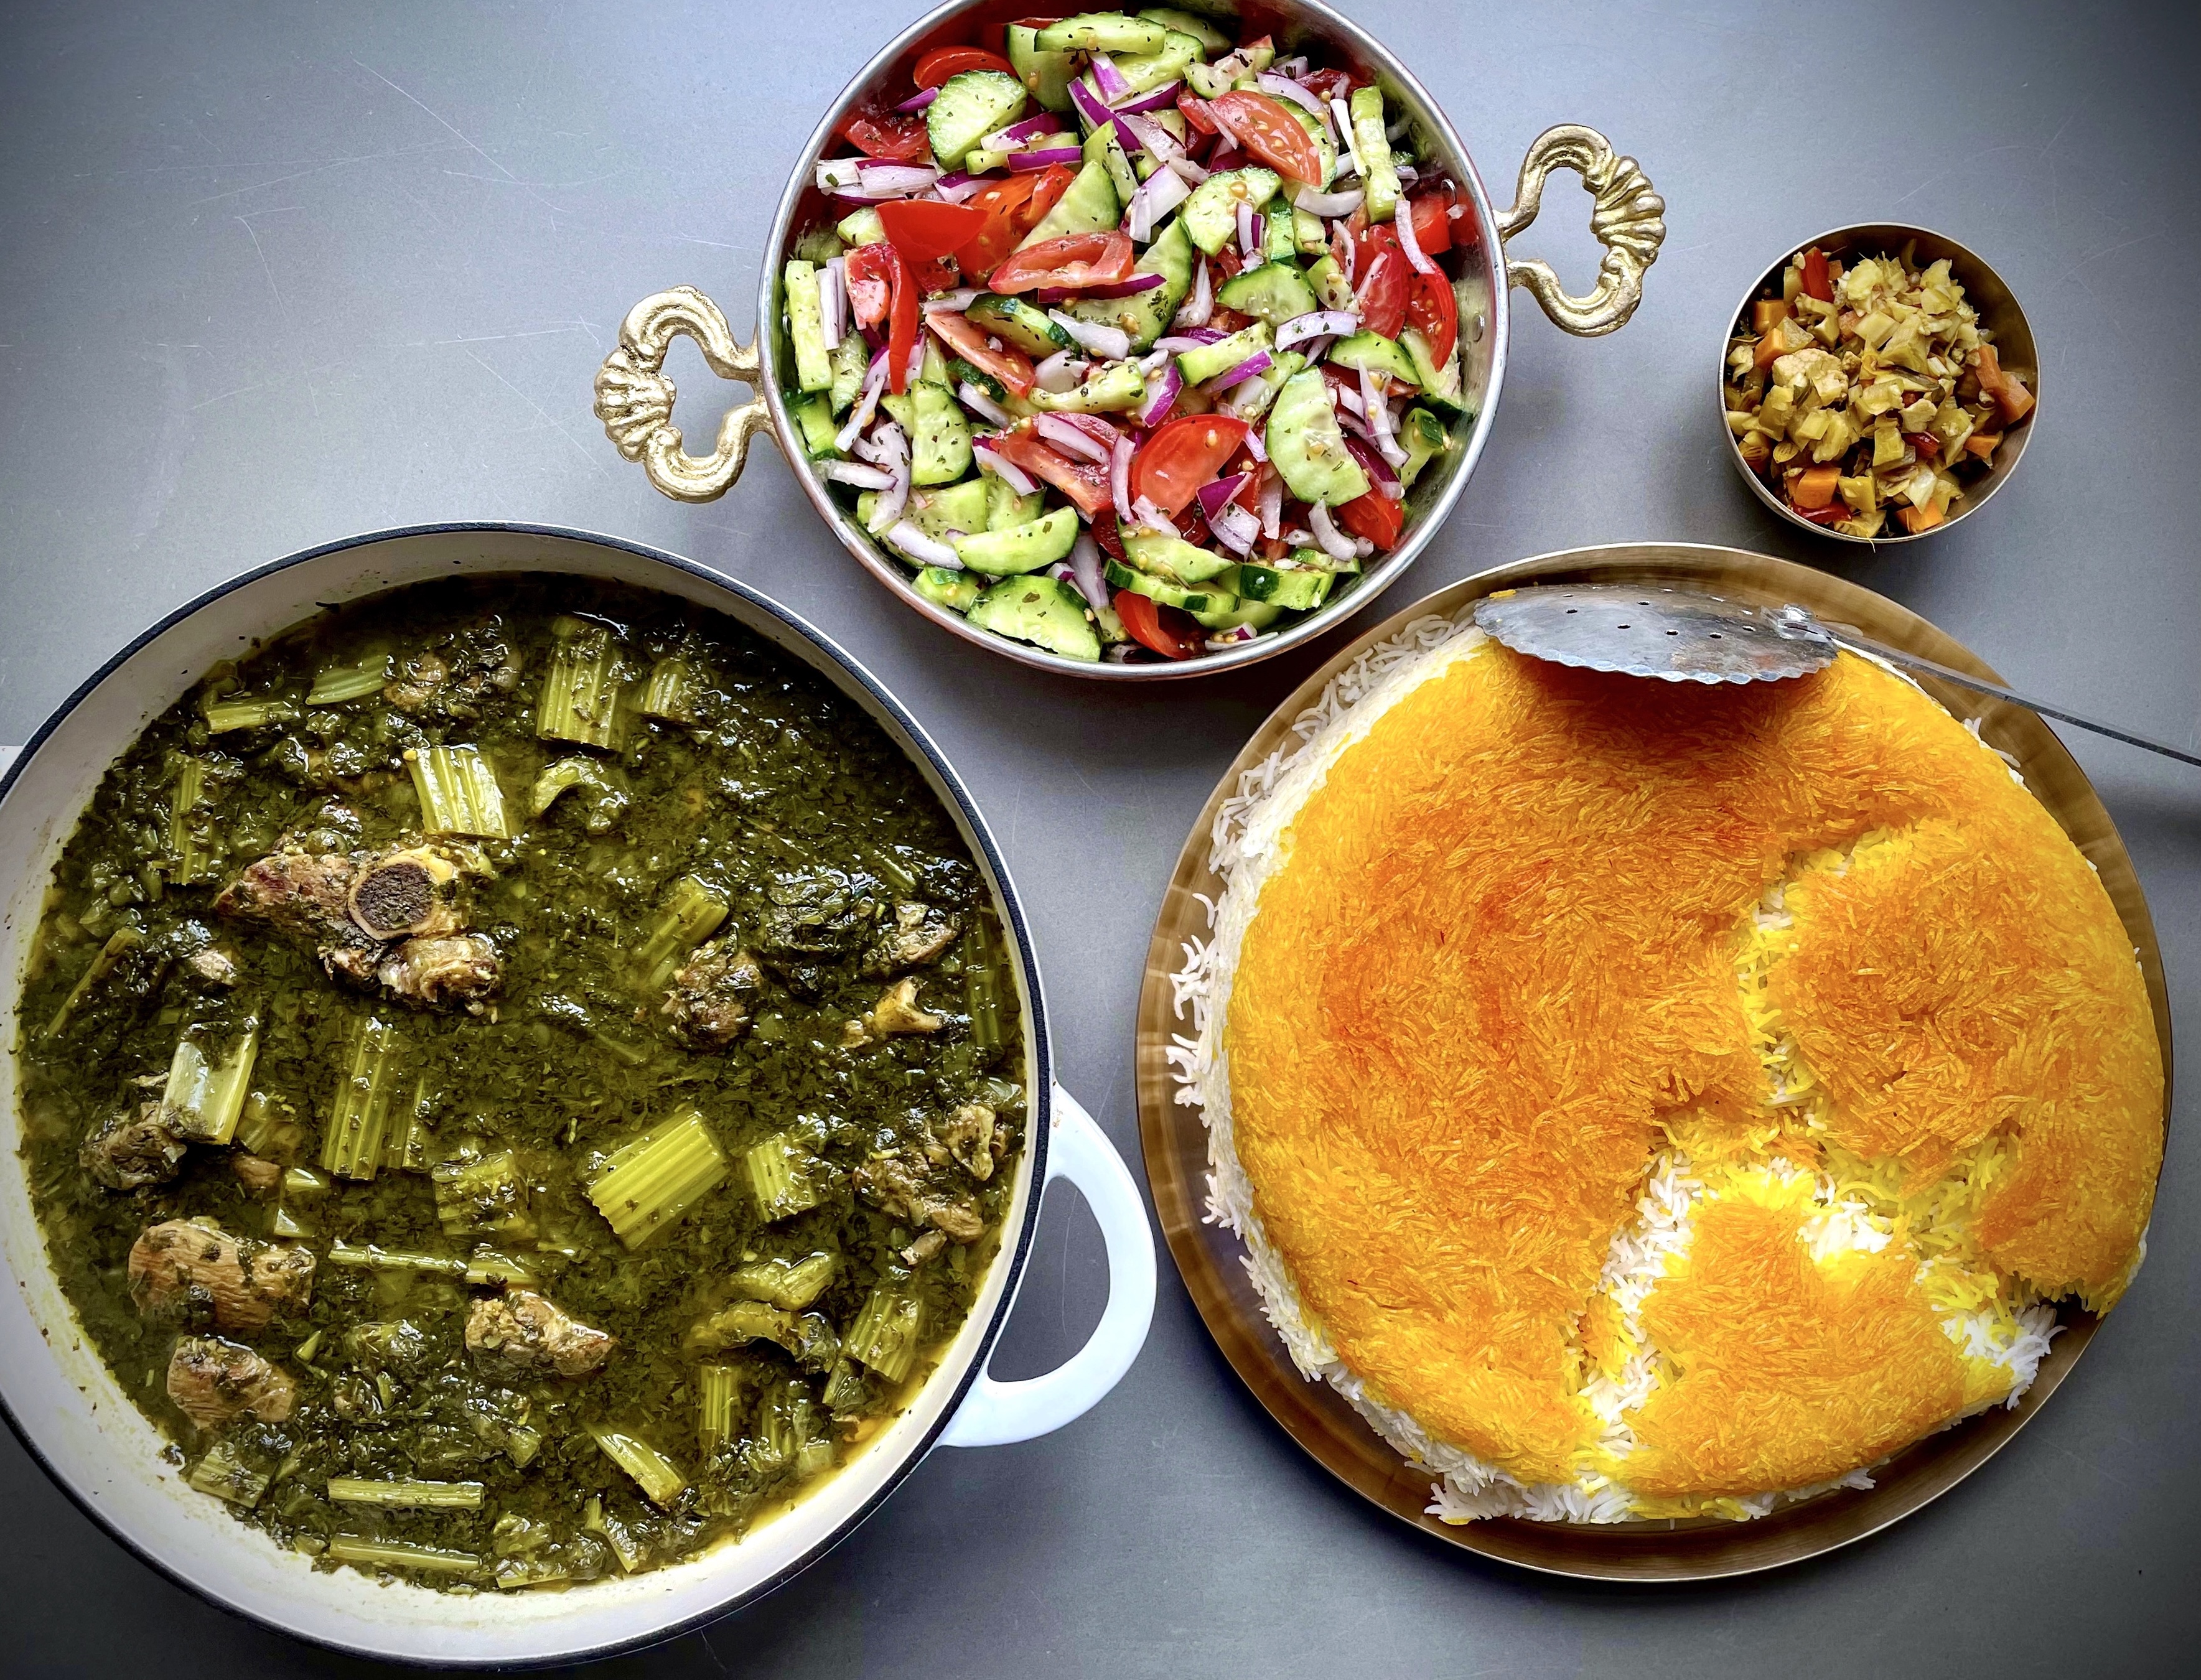
This stew is the lesser-known of the Persian celery stews. The famous one being Khoresh Karafs made with lamb, mint, parsley and celery. This version can be made with chicken, lamb or beef with the stew being tomato-based.

In my family, we distinguish between the two by referring to the colour: ‘Sabz,’ which translated means green in Farsi, for the herby version; and ‘Ghermez,’ which means red, for the tomato-based version. In fact, this version is probably the most popular among my mother’s side of the family, who primarily come from Mashhad in the Khorasan Province of Iran.

With tomatoes apparently only being introduced to Iran in the late 19th century, this stew is inevitably fairly young in the longstanding history of Iran and the Persian Empire. Some Iranians have never heard of this stew!

How to Serve Khoresh Karafs – Germez?

Serve with this stew with Kateh (Persian rice cooked the easy way). A simple salad with a citrus dressing, or fresh herbs, or pickle / olives also make complementary side dishes.

I cannot recommend this recipe enough with it being so easy to prepare and cook, using only a handful of ingredients but maximising on flavour. It is a comforting yet light stew so I love eating this in the earlier part of Spring as we make the gentle transition away from eating the heartier dishes and move towards salads, BBQ’s and a Mediterranean feel to our dishes.

Other Chicken Recipes


Khoresh-Karafs (Ghermez)

Chicken stew with celery and tomatoes
Prep Time10 minutes
Cook Time1 hour 30 minutes
Total Time1 hour 40 minutes
Course: Main Course
Cuisine: Persian, Iranian
Keyword: easy recipe, stew, slow cooked, comfort food
Servings: 4 (to 6)
Author: Mersedeh Prewer

Ingredients

  • 3 tbsp vegetable oil
  • 8 skinless chicken thighs on the bone
  • 1 medium onion (finely diced)
  • 3 cloves garlic (crushed or minced)
  • 1 red chilli (minced - optional)
  • 1 medium leek (medium sliced)
  • 1 tsp turmeric
  • 3 tbsp tomato purée
  • 650 ml water
  • 1 bay leaf
  • Juice of 1 lemon or lime
  • 1/8 tsp ground saffron (bloomed in 2 tbsp of water)
  • 1 head celery (chopped in 2 inch chunks)
  • 5 small / medium tomatoes (halved)
  • Salt and pepper (to taste)
  • Chopped fresh parsley (to garnish)

Instructions

  • Place a shallow casserole pan or equivalent on a medium-high heat. Add 1 tbsp oil. Seal the chicken thighs on both sides, remove from the pan and leave to one side until ready to use.
  • Add 2 tbsp oil to the pan and add onions. Cook until the onion turns golden. Then add garlic and chilli and stir in until evenly distributed.
  • Add leek to the pan and and cook until softened. Add turmeric and stir. Follow with tomato purée and stir in until evenly distributed. Then add water, bay leaf, lemon juice, saffron water and stir.
  • Add chopped celery. Then evenly arrange the chicken thighs in the pan so that they are just submerged in the liquid of the stew. Place the tomato halves evenly in the stew.
  • Bring stew to a boil and then lower the heat to allow to simmer with a lid on the pan for about an hour or until the chicken is practically falling off the bone. If the stew is too watery, allow to simmer further without the lid on to thicken the sauce.
  • Season with salt and pepper to taste and sprinkle with fresh chopped parsley before serving. Serve with saffron Kateh.

Persian-Style Dal with Persian Mixed Spice & Dried Limes

A deeply comforting dal cooked in a rich tomato sauce with warming spices. The combination of the dried limes and Persian mixed spice creates an incredible savoury dish. A great vegetarian dish to eat with rice and or flatbread.

I discovered a love for dal over the last ten years. My husband introduced me to the world of dal during one of our early dates. He is a big fan of Indian cuisine and always orders a dal dish to accompany his meal. I was reluctant at first but, after a spoonful, I fell in love with the creamy texture and the aromatics of the dish. I wanted to make a dal dish with a Persian twist so I started experimenting!

Ingredients in this Dish

This dish is made with yellow split peas (Channa Dal) using the holy trinity of Persian cooking – onion, turmeric and saffron. I also added other familiar flavours from our cuisine during the recipe development including limoo amani (dried lime), advieh (Persian mixed spice) and nigella seeds. The resulting dish is deliciously savoury, packing an umami punch and satisfying even the die-hard carnivore.

Limoo amani can be bought online or from most Middle-Eastern food shops. It adds a musky and citrusy flavour to the dish. Be careful when piercing a hole into the dried lime as you do not want the seeds to fall out while it is cooking as it can make the dish bitter – just a gentle shallow poke into the lime with the end of a sharp knife.

Advieh can also be bought from most Middle-Eastern food shops – I buy mine online from Freshly Spiced on  Etsy. The combination fo spices are nutmeg, rose petals, cardamom, cumin, black pepper, goriander, and cinnamon.

I like a little heat in my food so I add red chilli to my dal, but feel free to leave it out.

How to Serve This Dish

Serve it with roti or naan, rice if you want a hearty meal with fresh herbs, torshi or a yoghurt dip on the side such as Maast o’Moosir (yoghurt and Persian shallot dip) or Maast O’Khiar (Persian yoghurt and cucumber dip).

Leftovers

This dal dish will last in the frisge up to 5 says if kept in an airtight container. Always cool dishes completely before refridgerating.


Persian-Style Dal with Persian Mixed Spice & Dried Limes

Prep Time15 minutes
Cook Time1 hour
Total Time1 hour 15 minutes
Course: Main Course
Cuisine: Persian, Iranian, Fusion
Keyword: vegetarian, vegan option, dhal, dahl, daal
Servings: 4
Author: Mersedeh Prewer

Ingredients

For the dal

  • 250 g chana dal (split yellow lentils) (rinsed with water until it runs clear and left in a bowl of water to soak overnight)
  • 2 tbsp vegetable oil
  • 1 onion
  • 3 cloves garlic
  • 1 whole red chilli (finely chopped - please feel free leave out / reduce amount or deseed if you would prefer it less spicy)
  • 1 tsp coriander seeds
  • 1 tsp turmeric
  • 900 mls vegetable stock
  • 1 bay leaf
  • 1 to 2 limoo amani (dried lime)
  • 200 g fresh tomatoes (chopped)
  • 1/8 tsp ground saffron (bloomed in 2 tbsp of water)
  • Juice from half a fresh lime
  • Salt and pepper (to taste)

For the temper and garnish

  • 2 tbsp ghee (non dairy alternative, if vegan)
  • 1 tsp black mustard seeds
  • 1/4 tsp advieh (Persian mixed spice)
  • 1 tsp nigella seeds (to garnish)

Instructions

  • Blend onion and garlic into a paste in a food processor or equivalent.
  • Take a large saucepan and add 2 tbsp oil and place on medium-high heat. Add chilli and coriander seeds. Toast lightly for 30 seconds to release flavours. Be careful not to burn otherwise it will be bitter. Add onion and garlic paste to the pan and cook for 5 minutes. Add turmeric and cook for a couple of minutes.
  • Drain channa dal and rinse. Then add to the pan with stock, chopped tomatoes, bay leaf and bloomed saffron.
  • Pierce imoo amani 3 to 4 times around the lime gently with the tip of a sharp knife and add to the pan - only a shallow piercing is required. Bring to a boil, then turn the heat down, add a lid and let it simmer for 45 minutes.
  • When the channa dal has cooked, remove from heat and remove the bay leaf and limoo amani. Stir to break down. Squeeze some fresh lime juice and season to taste. Leave the mixture to thicken.
  • To make the temper, place a small frying pan on high heat. Add ghee and fry mustard seeds for 30 seconds. Turn heat off, add advieh and mix and then pour into the dal mixture and stir. Sprinkle nigella seeds to garnish.
  • Serve with chapatis or roti and/or rice with yoghurt or torshi.

Sabzi Polo ba Mahi (Persian Herbed Rice with Salmon)

Commonly served during Norooz, rice is layered and steamed with fresh herbs, saffron and garlic butter to create a delightfully aromatic dish. Grilled salmon, marinated in saffron, lemon, garlic and honey, is served alongside the Sabzi Polo to create the ultimate Persian meal.

A Special Dish

This dish is synonymous with Norooz – Persian New Year. Rice is steamed with saffron, garlic and chopped herbs. It is usually served with fish and Kuku Sabzi (a herb and egg frittata).

In Persian, Sabzirefers to herbs or vegetables; ‘Polorefers to the fact that the rice is cooked with another element mixed in, in this case the fresh herbs. The herbs used in Sabzi Polo vary, but typically include dill, coriander, parsley, Persian chives or the green ends of spring onions and in some cases fenugreek.

Iranians traditionally eat Sabzi Polo with a fried or smoked ‘mahi sefid’ (‘white fish’, the Caspian kutum or Caspian white fish which inhabits the Caspian Sea). It’s usually served with pickled garlic, other traditional pickles, Salad Shirazi and ‘Naranj’ – a tart and slightly bitter orange, which we squeeze over the fish and rice like a lemon adding a citrus note to the dish. You can buy Naranj from your local Middle-Eastern supermarket. Sainsbury’s also stock Naranj (bitter Seville marmalade oranges) during the season. Kuku Sabzi is also served alongside the rice on the day, a great alternative should fish not be your thing.

What are the Ingredients?

Below is my family recipe for Sabzi Polo. We tend to use a greater amount of fresh herbs compared to others. The herbs use in this recipe are fresh coriander, parsley and dill. In Iran chives are also used but the chives available in the UK are not as spicy so we replace these with the green ends of spring onions. The herbs and greens are mixed in while the rice is parboiling. After draining the rice, it is steamed with garlic butter drizzled over with a little saffron to add further aromatics to this dish.

The accompanying fish is grilled salmon marinated in a simple saffron, honey, garlic, lemon juice, olive oil infusion and smoked sea salt. You can make the Sabzi Polo with any fish you want, including smoked fish like many in Iran will eat on the day. You can pan fry, BBQ, grill, oven bake, poach or steam your fish if you prefer.

Your Choice of Tahdig

Due to the herbs, the tahdig (crispy rice formed at the bottom of the pot) will come out a dark green-brown as you can see in the first picture so do not panic when you flip the crispy stuff out – it’s meant to be that dark!

However, should you prefer you can prepare the dish with a saffron layer of Tahdig as you can see in the pictures above and below. All you need to do is parboil the rice without adding the herbs, drain it and then take 2 cups of rice and add to a little saffron water (1/4 teaspoon ground saffron bloomed in 3 tablespoons water). Mix the rice until fully coated and then line the bottom of the pan, following the addition of the oil/butter, as set out at the step entitled ‘Preapre the Tahdig Layer’ below. Then pat it down and layer the cooked rice with the fresh herbs and the garlic butter layer by layer on top.

You can also have potato or bread tahdig as an alternative. Just replace the rice layer with slices of potato or flatbread.

Serving and Storing Sabzi Polo Ba Mahi

Serve this dish alongside all or one of the following.

  • Salad Shirazi (Persian chopped tomato, cucmber and red onion salad dressed with lime, olive oil and mint).
  • Borani Laboo (Persian beetroot and yoghurt dip).
  • Maast O’Moosir (yoghurt and Persian shallot dip).
Storing Leftovers

Store in an airtight container, once cooled down, and in the firdge. The rice will last up to 5 days. The salmon will last up to 3 days. you can reheat the rice and salmon in a microwave. Or you can reheat the rice in a saucepan. Remember to add a tablepoon or so of water to rehydrate the rice if reheating. The salmon can also be reaheated in a medium oven.

Norooz – Persian New Year and the First Day of Spring (Northern Hemisphere)

Norooz is the day of the vernal equinox and marks the beginning of spring in the Northern Hemisphere. It marks the first day of the first month of the Iranian calendar (Farvardin). The moment the Sun crosses the celestial equator and equalizes night and day is calculated exactly every year. Families gather together to observe the rituals. Due to this calculation, the day Persian New Year falls upon can vary but generally it is either on the 20th or 21st March. The Persian name translated means ‘New Day.’

The festivities and rituals we observe are focussed on letting go of the winter and all the negativity that may be associated with it. We look forward to new life, prosperity and have great optimism which is brought by spring and then the summer months.

In the lead up to the the New Year celebrations, many Iranians will undertake a ritual familiar to many – the ‘Spring Clean.’ I always do a major spring clean and this year was no exception. By day 3 into my efforts my house was messier than when I started, but by the end of the process I felt physically and mentally lighter from the purge of the clutter and the deep clean of the house.

The evening of the last Tuesday before Norooz is the night we celebrate Chaharshanbeh Soori – a festival of fire where we gather together and jump over bonfires. The tradition of jumping over the bonfire originates from people believing that the fire would take their problems, sickness and winter pallor and be replaced by energy and warmth, contributing towards their success for the upcoming year. As we jump, we chant the following words: ‘Zardiye man az toh (my pallor to you); Sorkhiye toh az man (your redness to me).’ See my post about Chaharshanbeh Soori and the dish we eat on that day here.

Haft-Seen

  1. Sabzeh (wheat, barley, mung bean, or lentil sprouts grown in a dish) – symbolising rebirth and growth.
  2. Samanu (sweet pudding made from wheat germ) – symbolising strength and power.
  3. Senjed (Persian Olive / oleaster) symbolising love.
  4. Serkeh (vinegar) symbolising patience.
  5. Sib (apple) – symbolising beauty.
  6. Seer (garlic) – symbolising health and medicine.
  7. Somagh (sumac) – symbolising sunrise.

The Haft-Seen may also include a mirror (self-reflection), candles (enlightenment), eggs (fertility),  goldfish (progress), coins (wealth), hyacinth (spring’s arrival), and traditional confectioneries. A “book of wisdom” such as the Quran (religious text of Islam), or the Book of Kings – the Shanameh of Ferdowsi (an epic and long poem on the Persian Empire), or the Divān of Hafez (an anthology of the famous Iranian poet Hafez’s poems) may also be included.

Music will play and we will eat Sabzi Polo ba Mahi and Kuku Sabzi. Many of us continue the celebrations by having a separate organised event for the wider family and friends at a hotel or restaurant where we dress up and dance the night away.

During the Norooz holidays, we make short visits to the homes of family and friends. Typically, young people will visit their elders first. Visitors are offered tea and pastries, cookies, fresh and dried fruits and mixed nuts or other snacks. Gifts are given from the elders to the younger members of the family.

On the 13th day of the Norooz celebrations we celebrate Sizdah Bedar. Iranians spend the day outdoors. Many will go out for a family picnic in a local park. Come rain or shine we will gather outdoors and celebrate this day – throwing our sabzeh into a nearby river or stream marking the end the Persian New Year celebrations.


Sabzi Polo ba Mahi

Herbed rice served with grilled salmon
Prep Time20 minutes
Cook Time1 hour
Course: Main Course, Rice Dish, Fish Dish
Cuisine: Persian, Iranian
Keyword: coriander, parsley, dill, salmon
Servings: 4 (to 6)
Author: Mersedeh Prewer

Ingredients

For the Sabzi Polo (herbed rice)

  • 1/4 tsp ground saffron (bloomed in 100mls of water)
  • 400 g white long grain basmati rice
  • 2 tbsp salt
  • 80 g fresh coriander
  • 80 g fresh dill
  • 80 g fresh parsley
  • The green ends of 5 spring onions
  • 2 tbsp vegetable oil
  • 2 tbsp melted butter mixed with 3 crushed or minced cloves of garlic

For the mahi (salmon)

  • 4 salmon fillets (or 1 side of salmon circa 600g to 800g)
  • Juice of 1 lemon
  • 1 tbsp honey
  • 2 tbsp olive oil
  • 1/8 Small pinch of ground saffron (bloomed in 2 tbsp of water)
  • 2 cloves garlic (minced or crushed)
  • Smoked Sea Salt and Pepper (to taste - you can use normal salt)

Instructions

Marinade the Salmon

  • Mix olive oil, lemon juice, bloomed saffron, honey, smoked sea salt, pepper and garlic and pour it over fish. Massage the marinade into the fish. then pleace fish flesh side down into marinade. Cover and place in fridge for a minimum of 12 hrs. I find the best results are to marinade the salmon for 2 nights.

Wash and Soak the Rice

  • Wash the rice in cold water until the water runs clear. Then place with 1 tbsp of salt in a bowl and pour in cold water to cover with 2 inches clear above the rice. Soak overnight.

Prepare the Herbs & Greens

  • Wash all the herbs and spring onions. Remove tough woody stems from the herbs and cut the spring onions to remove the green ends. In batches, pulse the herbs and spring onion ends in a food processor until they are finely chopped. Place in a bowl until ready to use.

Make the Garlic butter

  • Melt butter mixed with 3 crushed or minced cloves of garlic over medium heat in small pan. Put to one side until ready to use.

Parboil the Rice

  • Fill a large non-stick saucepan with approximately 1.5 litres of water and 1 tbsp of salt. Bring the water to boil. Drain rice and add to the saucepan. Gently stir the rice to make sure it does not stick to the pan. cook rice until al-dente.
  • Stir in herbs and greens, turn heat off and immediately drain rice in a colander or sieve. Sprinkle a little cold water on the rice to halt the cooking process. Taste the rice - if it is very salty then rinse the rice further with a little water.

Prepare Tahdig Layer

  • Place the empty saucepan on stove. Add 2 tbsp of oil. Add 1 tbsp of the bloomed saffron to the saucepan and mix with the oil to distribute evenly. To make rice tahdig spoon about a 1-inch layer of rice into the saucepan and gently stir to mix with the saffron oil to ensure colour is distributed evenly. Pat down flat with spoon.

Layer and Steam the Rice

  • Reserve 5 tbsp of rice and layer rest into a gentle sloping pyramid shape in the saucepan, drizzling garlic butter on each layer of rice spooned in. Mix reserved rice with remaining saffron water and then spread on top of the rice. Pour any remaining saffron water over the rice. Poke 5 holes, evenly distributed, into the rice to the bottom of the pan with the end of a spoon.
  • Place glass lid on saucepan over high heat. Once steam rises from rice lower heat to the minimum flame or equivalent. Cover the lid with a tea towel (making sure it is not a fire risk) and place on saucepan. Allow to steam for a minimum of 45 mins to get a crunchy and thick layer of tahdig.

Cook the Salmon

  • Remove salmon from fridge to come to room temperature prior to cooking.
  • Heat grill to high. Place the fish in a shallow baking dish, then grill for 5 to 7 mins until cooked through, but still a little pink in the centre, cover and set aside.

Serve the Sabzi Polo Ba Mahi

  • When the rice is cooked, spoon the saffron coloured rice separately in a bowl and reserve for the garnish. Spoon the rest of the Sabzi Polo on to your chosen dish and plate up your tahdig separately. Garnish with the saffron-coloured rice and serve with the grilled salmon, fresh naranj (or lemons or limes) to squeeze over the fish and rice, Salad Shirazi and torshi.

Ash Reshteh (Persian Noodle Soup with Herbs & Beans)

A hearty soup made with legumes, fresh herbs and noodles. This beloved Persian soup is one of the dishes eaten during Persian New Year celebrations (Norooz) and is basically a hug in a bowl!

What is Ash Reshteh?

Although we have translated this dish to be described as a soup, Persian ash (pronounced ‘aash’) recipes tend to be a hearty bowl of goodness. Ash Reshteh is no exception to the rule. A wholesome bowl packed full of Persian noodles (‘reshteh’), kidney beans, chickpeas, green lentils, cooked with fresh herbs and greens and flavoured with kashk (a fermented / preserved food made with the whey left over from cheese-making). The texture of this ash is less soup and more like a chilli.

My version of this recipe differs to my maman’s recipe. I don’t use flour to thicken my ash. I also use slightly more herbs than her. The resulting ash feels fresher and lighter than the traditional recipe / method. If you cannot get your hands on Persian noodles, the closest alternative are udon noodles. You can also use spaghetti or linguine. If you are vegan, leave the kashk out and add some freshly squeezed lemon or lime juice to taste. You can also use a dairy-free yoghurt  in addition to the fresh citrus.

This dish is served during the winter time and at special Iranian events like Chaharshanbeh Soori; and Sizdah Bedar. The noodles in the ash are supposed to symbolize good fortune for the new year.

See my next post which is about Norooz and the dish Sabzi Polo ba Mahi (rice layered with herbs and served with fish) which we Persians eat on the day. This post focusses on Chaharshanbeh Soori and Sizdah Bedar, when my family come together to celebrate and eat Ash Reshteh.

Chaharshanbeh Soori

The first event in our Norooz festivities takes place on the evening of the last Tuesday before Persian New Year. It is a Festival of Fire. People in all parts of Iran and those of us who live outside of Iran celebrate this festival by setting up bonfires in almost all the public places in Iran – in our gardens or at organised events for the diaspora community.

We eat Ash Reshteh and other Persian delights and jump over the bonfires. The tradition of jumping over a bonfire originates from people believing that the fire would take their problems, sickness and winter pallor and be replaced by energy and warmth, contributing towards their success for the upcoming year. Therefore, jumping over fire on Chaharshanbeh Soori night is like a purification rite or a phrase familiar to the West  ‘out with old, in with the new.’

As we jump, we chant the following words: ‘Zardiye man az toh (my pallor to you); Sorkhiye toh az man (your redness to me).’

Another tradition is to bang on pots and pans with spoons that are named as ‘Ghashogh Zani,’ with the objective of beating out the last Wednesday of the year.

It is a celebration of good health and light – the end of winter and the beginning of Spring. It is believed that the ritual guarantees the dissipation of the misfortunes and evils and the materialization of hopes and desires for the next year.

Sizdah Bedar

Sizdah Bedar is considered the final day of the Persian new year celebration. It is celebrated on the thirteenth day of Norooz. The festival’s name translated means ‘getting rid of the thirteenth.’ As with many cultures, the number 13 was considered bad luck by Iranians and so they believed that by being outside with nature the bad luck would dissipate. Therefore, on Sizdah Bedar, Iranians spend the day outdoors. Many will go out for a family picnic in a local park. One family member will be entrusted with bringing a pot of Ash Reshteh and the rest of us the sandwiches and other Persian treats!

Come rain or shine we will gather outdoors and celebrate this day – throwing our sabzeh (sprouted lentils or wheat and one of the symbols of Norooz representing rejuvenation and new life) into a nearby river or stream. Other than eating, another ritual for the day is knotting greens. Usually, the young unmarried people knot the green of the sabzeh to find their soulmate prior to throwing it into the water.


See my how to Instagram Reel below:


Ash Reshteh

Persian noodle soup
Prep Time20 minutes
Cook Time2 hours 30 minutes
Total Time2 hours 50 minutes
Course: Soup, Main Course
Cuisine: Persian, Iranian
Keyword: ashe reshteh, legumes, spinach, coriander, parsley, dill
Servings: 6 (to 8)
Author: Mersedeh Prewer

Ingredients

For the ash

  • 125 g chickpeas (soaked overnight in a bowl with the other beans and lentils plus tsp of salt)*
  • 125 g red kidney beans (soaked overnight in a bowl with the other beans and lentils plus tsp of salt)*
  • 125 g green lentils (soaked overnight in a bowl with the other beans and lentils plus tsp of salt)*
  • 1 large bunch fresh coriander (between 100 and 150 g)
  • 1 large bunch fresh parsley (between 100 and 150 g)
  • 1 large bunch fresh dill (between 100 and 150 g)
  • 1 bunch spring onions (green ends only)
  • 200 g fresh spinach
  • 3 tbsp vegetable oil
  • 1 large onion (finely diced)
  • 3 cloves garlic (crushed or minced)
  • 1/2 tsp turmeric
  • 2 litres vegetable stock (you can use water which is traditionally used but I like the extra depth of flavour stock brings to the dish)
  • 150 g Persian noodles - reshteh (you can use udon noodles, spaghetti or linguine as an alternative)
  • 3 tbsp kashk (mine are heaped tablespoons - add 1 tbsp at a time and mix and taste each time to see what amount suits your tastes)
  • Salt and pepper (to taste)

For the garnish

  • 100 ml vegetable oil
  • 1 to 2 large onions (finely sliced)
  • 2 tsp dried mint
  • 1 tbsp kashk (diluted with some water to make it runny for drizzling on the ash)

Instructions

For the Ash

  • Soak your beans, lentils and chickpeas in a bowl of salted water overnight. The morning after, cook the beans and lentils in water by bringing to the boil and then simmering for 30 mins (this aids with making them digestible). Drain and leave to one side until you are ready to cook the Ash Reshteh.
  • Wash all the herbs, spinach and spring onions. Remove all the tough woody stems from the herbs and spinach. Cut the spring onions to remove the green ends for the Ash.
  • In batches, pulse the herbs, spinach and spring onion ends in a food processor until they are finely chopped. Place the greens in a bowl until you are ready to add to the Ash.
  • Take a large stockpot or equivalent and place on a medium / high heat. Add 3 tbsp of vegetable oil. After a minute or so add the finely diced onion and fry until it is tender and turning golden brown.
  • Add the garlic and turmeric and stir until evenly distributed and you can smell the aroma.
  • Drain the bean and lentil mixture and add to the stockpot. Cook for about a minute, stirring gently to coat with the onions, oil and spice.
  • Add the stock and bring to a boil. Reduce the heat to allow the beans to simmer. Place the lid on the pot and cook for approximately 30 mins to 1 hr. Skim off any foam which may rise to the top and stir now and again. To check if the bean mixture is cooked test a chickpea, as they take the longest to cook. The chickpea should be tender with no grainy or chalky texture to it.
  • Once the bean mixture is cooked, add the chopped greens and allow the Ash to simmer for about 30 mins for the greens to wilt. If the Ash is too thick after the greens have wilted, add some water. The texture of the Ash should be thicker than soup like a chilli but not so thick it feels like there is no liquid in it.
  • Then add the noodles - you can snap these to the length you desire. I like mine fairly long so I snap mine in half, if at all. Allow the Ash to cook with the noodles for about 20 to 30 mins. Test a noodle to see if cooked to you preferred texture - we tend to have ours very soft.
  • Then add the kashk 1 spoonful at a time and mix it fully into the Ash. Taste as you go along. Some put less kashk into their Ash and add more to their liking by way of a garnish.
  • As kashk is salty, add any extra salt to your taste and a generous amount of pepper. Then give the Ash a gentle stir and simmer on a low heat until it is evenly heated through.

For the Garnish

  • You can prepare the mint oil and fried onions in advance of / or during the cooking of the Ash.
  • For the mint oil - place a frying pan on a low heat and add 2 tbsp of oil and 2 tsp of dried mint and let the mixture heat through for only 1 minute. Then pour it out into a bowl and set aside for when you are ready to garnish the Ash.
  • For the fried onions - wipe the frying pan used to make the mint oil and place it on a medium heat. Add the remaining oil and let it heat through for about 1 minute. Then add the finely sliced onion and a pinch of salt. Cook, stirring regularly until it turns golden brown and caramelized - about 20 mins. Place the onions on a paper towel to absorb the oil and set aside for when you are ready to garnish the Ash.
  • When you are ready to serve, ladle into bowls, drizzle with some of the diluted kashk, the mint oil and a sprinkling of onions.

Notes

*You can use pre cooked tinned beans and lentils. Use 1 x 400 gram tin of each.

Kashke Bademjan (Persian Aubergine Dip with Kashk)

Deliciously moreish, you only need a few ingredients to make this traditional garlicky Persian aubergine dip. A great addition to a mezze or as an appetiser.

What is Kashke Bedemjan?

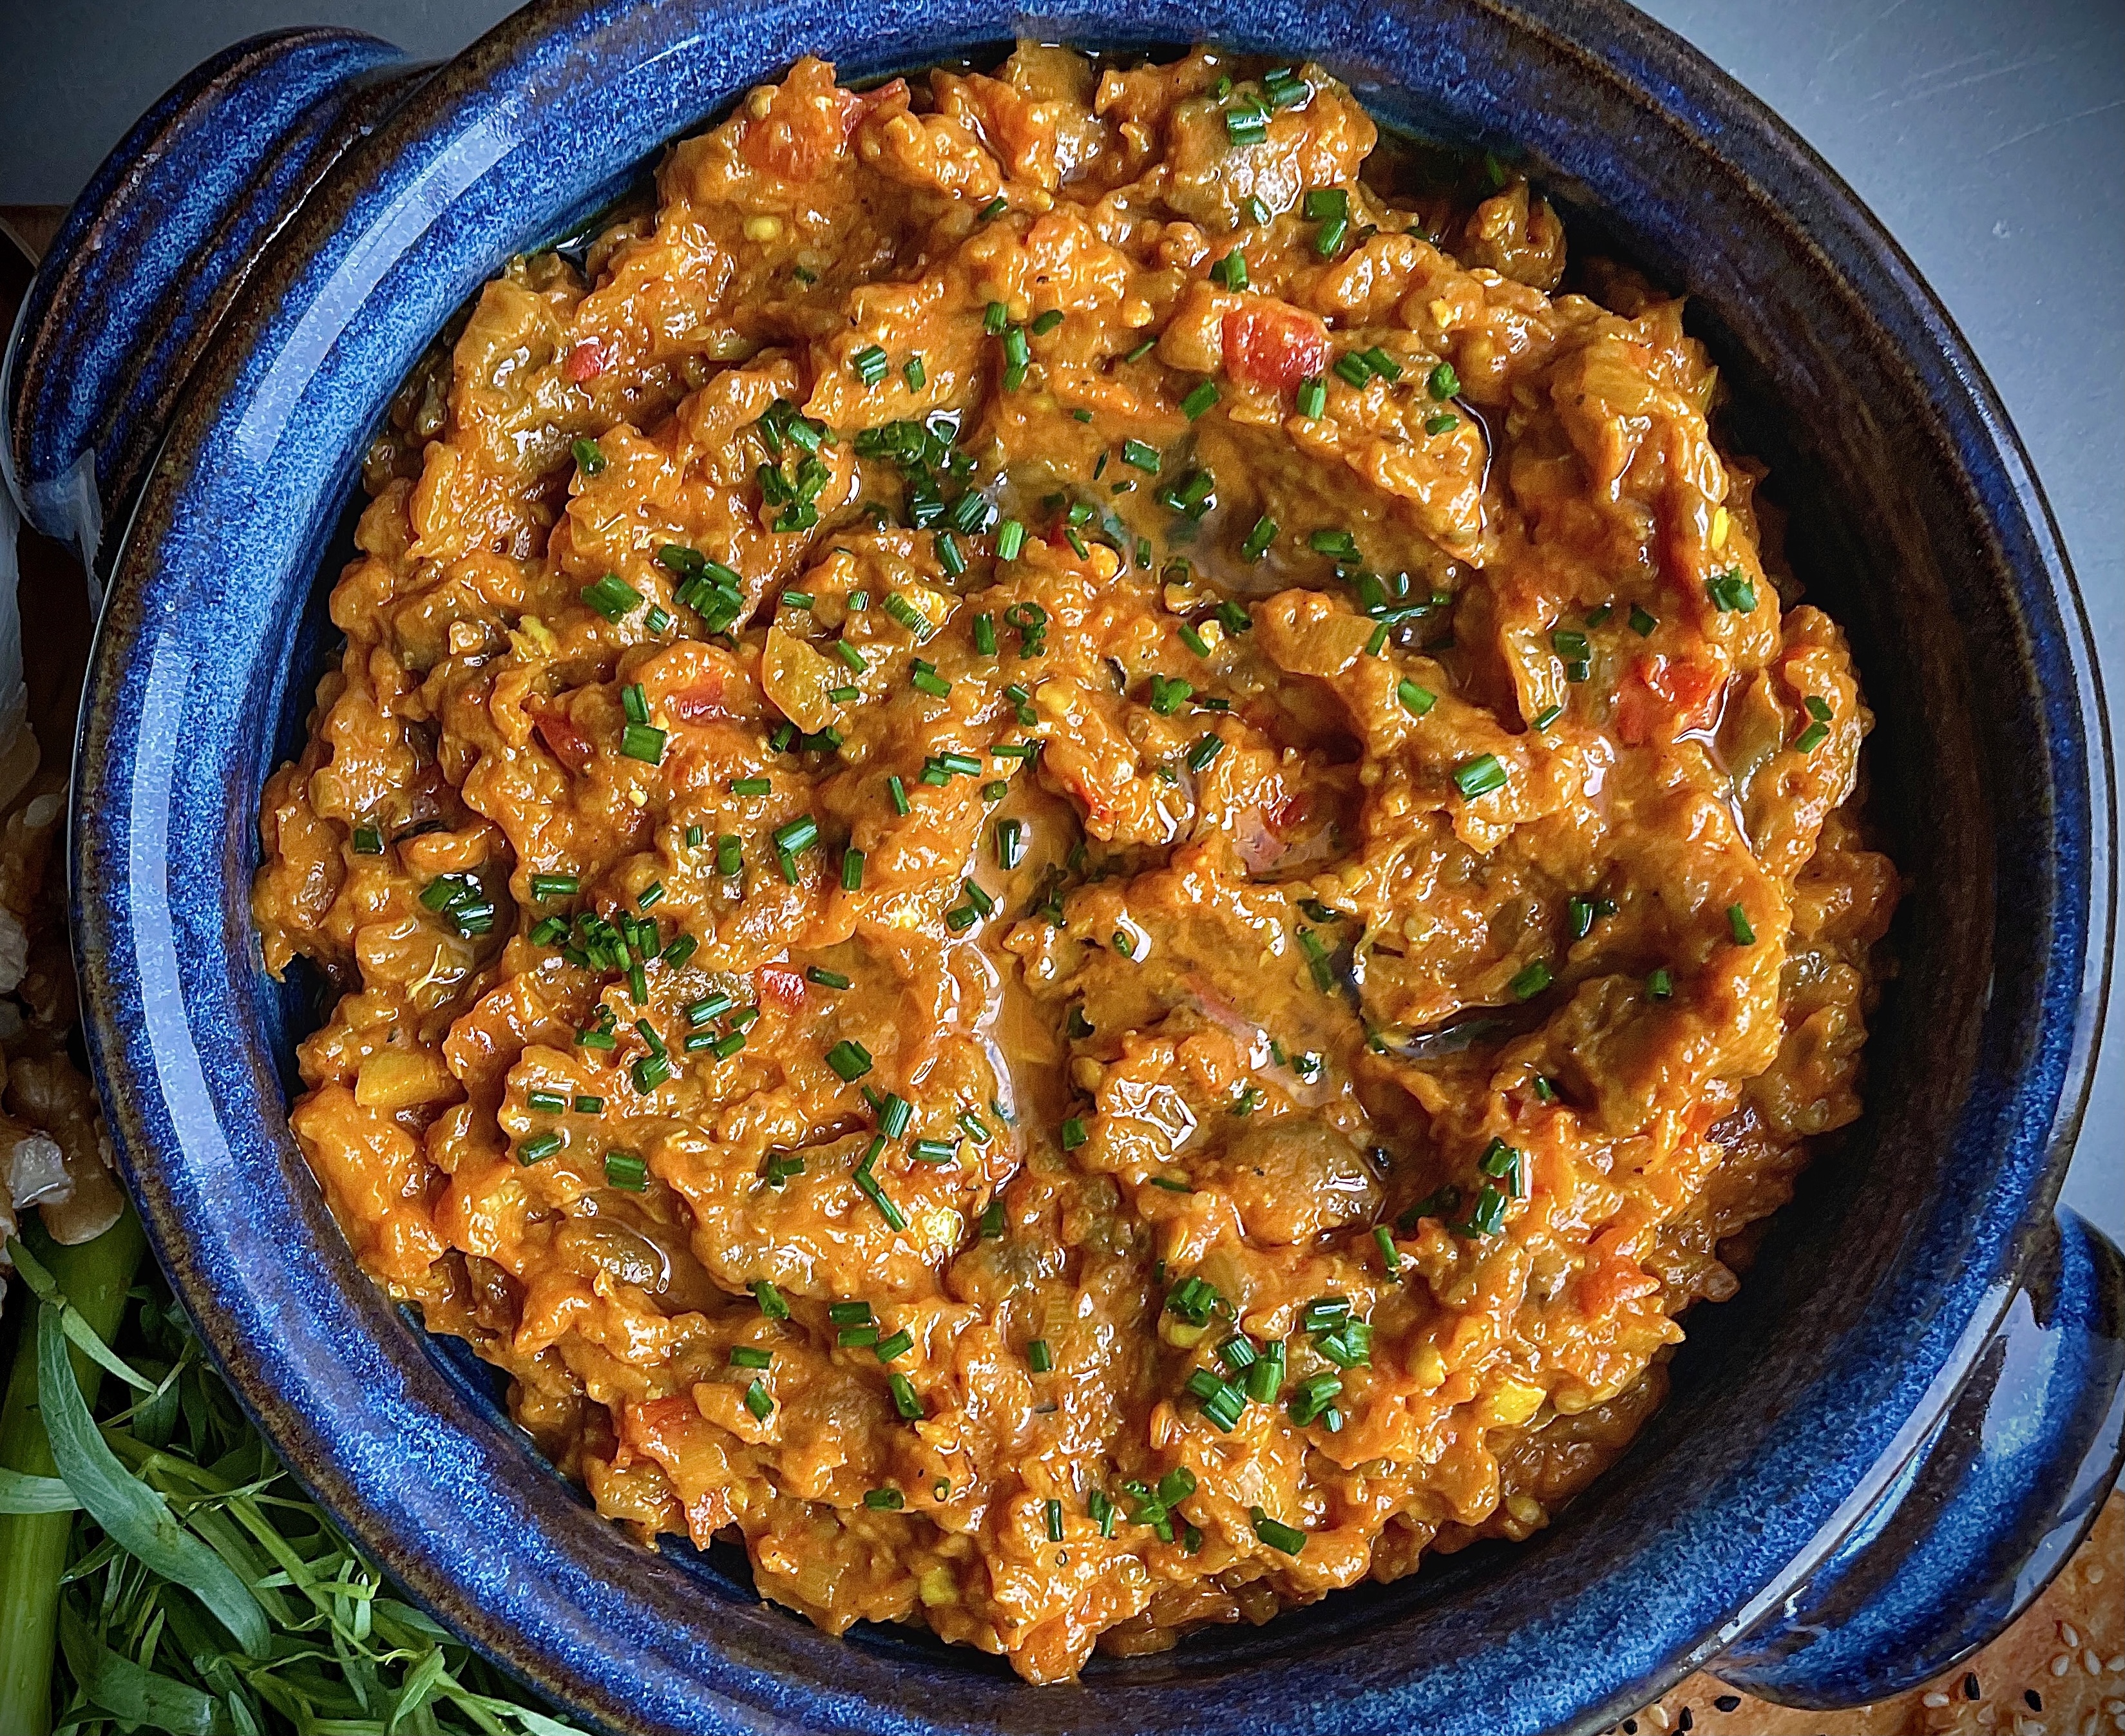
This dish literally translates as ‘kashk and aubergine.’ It is a dip make with aubergine, which is cooked and flavoured with turmeric, onion and lots of garlic. Kashk is mixed through to give a slightly tart and creamy flavour. The dip is then topped with mint oil, kashk, crushed walnuts and cispy onions. It is a unique tasting dip with its rich and earthy tones.

What is Kashk?

Kashk is a range of fermented dairy products used in Iranian, Turkish, Balkan and Arab cuisines. Kashk has been a staple in the Persian diet for thousands of years.

Persian “kashk” is a fermented / preserved food that comes in liquid or dried form. It is traditionally made with the whey left over from cheese-making. It is used in dishes like Ash Reshteh (a herb, lentil, bean and noodle soup) and Kaleh Joosh (a soup made with walnuts, onions and mint). In its dried form it needs to be soaked and softened before it can be used in cooking.

The taste of kashk is distinctive and almost indescribable. It is well worth purchasing and not substituting with an alternative, such as yoghurt. Kashk provides a sour, salty, creamy and slightly cheesy flavour to the dishes it is added to.

When I was growing up, my maman used dried balls of kashk which she would soak in a bowl before adding it to a recipe. Apparently before she knew she was pregnant with my sister, a relative surmised she was as she saw her sucking on kashk like they were sweets! Nowadays, you can buy kashk in liquid form in jars from Middle-Eastern food shops or online. I use Kambiz Kashk and buy it online here or by popping into a local Middle-Eastern supermarket.

Variation to the Recipe Below

I fry the aubergines, as do most Iranians when they cook this dish. But you can oven roast the aubergine, if you prefer. Brush them with a little oil and roast for 30 – 40 minutes or until they are cooked through and soft (oven temp – 180°C (fan) / 200°C (conventional) / Gas Mark 6). If you roast your aubergine, you will need to add a little oil to your frying pan to cook the garlic step 5 and 6 below).

How to Serve this Dish

In our family we tend to serve it as a starter with flatbread at our larger family gatherings. At home, as a family of 3, we eat it as a main course with a hearty salad like tabbouleh, Nan-e Barbari (Persian Flatbread) and some fruit for afters as pictured.

Other Delicious Dips

Check out these other great dip recipes.


Kashke Bademjan

Aubergine dip with kashk
Prep Time30 minutes
Cook Time1 hour
Total Time1 hour 30 minutes
Course: Main Course, Appetiser
Cuisine: Persian, Iranian
Keyword: kashk-e bademjoon, kashke bademjan
Servings: 4
Author: Mersedeh Prewer

Ingredients

  • 1 cup Vegetable oil (plus more if required)
  • 3 large aubergines
  • 2 large onions (sliced very finely)
  • 5 cloves garlic (crushed or minced)
  • 1 tsp turmeric
  • 250 ml water
  • 2 tbsp kashk (plus a little more diluted in a little water for the garnish / topping design)
  • 1 tsp dried mint
  • 1 tbsp ground walnuts (for garnish)
  • 1/8 tsp ground saffron (bloomed in 2 tsp of water - for decorating the dish - optional)
  • Salt and pepper (to taste)

Instructions

Prepare the Aubergines

  • Peel the aubergines and cut them lengthwise (approximately 1 inch thick slices). Salt them and leave them in a colander for 30 minutes to remove some of the water content.

Make the Mint Oil & Crispy Onions

  • In the meantime, take 2 tsp vegetable oil and heat in a small pan on low heat with 1/2 tsp dried mint. Let it infuse on low heat for 10 seconds and then remove and leave until ready to garnish the dish. Be careful not to burn the mint.
  • Place a large frying pan on medium-low heat. Add 2 to 3 tbsp oil and add onions with a pinch of salt. Fry them gently until they caramelise and start to turn a little crispy. Be careful not to burn them otherwise they will be bitter. Once cooked, remove them and place them on an absorbent paper towel for use later.

Cook the Aubergines

  • Add half of the remaining oil to the frying pan and fry aubergines in batches until they are golden brown. Top up the oil in the pan, if required. Using the back of a fork press down on the aubergine while it is frying to aid the process. When cooked, remove the aubergines from the pan and place them on an absorbent paper towel on a plate for use later.
  • You can re-use the pan you fried the aubergines in for cooking the next stages but if you do, make sure you give it a wash. Place pan on medium-low heat. Some oil will have formed on the top of your aubergine, drip this into the pan - just enough to sauté the garlic.
  • Add the garlic and let it sauté for only 10 seconds. Then add aubergines and stir until it has mixed with all the garlic. Add turmeric and 125 ml of water and stir. Then mash the aubergines using a fork or potato masher. Add the rest of the water (125ml) and mash and stir further until it has a stringy texture.
  • Add 1/2 tsp dried mint, half of the onions (reserve some of the fried onions for the topping / garnish) and 2 tbsp kashk. Mix until everything is fully incorporated. Taste the mixture and then season further with salt (if required) and pepper. Let mixture gently heat through and stir occasionally. The dish only needs to be warm for serving.

Garnish & Serve the Dish

  • Turn heat off and spoon aubergine mixture into a serving dish. Spoon off any extra oil which may have formed on top before garnishing. Garnish with fried onions, diluted kashk, saffron water (you can mix some of the kashk with the saffron water to make a yellow kashk as I have in the picture above), mint oil and ground walnuts in any design you like. Serve with flatbreads and salad.

Kateh-e Estamboli (Persian Easy Cook Tomato Rice)

A simple and comforting vegetarian dish made by steaming rice layered with an aromatic tomato, onion and potato mixture. A great mid-week meal option when served with fried eggs and yoghurt.

What is Kateh-e Estamboli?

This recipe is an adaptation of the dish ‘Estamboli Polo.’ A rice dish that comes in many different iterations. Some do a vegetarian version. Others include meat. Some include green beans. Some don’t use potatoes. My version is a vegetarian version with onions, potatoes and tomatoes layered through the rice. In addition, as found in most Persian cooking, turmeric and saffron provide the rich flavour to this rice dish. I have added some extras to my version including garlic, parsley and coriander for extra flavour.

I wanted a quick version of this dish for my family. Instead of using the traditional method of cooking Estamboli Polo by draining the rice after par-boiling, I used the kateh method. Simply boiling and steaming the rice without draining the water. The resulting rice is delicious, quick and involves less washing up. Also it still creates tahdig – the crispy rice at the bottom of the pot.

How to Serve this Dish

Perfect when accompanied with a salad like Salad Shirazi, or Maast O’Khiar (Persian yoghurt, mint and cucumber dip), or torshi and/or fried eggs.

How to Store Leftovers

Make sure the rice has completely cooled down, then store in an airtight container in the fridge up to 5 days.


Kateh-e Estamboli

An easy-cook vegetarian rice with potatoes, tomatoes, onions
Prep Time15 minutes
Cook Time1 hour 15 minutes
Total Time1 hour 30 minutes
Course: Side Dish, Rice Dish, Accompaniment
Cuisine: Persian, Iranian
Keyword: vegetarian, vegan option
Servings: 4
Author: Mersedeh Prewer

Ingredients

  • 2 tbsp vegetable oil
  • 200 g potatoes (peeled and diced into small cubes)
  • 1 medium onion (finely diced)
  • 2 cloves garlic (crushed) (optional)
  • 1 tsp turmeric
  • 1 tbsp tomato purée
  • 350 g fresh tomatoes (chopped)
  • 1/8 tsp ground saffron (bloomed in 2 tbsp of water)
  • 15 g each of fresh chopped parsley and coriander (optional)
  • Salt and pepper (to season potato and tomato mixture)
  • 2 cups white long grain basmati rice (approximately 400g of rice)
  • 650 ml vegetable stock
  • 1 tsp salt (for the rice)
  • 1 tbsp butter / ghee / vegetable oil

Instructions

  • Gently wash rice in cold water until water runs clear. Place in a bowl and fill with cold water to 2 inches above the rice. Let the rice soak for a minimum of 30 mins (preferably overnight).
  • Take a saucepan and add 2 tbsp vegetable oil and place on a medium / high heat. Add diced potatoes and fry until they turn golden and a little crispy. Then add onions and fry until they soften and turn translucent.
  • Then add the garlic, turmeric and tomato purée and stir until evenly distributed in the mixture. Add chopped fresh tomatoes, the bloomed saffron, fresh herbs and seasoning. Stir and cook for a few minutes. Turn heat off and leave mixture until you are ready to add to rice.
  • Drain and put rice in a saucepan and add vegetable stock and 1 tsp salt (I use a standard UK 20 cm saucepan with a glass lid, 2.5 litre capacity).
  • Put the saucepan on high heat until water starts to boil. Once water comes up to the boil, turn heat to medium and add butter /ghee / oil and stir gently to mix. 
  • Once you start to see holes forming in the rice (as the water is evaporating), take the temperature down to the lowest setting. Take potato and tomato mixture and pour into the rice. Gently stir into the rice mix whilst trying to avoid breaking the rice grains.
  • Take a clean tea towel and wrap the lid of the saucepan, making sure it is not a fire hazard. Place the lid on the saucepan. The tea towel will help the steaming process and soak up the water, preventing it from falling back into the rice and making it mushy. Leave the rice cooking for 45 mins or more. The longer you leave it, the better the crispy layer that forms at the bottom of the pot (tahdig).
  • Once you have come to the end of the cooking time (45 mins or more with the lid on), turn off heat and dish up the rice on to your plates or serving dish. Plate up your tahdig as well. Serve with salad or yoghurt, and / or eggs.

Kuku Sabzi (Persian Herb Frittata )

A traditional Persian frittata dish, densely packed with fresh herbs with a crunch provided from walnuts and a little tartness from barberries in each mouthful. This delightful dish is commonly eaten during Persian New Year celebrations (Norooz).

What is Kuku Sabzi?

Kuku Sabzi is a frittata-style dish traditionally made with eggs, turmeric, coriander, parsley, dill, chives, barberries and crushed walnuts. It is usually fried and then sliced into triangles. You can serve it either hot or cold as a starter, side dish or a main course. It can be accompanied with bread or rice and either yogurt or salad.

The key difference between a kuku and a frittata is the egg to vegetable ratio, with the kuku favouring the latter.

Kuku Sabzi and Norooz

Kuku Sabzi is eaten during the celebrations for Persian New Year (‘Norooz’). Norooz is the day of the vernal equinox, and marks the beginning of spring in the Northern Hemisphere. It usually falls on 21 March each year. This festival dates back over 3000 years and is rooted in the ancient Persian religion of Zoroastrianism.

It is estimated that Norooz is celebrated by over 300 million people including communities in Afghanistan, the Kurdish regions of Iraq and Turkey, Parsis in India, and their related diaspora around the world.

The herbs in Kuku Sabzi symbolise rebirth, and the eggs symbolise fertility. We serve it alongside Sabzi Polo ba Mahi (Persian herbed rice and fish).

How this Recipe Differs

  • This version of Kuku Sabzi is baked, which makes for a healthier dish.
  • British chives are not as spicy as Iranian chives so replace these with the green ends of spring onions.
  • The addition of baby spinach leaves results in a bright green kuku.

As with the traditional recipe, barberries are added to the kuku mixture. This gives a tart burst of flavour from the berries with each bite. You can buy barberries from most Middle-Eastern food shops or, alternatively, buy them online. I also add coarsely ground walnuts to the mixture to give a little crunch to the kuku.

Some Tips for cooking Kuku Sabzi

To prepare the herbs, wash them and remove the toughest parts of the stems. There is no need to remove all the leaves from all the stems if you have a food-processor to chop the herbs finely for you. Dill and parsley will require a bit more time removing the tough stems unlike coriander which you can usually chuck in and blitz.

Silicon baking moulds are excellent for baking kuku but if you don’t have any, use a standard muffin tin but make sure you grease and line it properly.

How to serve Kuku Sabzi

Serve alongside vibrant Beetroot Borani (yoghurt and beetroot dip) as pictured. You can find the recipe for this delicious dip here.


Kuku Sabzi Instagram Reel


Kuku Sabzi

Persian herb frittata
Prep Time10 minutes
Cook Time25 minutes
Total Time35 minutes
Course: Main Course, Appetiser
Cuisine: Persian, Iranian
Keyword: vegetarian, egg recipes
Servings: 12 (mini kuku)
Author: Mersedeh Prewer

Ingredients

  • 100 g fresh parsley (washed and tough stems removed)
  • 100 g fresh coriander (washed and tough stems removed)
  • 100 g fresh dill (washed and tough stems removed)
  • 5 spring onions (green ends only)
  • 1 handful baby spinach leaves
  • 3 tbsp olive oil (1 tbsp for greasing your muffin tin, 2 tbsp for the kuku mixture)
  • 1/2 tsp turmeric
  • 2 cloves garlic
  • Zest of 1 lime
  • 6 large free range eggs
  • Salt and pepper (to taste)
  • 1 tbsp self-raising flour (heaped tbsp)
  • 1 tbsp dried barberries (optional)
  • 1 tbsp ground walnuts (to garnish - optional)

Instructions

  • Pre-heat oven to 160°C (fan) / 180°C (conventional) / Gas Mark 4.
  • Take a 12-hole muffin tin, grease (using 1 tbsp olive oil) and line holes with baking paper. Brush a little olive oil into each recess after lining and leave to one side until ready to use.
  • Put herbs, spinach and spring onion ends into food processor and pulse until the herbs are finely chopped. Then add eggs, turmeric, garlic, lime zest, olive oil, self-raising flour, salt and pepper and pulse food processor until fully incorporated.
  • Add barberries and coarsely chopped walnuts (if using) to the mixture and stir.
  • Take muffin tin and spoon the mixture evenly between the 12 holes.
  • Place in oven for 25 mins. To check if  the kuku are done, use a thin skewer / tip of a knife to check one by gently poking to the bottom. It should come out clean.
  • Serve warm or cold, sprinkled with ground walnuts and barberries alongside a salad, dips and bread as part of a mezze-style meal.


Kuku Sibzamini ba Laboo (Potato & Beetroot Mini Frittatas)

These Persian mini frittatas made with potatoes, beetroot and feta are full of flavour and incredibly easy to make. Serve either warm or cold with flatbread and yoghurt as part of a mezze platter.

What is Kuku?

Kuku is a Persian frittata-style dish. Usually vegetarian, it is made with beaten eggs, herbs or vegetables folded in. The main difference between kuku and its western counterparts is the ratio of egg to vegetables, with kuku favouring the latter.

Types of Kuku

The two most well known kuku recipes are Kuku Sabzi (made with herbs, barberries and walnuts); and Kuku Sibzamini (made with potatoes). We also have Kuku Kadoo (made with courgettes). There are no hard and fast rules about what you should put in your kuku. I have made ones with curried mushrooms; kale and red pepper; cheese and tomatoes; and the list goes on.

What is in Kuku Sibzamini ba Laboo?

The traditional Kuku Sibzamini recipe is made using mashed potatoes, grated onion, turmeric, saffron, dried mint and egg. The mixture is then made into patties and fried.

This recipe is my variation to Kuku Sibzamini. I have added beetroot, garlic and feta to the recipe. The resulting kuku has a vibrant colour and delicious depth to the flavour. I also bake the kuku instead of frying.

Always use fresh and good quality ingredients. Make sure the feta you use is block feta in brine and not crumbled. My favourite brand is Aytac.

How to Serve Kuku Sibzamini ba Laboo

It is a great addition to a mezze platter or a sandwich filler. You can serve it either hot or cold; as a starter, side dish or a main course. Serve kuku with flatbread, yoghurt and/or salad. The picture below is one of our kuku platters.


Kuku Sibzamini ba Laboo

Potato & Beetroot Mini Frittatas
Prep Time15 minutes
Cook Time45 minutes
Total Time1 hour
Course: Main Course, Appetiser
Cuisine: Persian, Iranian
Keyword: vegetarian, egg recipes
Servings: 12 (mini kuku)
Author: Mersedeh Prewer

Ingredients

  • 3 tbsp olive oil (1 tbsp for greasing the muffin tin and 2 tbsp for the kuku mixture)
  • 500 to 600 g potatoes (peeled, boiled and mashed - use potatoes suitable for mashing such as Desiree or Maris Piper)
  • 1 medium / large beetroot (boiled, peeled and grated with excess water squeezed out)
  • 80 g feta or equivalent (crumbled or cut into small chunks)
  • 1 small / medium onion (grated with excess liquid squeezed out)
  • 2 cloves garlic (minced)
  • 1 to 2 tsp dried mint
  • 1 tsp turmeric
  • 4 large free-range eggs
  • Salt and pepper (to taste)

Instructions

  • Pre-heat oven to 160°C (fan) / 180°C (conventional) / Gas Mark 4.
  • Take a 12-hole muffin tin, grease (using 1 tbsp of olive oil) and line holes with baking paper. Brush a little olive oil into each recess after lining and leave to one side until you are ready to use.
  • Mix all ingredients for the kuku (mashed potato, grated beetroot, grated onion, crumbled feta, garlic, mint, turmeric, eggs, remaining 2 tbsp olive oil, salt and pepper) in a mixing bowl.
  • Take muffin tin and spoon mixture evenly between the 12 holes.
  • Place in oven for 25 mins. To check if kuku are done, use a thin skewer / tip of a knife to check one by gently poking to the bottom. It should come out clean.
  • Serve warm or cold with salad, dips and flatbread as part of a mezze platter / meal.

Khoresh Beh ba Aloo (Persian Chicken & Quince Stew)

A seasonal stew made with slow cooked chicken, quince, sour plums and apricots. Deliciously sweet and sour and warming from the saffron and cinnamon aromatics.

What is Khoresh Beh ba Aloo?

Chicken is slow-cooked in a saffron and turmeric-infused sauce with apricots, sour plums and quince to give an amazing sweet and sour flavour.

This khoresh (stew) is not as well-known as other stews from Iran such as Ghormeh Sabzi (lamb stew with herbs and dried limes) or Fesenjoon (chicken stew with pomegranate molasses and walnuts). This is probably due to the hero ingredient of the stew – quince. Quince is in season between October and January in the UK and during these months I suspect most Iranian households (like my family) will try to cook this dish a few times before the season ends.

What is Quince?

Quince is the fruit from a deciduous tree. It has a similar appearance to a pear but the fruit is generally not eaten raw but processed. Many of you may be familiar with quince being used to flavour gin, eaten as a paste with cheese or made into jam.

For those of you new to quince, let me tell you about this lovely fruit. It is a member of the apple and pear family. It has a yellow, lumpy hard flesh with a bitter flavour when raw. Due to the unpalatable flavour when raw, quince is generally consumed after cooking. When cooked, quince becomes soft and dense and develops a sweet, slightly tart flavour with hints of apple, pear, and citrus. Quince can last up to several weeks if stored in a fridge.

Origins of this Dish

The best quince is grown in Esfahan in Iran and unsurprisingly the dish originates from this beautiful city. There are a few variations of this khoresh  with some cooking it with lamb; using tomato purée; adding lentils. The recipe I have shared below results in a sweet and sour stunning golden stew, an unusual colour by comparison to the other stews we Iranians cook.

Ingredients in Khoresh Beh ba Aloo

This dish is delightfully easy to cook with minimal preparation. The final dish is comforting and loved by adults and children alike, so it is a great family recipe.

  • Butter / Ghee and Vegetable Oil: to cook various elements of the stew such as the quince and onions.
  • Quince: available at most South Asian or Middle Eastern supermarkets when in season.
  • Chicken Thighs: skinless chicken thighs on the bone are the best cut for stews.
  • Onion: used as the basis of most stews including meat.
  • Turmeric, Saffron and Cinnamon: provides a warming and earthy flavour profile to the stew. The turmeric and saffron also provide the golden hue to the dish.
  • Water: the cooking liquid. Vegetable or chicken stock can also be used.
  • Corn flour: to thicken the stew.
  • Honey: to sweeten and balance the tartness of the quince and sour plums.
  • Dried Apricots: available in local supermarkets. Soak them before adding them to the stew.
  • Dried Bukhara Sour Plums: deliciously tart and will need to be soaked overnight before adding to the stew. You can buy them online or from most South Asian or Middle Eastern supermarkets.
  • Salt and Pepper: to season the dish.

How to Serve Khoresh Beh ba Aloo

Serve this khoresh with Chelow (Persian steamed rice) and Salad Shirazi. Alternatively, serve it with a parsley mash and steamed green vegetables or just eat it with crusty bread.


Khoresh Beh ba Aloo

Chicken stew with quince, sour plums and apricots
Prep Time10 minutes
Cook Time1 hour 20 minutes
Total Time1 hour 30 minutes
Course: Main Course
Cuisine: Persian, Iranian
Keyword: chicken, quince, apricots, sour plums
Servings: 4
Author: Mersedeh Prewer

Ingredients

  • 1 tbsp butter or ghee
  • 2 medium quince (halved, sliced 1.5 inch thick and with core taken out)
  • 3 tbsp vegetable oil
  • 8 chicken thighs or a whole large chicken (approx. 2 kg - quartered) (on the bone, skin removed)
  • 1 onion (finely diced)
  • 1/4 tsp turmeric
  • 1/4 tsp ground saffron (bloomed in 2 tbsp of water)
  • 1 cinnamon stick
  • 500 ml water
  • 1 heaped tsp corn flour (dissolved in 1 tsp of cold water)
  • 3 tbsp honey
  • 15 small dried apricots (soaked in hot water overnight)
  • 20 dried bukhara sour plums (soaked in hot water overnight)
  • Salt and pepper (to taste)

Instructions

  • Take a frying pan, add butter and place on medium-high heat. Once the butter has melted, fry quince until caramelised on each side. Place them on a plate and put to one side.
  • Season chicken. Add 1 tbsp oil to the same frying pan and seal the chicken. Then place on a plate and put to one side.
  • Take a large casserole dish with a lid (minimum 3.5 litre capacity). Add 2 tbsp of oil and place on a medium / high heat. Then add diced onions and fry until translucent.
  • Add turmeric and stir until evenly distributed. Add chicken thighs, then add water and bloomed saffron. Add the corn flour paste. Season sauce to taste. Add cinnamon stick.
  • Drain apricots and sour plums from the water they have soaked in and add to pan with honey. Stir gently and distribute the fruit evenly across pan.
  • Arrange quince in the saucepan. Quince cooks very quickly and can be quite mushy so arrange the quince so it partially rests on the thighs. Once the liquid starts to bubble, turn the heat down to low and place the lid on the pan. Let the stew simmer for 40 mins to 1 hr or until chicken is tender and falling off the bone. Prior to serving, taste the stew and season further if required.
  • Serve with chelow and Salad Shirazi; or mashed potatoes and some steamed green vegetables; or crusty bread.


Zereshk Polo ba Morgh (Barberry Rice & Saffron Chicken)

Steamed rice with a layer of sweetened barberries served with a saffron roasted chicken. This dish is a real Persian classic and one that most Iranians cherish!

It definitely tops my list of Persian comfort foods, reminding me of my childhood and the big family gatherings my mother would host.

What is Zereshk Polo ba Morgh?

Zereshk polo is Persian steamed rice, layered and/or topped with barberries. It is a sweet and sour dish. The barberries are gently sautéed on a low heat with sugar and bloomed saffron water before being added to the rice.

Where rice dishes are referred to as ‘polo’ (pronounced ‘pawlaw’) it usually indicates that the rice has been mixed with some other ingredient. Our plain white rice, served with our kebabs and khoresh (stews) is referred to as ‘chelow.‘ In the case of this dish, barberries are the additional ingredient. 

Barberries are edible red berries which grow in the wild in Europe and West Asia. They are rich in vitamin C and tart in flavour. They are called ‘zereshk’ in Persian and are bought and used in their dried form. You can buy zereshk from most Middle-Eastern food shops or online.

‘Morgh’ means ‘chicken’ in Persian and refers to the accompanying protein served with the rice. It is commonly served with poached saffron chicken or chicken stewed in a saffron sauce and either layered through the rice or on the side. Some Persian restaurants serve it with Jujeh Kabab (grilled chunks of chicken, marinated in onion, lemon juice and saffron). Either way, you must be getting a sense that some kind of saffron flavoured chicken complements this sweet and sour rice dish! 

My Version of Zereshk Polo ba Morgh

My mother and other members of our family would always poach chicken breast and layer it in the zereshk polo. I appreciate now that, when cooked for too long, this cut of meat can be quite dry. My recipe below uses chicken breast but the cooking method ensures it remains juicy. I generally source chicken from a butcher (online or the old-fashioned method of dropping into a local establishment).

For this recipe I bought chicken breasts with the skin left on and a partial wing (the drumette) in tact. I marinate the chicken overnight, pan fry them and then finish it off in the oven as per the recipe instructions below.

You can also eat this rice with saffron stewed chicken (see picture below). I will post a recipe for this in due course, but for now the recipe below is a homage to the dish I grew up with. The recipe below will also result in the delicious crispy rice formed at the bottom of the pot (tahdig). Tahdig adds a lovely crunchy texture to the dish.

How to Serve Zereshk Polo ba Morgh

Because of the layer of barberries and saffron rice, the key to serving this dish is to spoon the rice out on to a platter (as seen in the pics). The tahdig is usually served separately as a side dish.

Serve this dish with:
  • A mix of fresh herbs (coriander, parsley, mint, chives, tarragon and Thai basil).
  • Torshi (Persian pickles).
  • Maast O’Khiar (Persian yoghurt and cucumber dip).
  • Salad Shirazi (Persian chopped cucumber, tomato and onion salad).


Zereshk Polo ba Morgh

Barberry Rice and Saffron Chicken
Prep Time15 minutes
Cook Time1 hour 15 minutes
Total Time1 hour 30 minutes
Course: Main Course, Rice Dish
Cuisine: Persian, Iranian
Keyword: family recipes, chicken, saffron
Servings: 4
Author: Mersedeh Prewer

Ingredients

For the Saffron Chicken

  • 4 Chicken Breasts (with skin and drumette - see note above about cut)
  • 1 medium Onion (finely sliced)
  • 1 tbsp tomato purée
  • 1 tbsp Greek yoghurt
  • 2 tbsp olive oil (for the marinade)
  • 1/2 tsp turmeric
  • 1/8 tsp ground saffron (bloomed in 2 tbsp of water)
  • 1/2 lemon (juice squeezed)
  • Salt and Pepper (to season)
  • 25 g butter (to cook the chicken)
  • 2 tbsp olive oil (to cook the chicken)

For the Rice

  • 2 cups white long grain Basmati rice (approx. 400g)
  • 2 tbsp salt
  • 2 tbsp vegetable oil
  • 2 tbsp ghee or butter
  • 1/8 tsp ground saffron (bloomed in 2 tbsp of water for the tahdig - crispy rice formed at the bottom of the pot)
  • 1/4 tsp ground saffron (bloomed in 2 tsp of rose water and 2 tbsp of water for the saffron rice garnish)

For the Barberries

  • 5 tbsp barberries (washed)
  • 2 tbsp caster sugar (feel free to add more if you want it sweeter)
  • 1/8 tsp ground saffron (bloomed saffron in 2 tbsp of water)
  • 2 tbsp caster sugar

Instructions

Preparation

  • Chicken – take chicken breasts and place in large bowl. Add onion, tomato purée, yoghurt, olive oil, turmeric, saffron and fresh lemon juice. Mix until evenly coated. Cover and leave in fridge to marinate for minimum 8 hrs (preferably overnight).
  • Rice – gently wash rice in cold water until water runs clear. Then place rice with 1 tbsp salt in a bowl and pour in cold water to cover up to 2 inches above. Leave to soak for minimum 30 mins (preferably overnight).
  • Barberries – take a small saucepan, place it on low heat and add 1 tbsp butter. Once melted, add barberries, sugar and bloomed saffron water and stir for 30 secs. Turn heat off and set aside for later.

Cooking the Rice

  • No less than 1 hour before you want to serve this dish, fill a large non-stick saucepan (minimum capacity 2.5 litres) with approximately 1.5 litres water and 1 tbsp salt. Bring water to boil.
  • Drain rice and then add to saucepan. Gently stir rice to make sure it does not stick to the pan. Every minute give it a gentle stir and take a grain of rice and check the texture – either between your fingers or using your teeth. What you want is a soft outer layer but still firm in the centre i.e. al dente. It can take any time from 3 to 7 minutes with the quantity of rice in this recipe.
  • Once parboiled rice reaches the correct texture, turn heat off and drain in a colander or sieve. Sprinkle a little cold water to halt the cooking process. Taste the rice – if it is very salty then rinse further with a little water.
  • Place empty saucepan on stove. Add 2 tbsp oil to pan. Add bloomed saffron (1/8 tsp bloomed saffron in 2 tbsp water) to saucepan and mix with oil to distribute evenly (this will give a lovely golden colour to your tahdig).
  • To make tahdig, spoon 1-inch layer of rice into saucepan and gently stir to mix with saffron oil to ensure colour is distributed evenly. Then pat down flat with spoon. Then layer the rest of the rice, reserving 5 tbsp in a separate bowl, into a gentle sloping pyramid shape and poke a few holes in it. 
  • Take bloomed saffron (1/4 tsp of saffron bloomed in 2 tsp rose water and 2 tbsp water) and add to the bowl with the reserved rice. Mix gently to create a golden coloured rice. Then spoon the golden rice into the saucepan to one side of the white rice.  Do not mix it. This saffron coloured rice will be your garnish.
  • Pour 2 tbsp cold water evenly over and drizzle 2 tbsp melted ghee or butter over rice. Place glass lid on saucepan and turn heat to highest setting. Once steam starts to rise, lower heat to lowest setting. Cover the lid with a tea towel (making sure it is not a fire risk) and replace on saucepan.
  • Allow to steam for a minimum of 45 mins to get a crunchy layer of tahdig – the longer you steam the rice the thicker the tahdig.

Cooking the Chicken

  • Approximately an hour before you want to serve this dish and just before you launch into cooking your rice, remove chicken from fridge and bring up to room temperature.
  • Preheat the oven to 180˚C (fan) / 200˚C (conventional) / Gas mark 6.
  • Approximately 30 mins before the rice has completed the cooking process, take chicken and generously season both sides with salt and pepper. Discard the rest of the marinade including the onion.
  • Place a non-stick pan over high heat. Once smoking add a drizzle of olive oil and place chicken breasts skin down in pan. Cook on this side for 5 minutes or until the chicken skin is golden and crisp.
  • Flip over and add 25 grams of butter split into small knobs. Once melted, baste the chicken with the foaming butter for 1 min. Then flip so they are skin side up again.
  • Place in oven and cook for 15–20 mins. The flesh should be firm and white (not pink) and the juices should run clear. A temperature probe should read 75˚C when it is safe to eat. Rest for 5 minutes before serving.

Serving the Dish

  • Once rice has completed its cooking time, turn off heat and remove lid from saucepan. Spoon the saffron-coloured rice out first into a separate bowl and reserve until you are ready to garnish. Spoon the rest of the rice onto a serving dish and plate up your tahdig separately. Then sprinkle the saffron rice over the white rice.
  • Reheat your barberries for 30 seconds on low heat, remove from and turn off the heat, and then spoon over the rice.
  • Serve the rice with the chicken, tahdig, a side of fresh herbs and / or Salad Shirazi and / or Maast O'Khiar and/or torshi.


Garni Yarikh (Stuffed Aubergines in a Tomato Sauce)

A vegan version of a dish cooked by both the Turkish and Iranians. Aubergines stuffed with lentils cooked in a tomato and saffron sauce.

Origins of this Dish

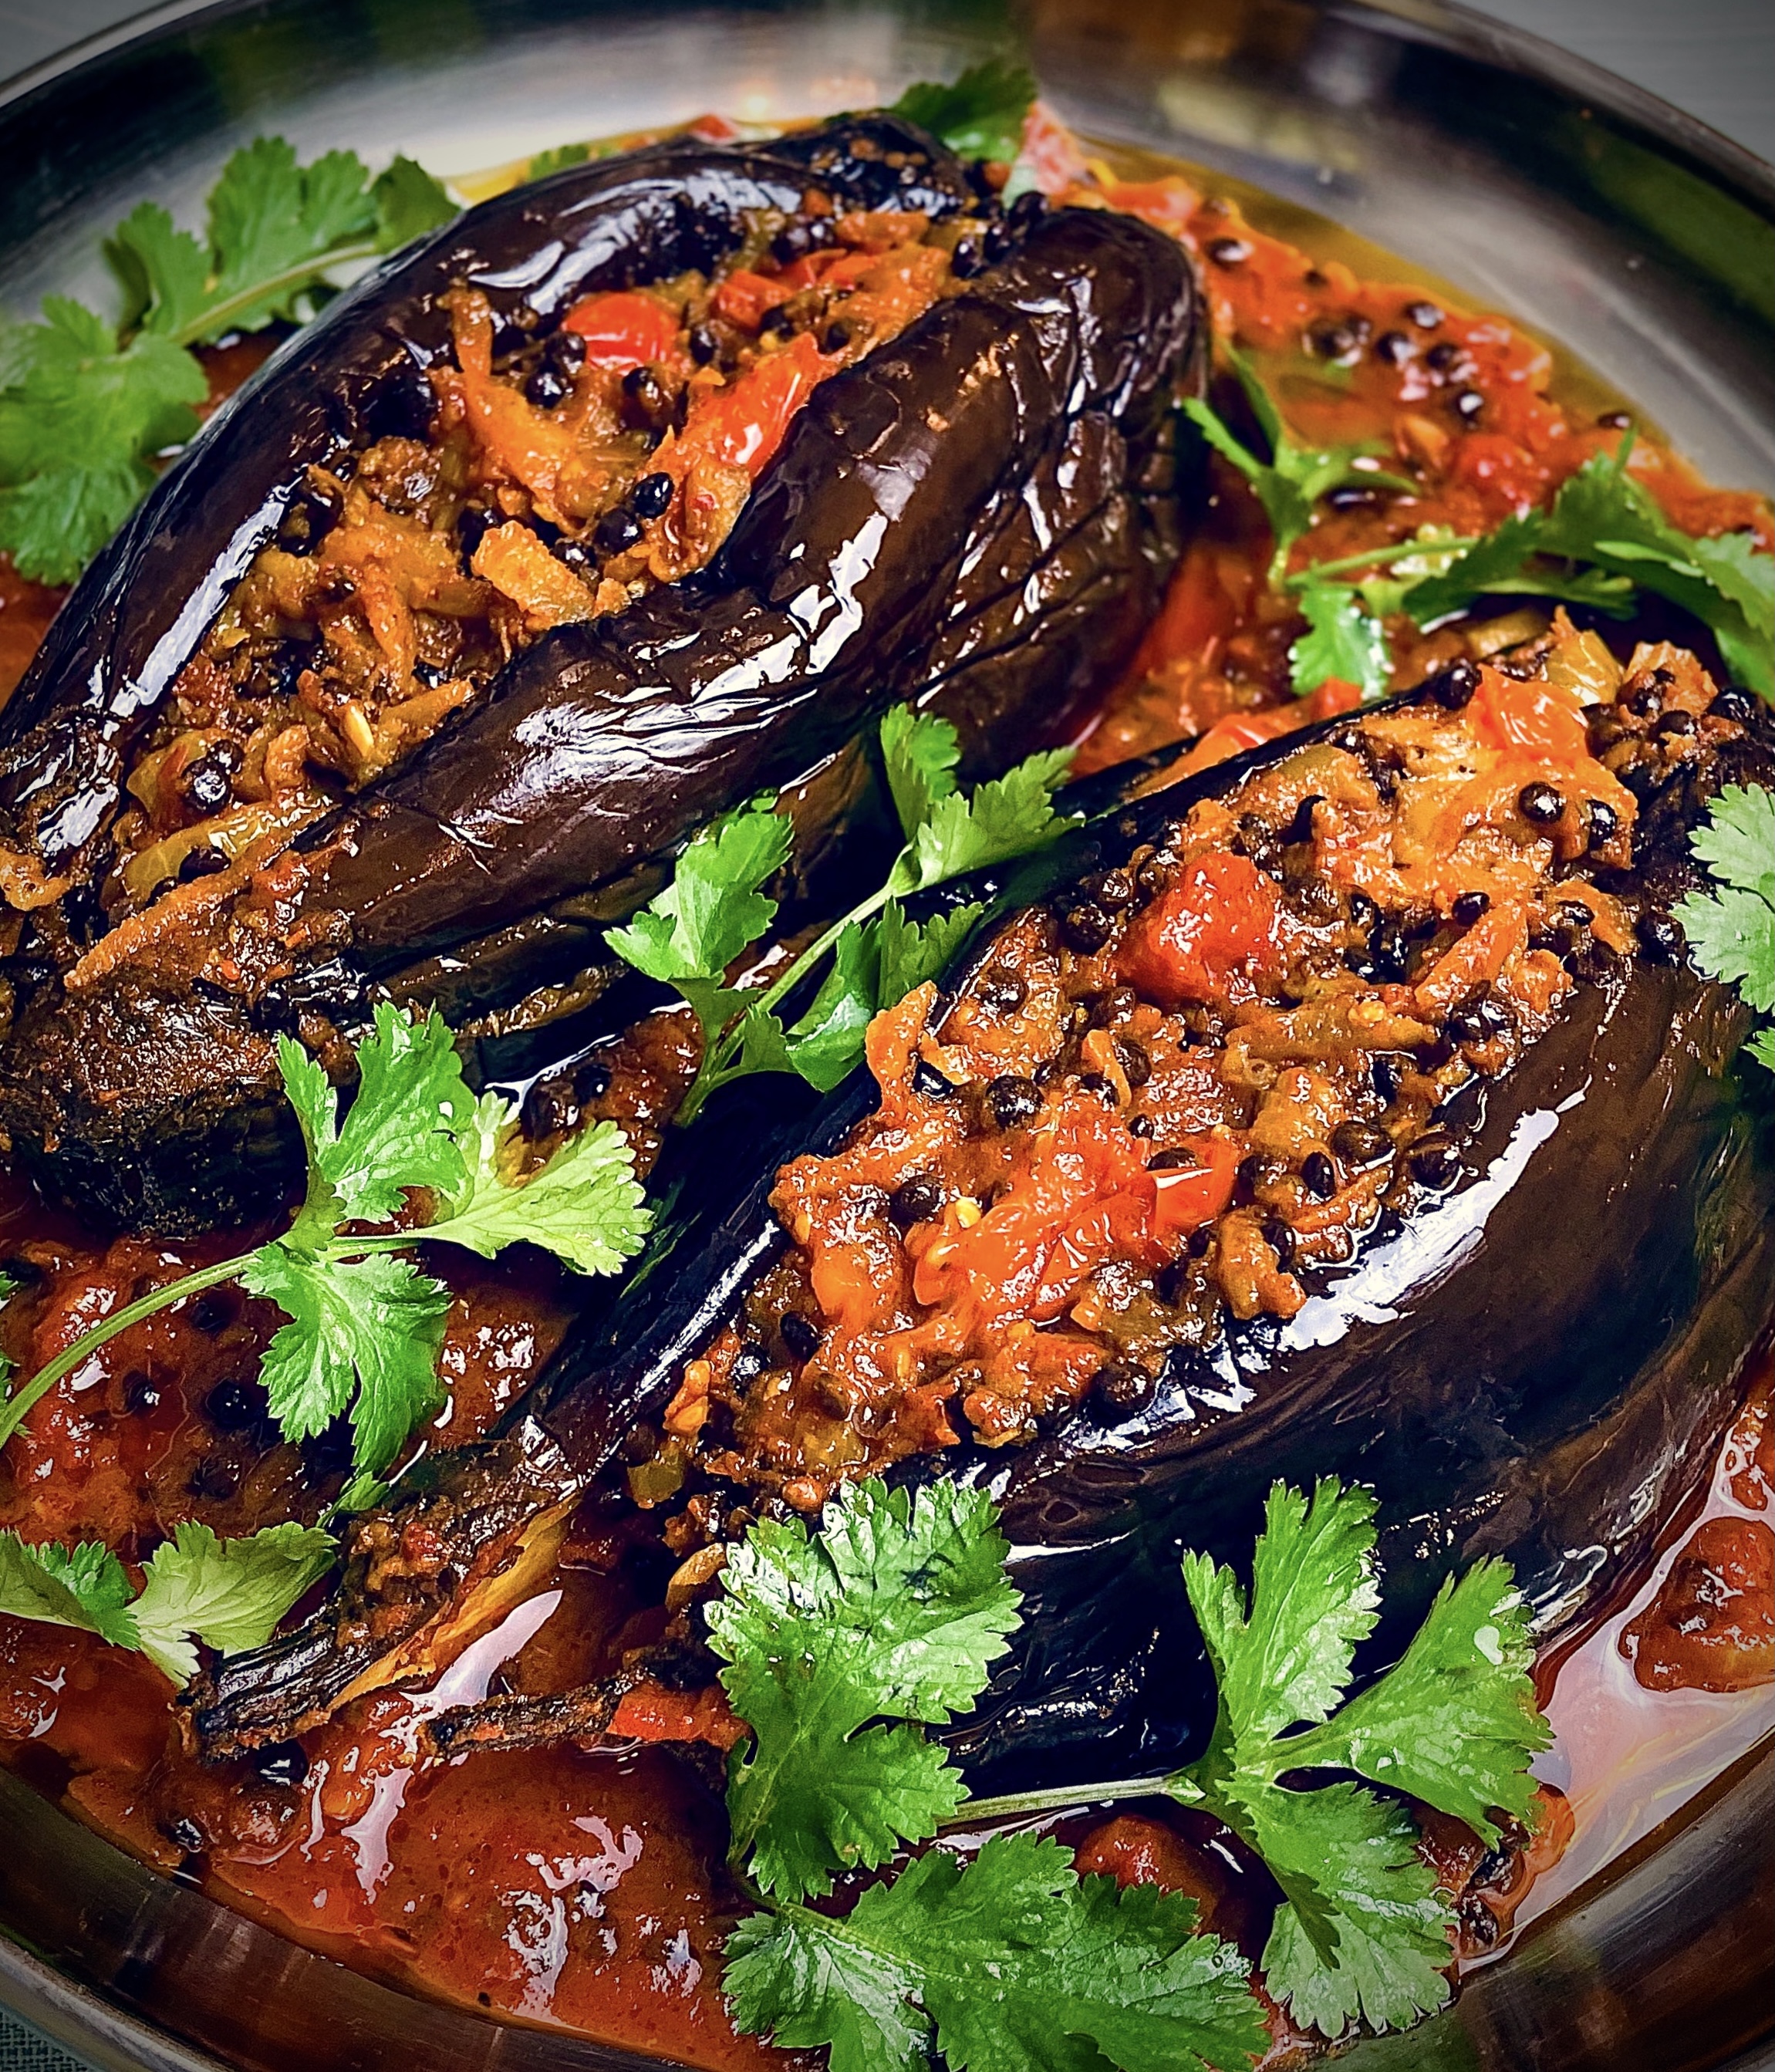
Garni Yarikh comes from the Azerbaijani province of Iran (northwestern Iran bordering Iraq, Turkey, Armenia, and the Republic of Azerbaijan). The region is mostly populated by Azerbaijanis also known as Iranian Azeris, who tend to speak Azerbaijani (a Turkic language) as their first language.

Garni Yarikh translated is ‘torn belly’ with the Persian equivalent being ‘Shekam Pareh’. Traditionally the aubergine is stuffed with a mixture of mince meat and then simmered in a rich and tangy tomato-based sauce. The Turkish version, and where it originates from, is called ‘Karnıyarık.’

A Vegan Version

The recipe below is a vegan version, as Iranian food can be quite heavy on the meat. Where an opportunity presents itself, I like to adapt a recipe to be plant-based. To make the recipe vegan, I have replaced the mince meat with lentils and added vegetables to the stuffing mixture. You can use any lentils you want. I buy pre-cooked lentils as it reduces the preparation and cooking time.

My go-to lentils for this dish are Merchant Gourmet Beluga Lentils. They absorb the sauce brilliantly and have a lovely texture.

If you have time, I recommend salting and leaving the aubergines for 30 minutes to draw out some of the water. Aubergines can afford to lose a little water pre-cooking but it isn’t an issue if you just want to launch into the recipe as per the steps below.

What to Serve with this Dish

Eat Garni Yarikh with a salad like tabbouleh and hummus on the side. This dish can also be served with rice (kateh or chelow). Also flatbread is a great accompaniment. 
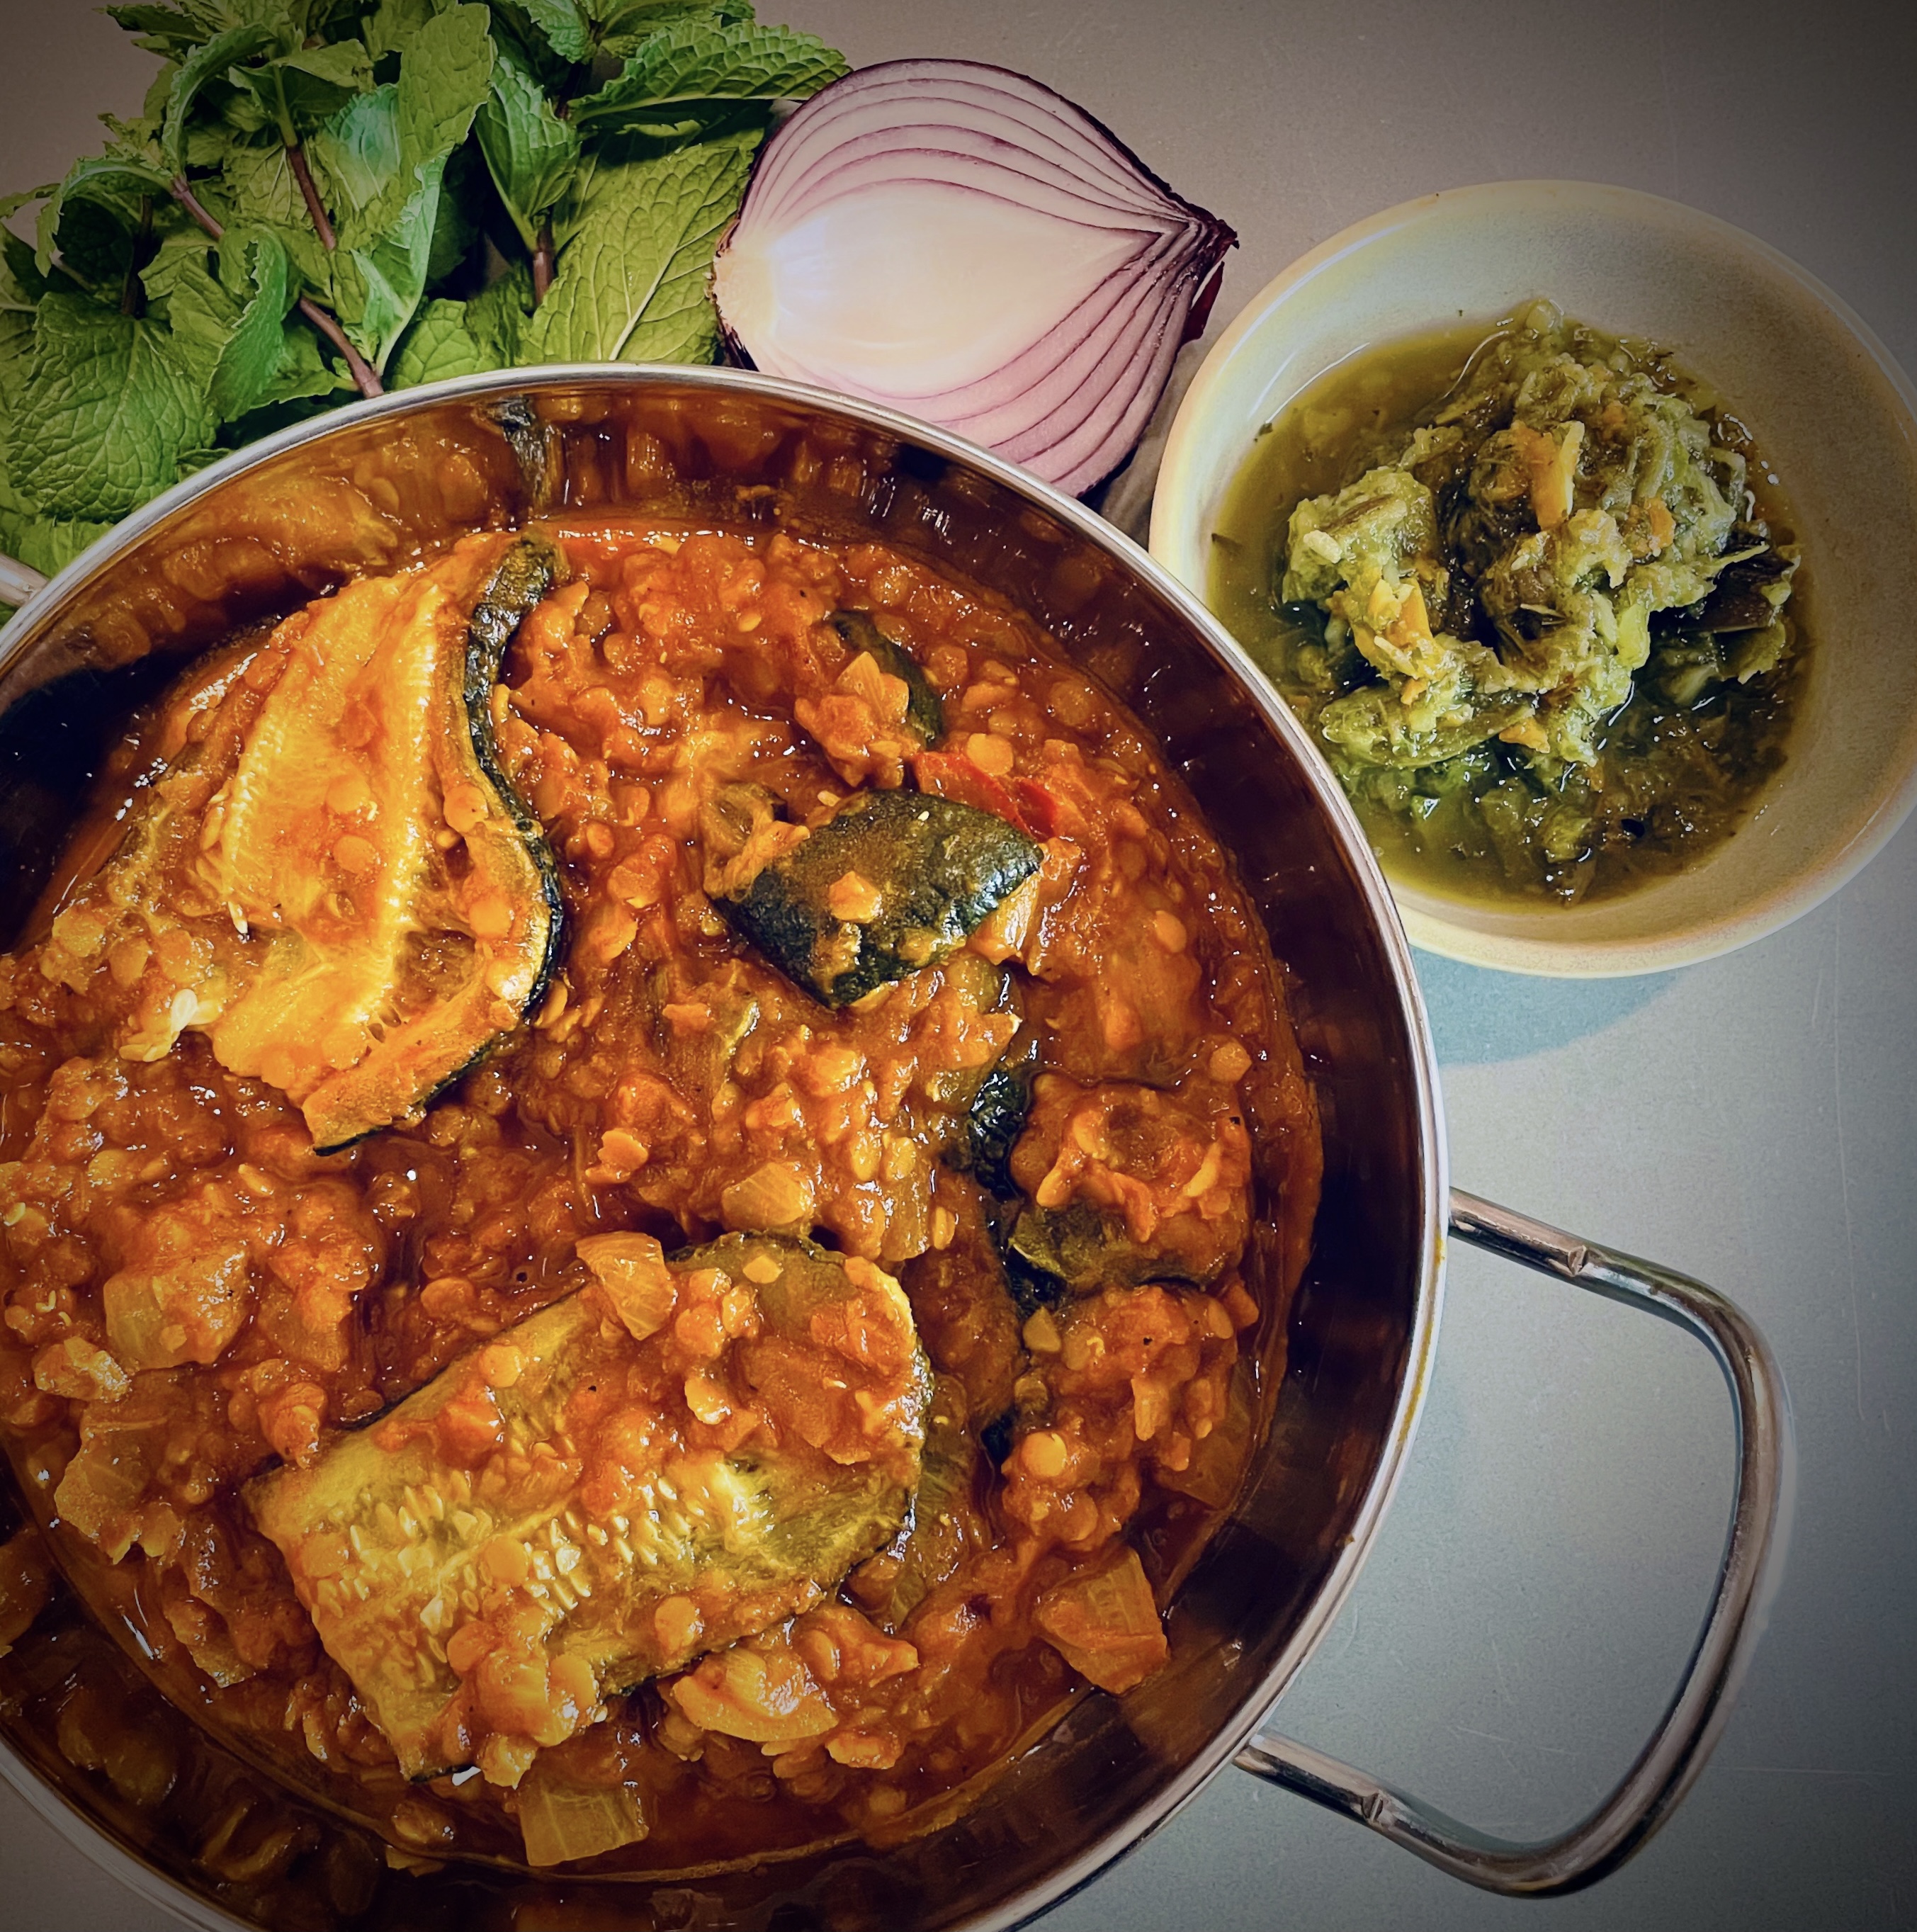

Garni Yarikh

Stuffed aubergines in a tomato sauce
Prep Time10 minutes
Cook Time1 hour 20 minutes
Total Time1 hour 30 minutes
Course: Main Course
Cuisine: Iranian
Keyword: tomatoes, vegetarian, vegan, aubergines
Servings: 4
Author: Mersedeh Prewer

Ingredients

  • 4 tbsp olive oil
  • 2 large aubergines
  • 1 onion (finely diced)
  • 1 carrot (grated)
  • 1 celery stick (finely sliced)
  • 4 garlic cloves (crushed)
  • 1 tsp turmeric
  • 1 tsp smoked paprika
  • 1/2 tsp dried red chilli flakes
  • 2 tbsp tomato purée
  • 1 pack Merchant Gourmet Beluga Lentils (250 grams cooked weight)
  • 250 ml water
  • 1 tbsp maple syrup
  • 150 g cherry tomatoes (halved)
  • 400 g tin of chopped tomatoes or passata
  • 1/8 tsp ground saffron bloomed in 2 tbsp of water (optional)
  • A few sprigs of fresh coriander (for garnish)
  • Salt and pepper to season

Instructions

Prepare and Roast the Aubergines

  • Pre-heat oven to 180°C (fan) / 200°C (conventional) / Gas Mark 6.
  • Slice aubergines lengthways. Then take a knife and criss-cross the flesh. Brush aubergines with olive oil and some of the crushed garlic and season well. Place on baking tray and roast in oven for 30 mins or until flesh is soft and cooked through.

Make the Lentil Stuffing Mixture

  • In the interim, take a frying pan, add 2 tbsp olive oil and place over medium-high heat.
  • Add onions and fry until they turn golden. Then add carrot, celery and garlic (reserve a little garlic for the tomato sauce) and cook until vegetables have softened.
  • Add turmeric, smoked paprika and chilli flakes. Follow with tomato purée and stir until evenly distributed in the mixture for a few minutes.
  • Add lentils, cherry tomatoes, water and maple syrup. Reduce the heat to low and let it cook for about 5 to 10 minutes until water has been absorbed and the cherry tomatoes have softened.
  • Remove aubergines from the oven. Scoop out some of the flesh, gently taking care not to tear the aubergine cases. Add flesh to the lentil mixture, stir and season to taste. Let the flavours of the mixture combine by gently cooking for a few minutes, stirring now and again.

Make the Tomato Sauce

  • Take a shallow casserole pan with a lid, place it on medium-low heat and add 1 tbsp olive oil and remaining garlic. Let it infuse with oil, being careful not to let it burn. Add chopped tomatoes / passata, the bloomed saffron and season. Let it simmer gently for 10 mins.

Assemble the Dish and Simmer

  • Take one aubergine half and gently place it on the tomato sauce. Fill it with half the lentil mixture and then place the other half of the aubergine on top. Repeat with the other 2 halves. Don't worry if some of the lentil mixture falls into the sauce - it will add to the overall flavour. Leave to simmer with the lid on the pan for approximately 20 mins.

Serve the Garni Yarikh

  • Serve aubergine garnished with fresh coriander accompanied by rice or bread and salad with a citrus dressing. If you feel confident serve the aubergine with the split facing upwards like I have in my picture so it looks like they have been stuffed.

Sosis Bandari (Spicy Sausage Sandwich with Saffron Roasties)

A famous street-food sandwich from the South of Iran made with beef sausages, peppers and onions cooked in a spicy and rich tomato sauce. This recipe comes with a side of saffron tatties served with harissa mayo!

What is Sosis Bandari?

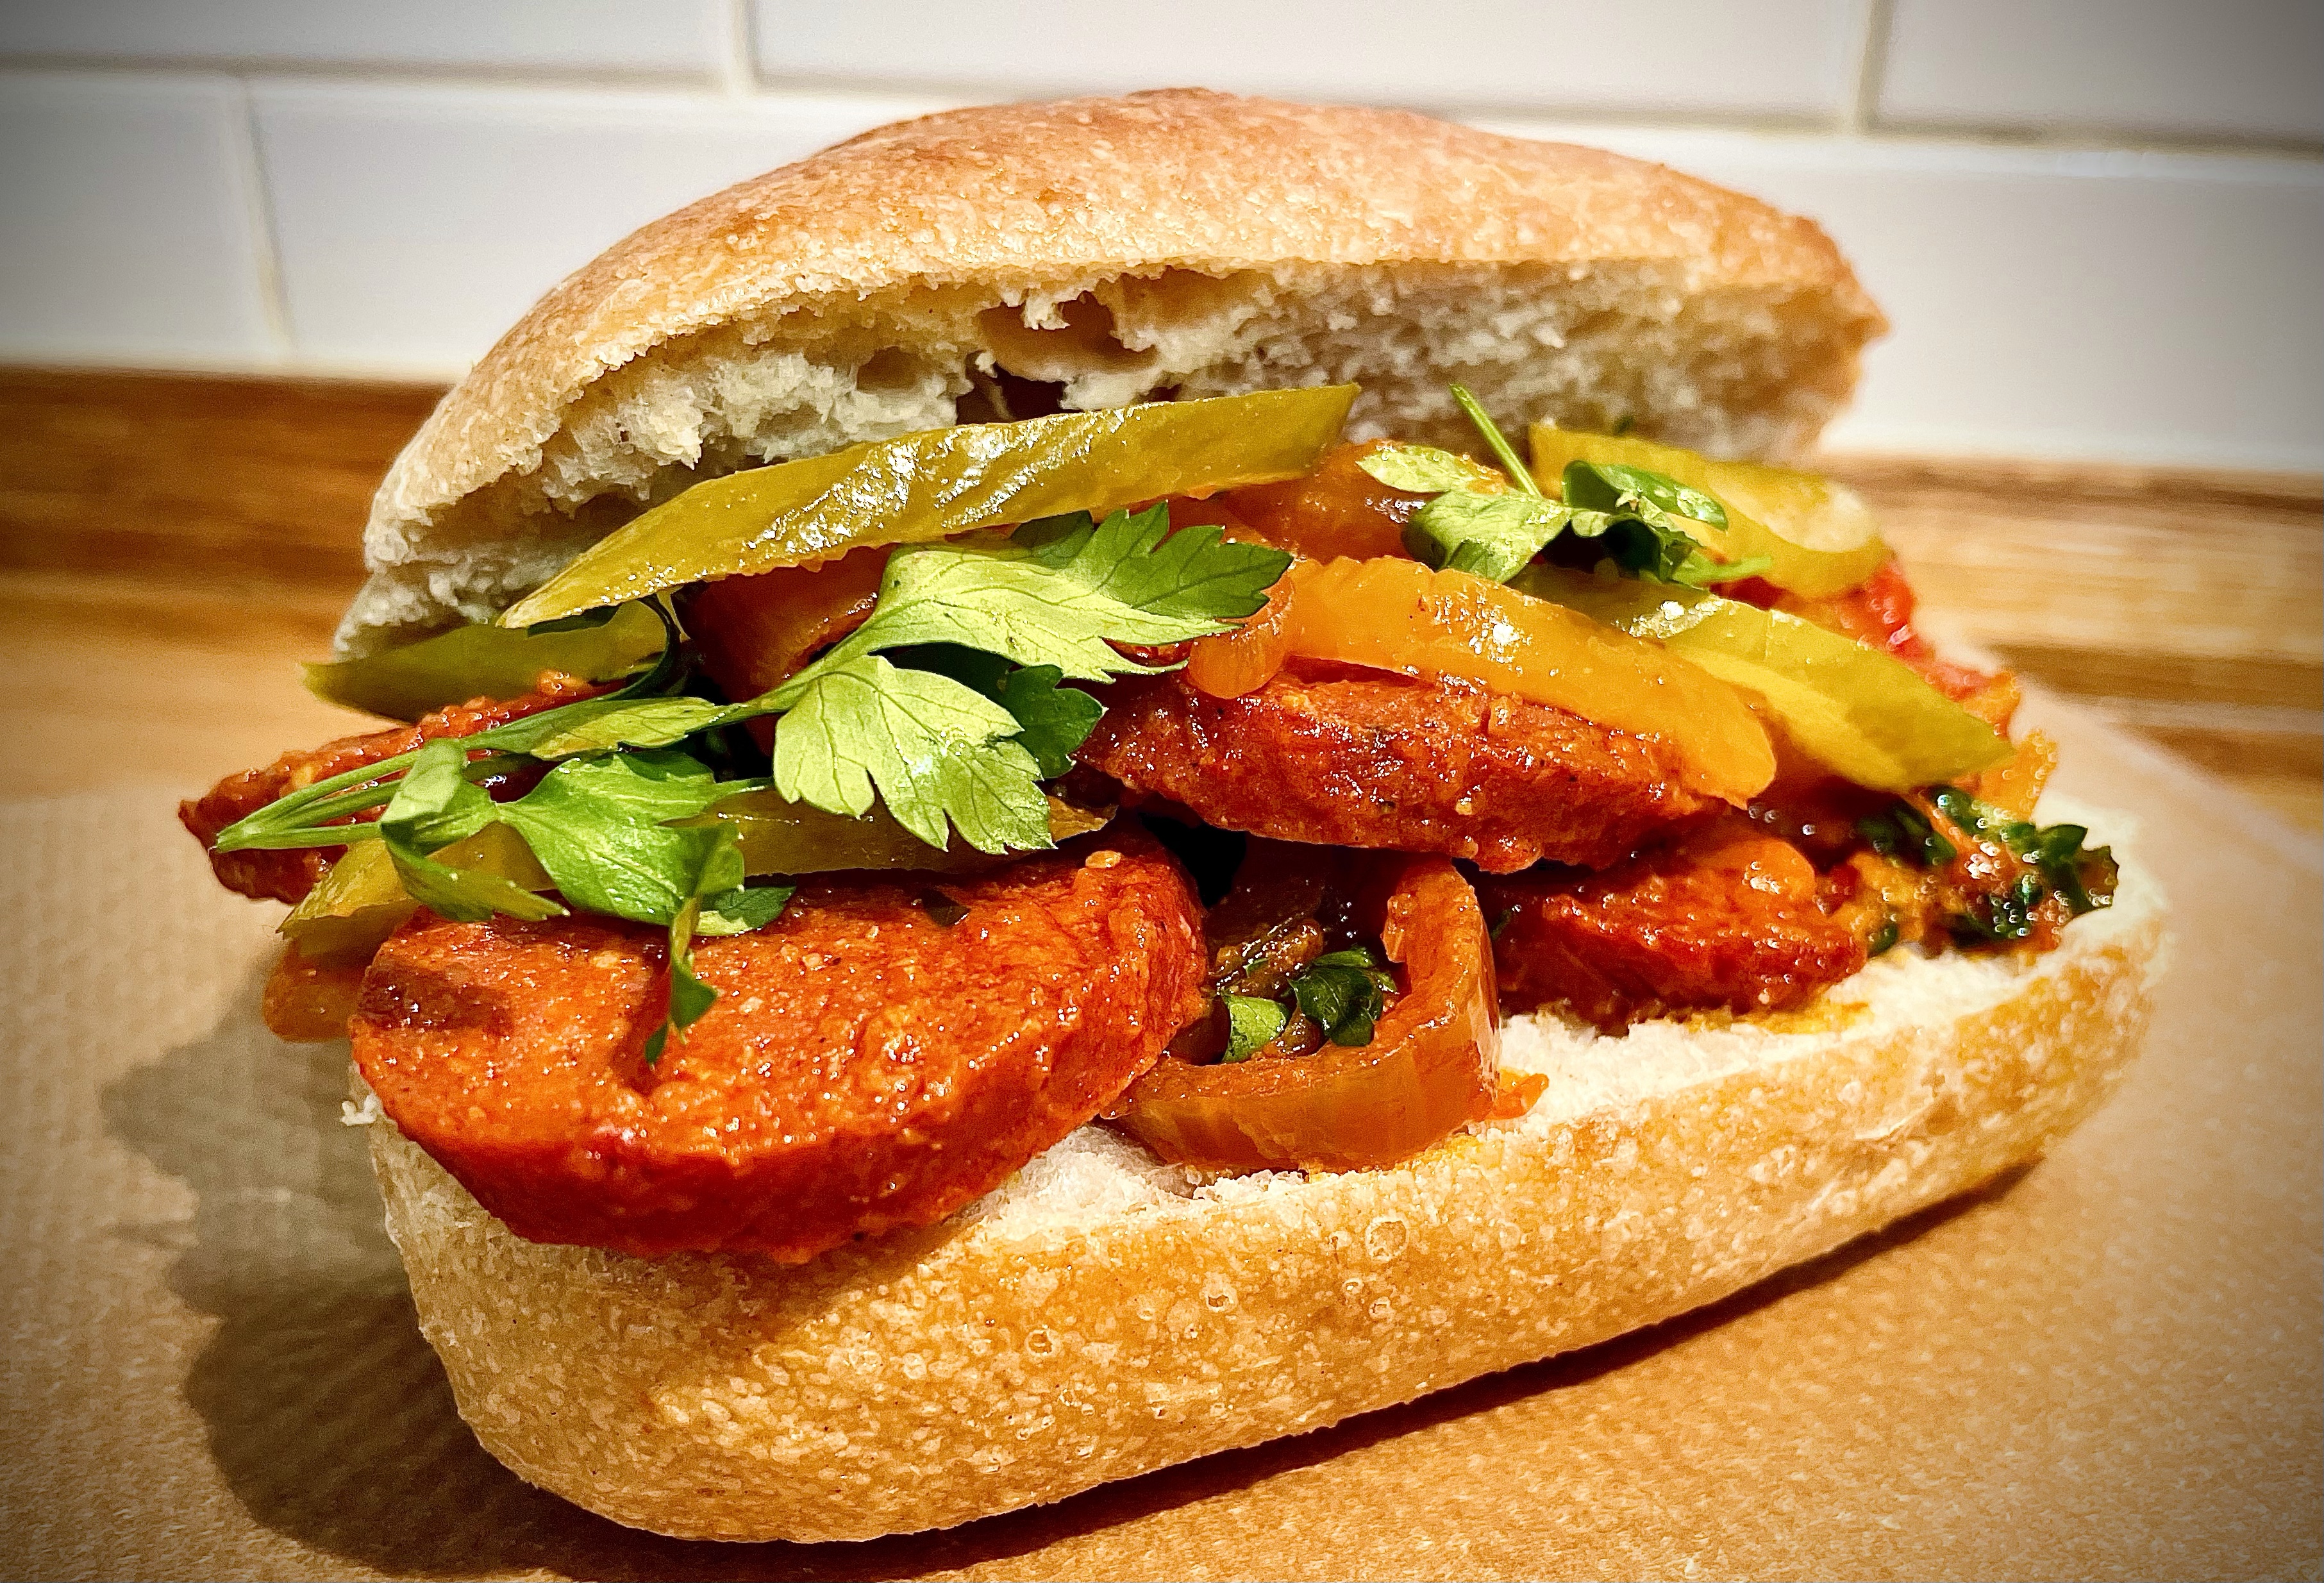
This dish is basically the Persian equivalent of a sausage sandwich! Beef sausages are cooked with onions and peppers in spicy tomato sauce and it is commonly served in a baguette-style bread.

Sosis Bandari translated is sausage from the port or port-style sausage. ‘Sosis’ is the Persian word for sausage, and ‘Bandar’ means port. Apparently this dish was invented in one of the northern ports of Iran, called Bandar Anzali where the first sausages were introduced from Iran (probably from Turkey). However, it became trendy amongst southern port residents, and the dish is now associated with Southern Iran. Iranians who live in the south of Iran mostly eat spicy foods and this dish packs a punch due to their revisions to the original recipe. 

Ingredients in Sosis Bandari

I love this dish as it is so easy to cook and, other than the sausage, all other ingredients are available at your local supermarket.

You will need:
  • Sucuk / Sujuk: a Turkish fermented sausage consisting of ground beef, garlic and other spices. they are encased in a red skin, which you peel off before cooking. You can buy them from most Middle Eastern supermarkets or online. If you cannot find sujuk, then use any other sausage you fancy including vegetarian or vegan varieties. Sujuk has a fair bit of oil in it and the heat of the pan should release sufficient amounts to cook the sausage and other vegetables. Add a dash of olive oil to your pan if required.
  • Garlic, turmeric and red chilli flakes: aromatics to flavour the dish.
  • Red onion, yellow pepper and cherry tomatoes: vegetables used for the dish.
  • Tomato puree and water: used to make the sauce for the Sosis Bandari.
  • Salt & Pepper: to season the dish.
  • Parsley: added as a garnish.

If you are using your local supermarket raw sausages then cook them first (as per the instructions on the packet) before slicing them up and adding to the recipe below.


Ingredients in Saffron Roasties and Harissa Mayo

Traditionally Sosis Bandari includes potatoes in the mixture itself, however my recipe extracts the potatoes and cooks them separately by making them into saffron flavour roasties to be eaten as a side dish and dipped into harissa mayonnaise. 

You will need:
  • Olive Oil: used to roast the potatoes.
  • New Potatoes: you can use any potatoes suitable for roasting. I use this variety as they are small, no need to peel and they cook quickly.
  • Saffron: used to flavour and colour the roasties.
  • Water: used to boil the potatoes. 
  • Salt & Pepper: to season the tatties.
  • Mayonnaise, Harissa Paste and Lime Juice: combined to make the Harissa may to dip the roasties in. I use Belazu Harissa paste either the rose or the standard version is fine.

How to Serve this Dish

I serve this dish as a sandwich using a rustic roll with a side of saffron roasties. I also love to put pickled cucumbers and some fresh herbs in the Sosis Bandari Sandwich. A cousin of mine recently mooted adding cheese to the sandwich which would also be an excellent addition.

Other Handheld Pockets of Deliciousness

Check out our other recipes:


Sosis Bandari

Persian spicy sausage with saffron roasties
Prep Time20 minutes
Cook Time45 minutes
Course: Main Course, lunch
Cuisine: Persian, Iranian
Keyword: easy recipe, sujuk, sucuk, spicy
Servings: 4
Author: Mersedeh Prewer

Ingredients

For the Saffron Roasties

  • 600 g new potatoes (halved – approx 150 grams per person)
  • 1/8 tsp ground saffron
  • Water to boil the potatoes
  • 2 tbsp olive oil
  • Salt and pepper (to taste)

For the Sosis Bandari

  • Approximately 300 grams of Sucuk Turkish sausages (remove outer skin / casing and slice diagonally) – see note above re: alternatives to sucuk
  • 2 cloves garlic (crushed)
  • 1 tsp turmeric
  • 1/2 tsp dried red chilli flakes
  • 1 large red onion (finely sliced)
  • 1 yellow pepper or red or green (finely sliced)
  • 1 heaped tbsp tomato purée 
  • 100 g cherry tomatoes (halved)
  • 100 ml water
  • Salt and pepper (to taste)
  • Fresh chopped parsley (to garnish)

For the Harissa Mayonnaise

  • 8 tbsp mayonnaise
  • 2 tbsp Harissa paste
  • A squeeze of a fresh lime

To Serve

  • 4 crusty rolls / mini baguettes
  • sliced gherkins or Persian pickled cucumbers and / or cheese can also be included in the sandwich

Instructions

Harissa Mayo

  • Combine mayo, harissa paste and lime juice in a small bowl. Cover and place in fridge until you are ready to serve the dish.

Roasties

  • Take a saucepan and fill with water, add halved new potatoes and saffron. Turn the heat to high and bring to a boil. Boil potatoes for approximately 8 to 10 minutes - you want them cooked through but not too soft as they will fall apart in the roasting stage.
  • While potatoes are cooking in the saucepan, pre-heat oven to 180°C (fan) / 200°C (conventional) / Gas Mark 6.
  • Turn the stove off and drain potatoes. Take a baking tray and place potatoes on it. Add oil, salt and pepper and toss potatoes until evenly coated. Place tray in oven and roast the potatoes for 30 minutes or until crispy to your liking.

Sosis Bandari

  • While potatoes are roasting, take a frying pan (about 30 cm diameter) and place on medium-high heat.
  • Add sliced sausages to pan, cook until they release oil and start to curl. Then add garlic, turmeric and chilli and stir until evenly distributed. Add sliced onions and pepper and stir until they start to soften.
  • Add tomato purée and stir. Add halved cherry tomatoes. Then add water and stir and lower heat to let the sosis bandari cook gently for about 5 minutes. Season to taste and scatter some chopped fresh parsley over the top.

Serving the dish

  • Turn oven and stove off. Remove the potatoes from the oven and place them on a paper towel to soak up any excess oil.
  • Fill rolls / baguettes with the sosis bandari (sliced gherkins or Persian pickled cucumbers and / or cheese can also be included in the sandwich).
  • Serve the sosis bandari sandwiches with a side of roasties and some harissa mayo to dip them in.

Sticky Pomegranate Chicken Wraps

You will love these moreish wraps filled with roasted chicken in a sticky pomegranate molasses marinade, crispy lettuce, fresh herbs, pickles and moosir mayo.

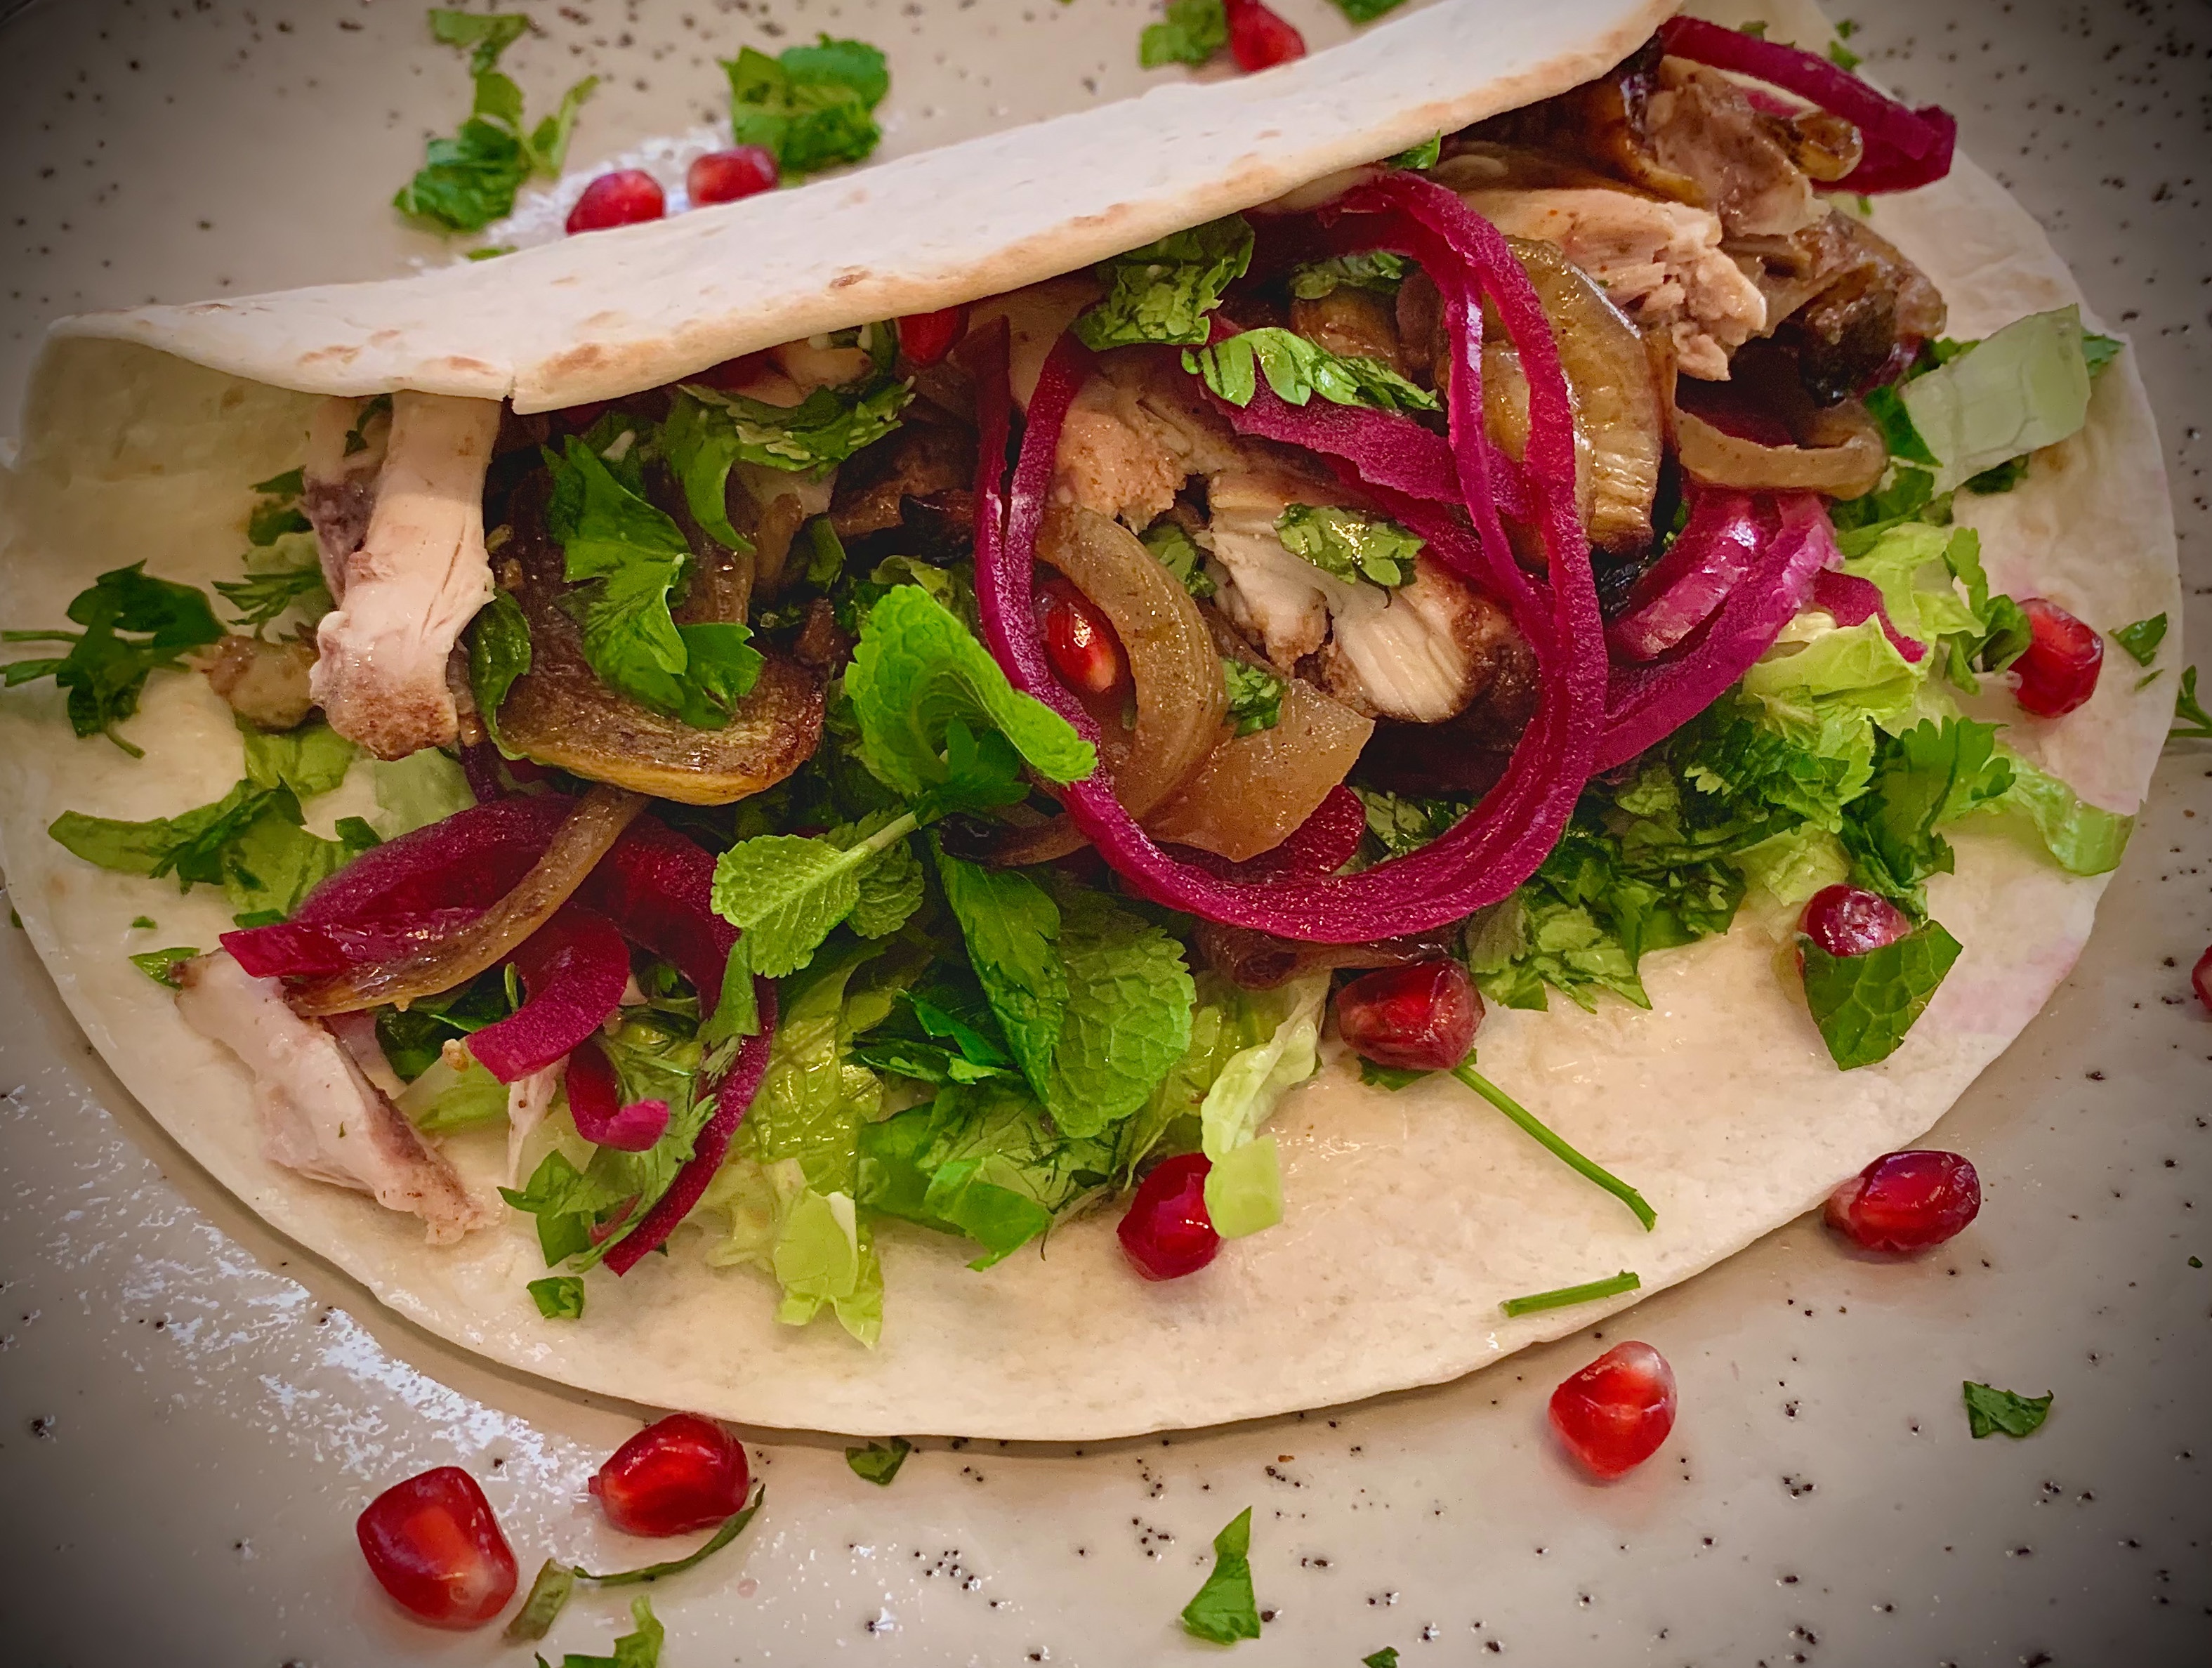
This is an easy recipe and will be familiar territory for you if you have, as most people have these days, cooked and / or eaten some kind of wrap. If not, it is still an easy recipe to follow and worth getting your hands on the two ingredients you may not have to hand – pomegranate molasses and moosir (Persian shallots).

What is Pomegranate Molasses?

Pomegranate molasses is a thick syrup with a dark grape colour made from reducing pomegranate juice. The juice is obtained from a tart variety of pomegranate. You can pick up pomegranate molasses (rob-e-anar) from most Middle-Eastern food shops, online or even at some local supermarkets.

It is deliciously tart but the addition of maple syrup and freshly squeezed orange juice balances the favours perfectly for this marinade and complements the chicken. As with all marinades, the longer you leave it the better. So if you have time to marinate your chicken  overnight (thighs with skin on and bone in preferably) this will allow the chicken to absorb all the delicious flavours. 

What is Moosir?

Moosir is a Persian shallot and has a flavour profile similar to garlic but slightly sweeter and less spicy. They grow wild in the foothills of the Zagros Mountains. They have to be found and dug out of the earth – a similar process to truffles. Commonly used in a yoghurt dip called Maast-o-Moosir, this ingredient adds an amazingly distinctive flavour to dishes. You can buy moosir from most Middle-Eastern food shops or online.

Moosir is bought in its dried form and will need to be rehydrated before use. Soak the moosir in water for 3 to 24 hours. Drain, then rinse in cold water and pat dry. Check the moosir and cut out any stems that remain hard after soaking. I have added the moosir to the mayonnaise for the chicken wraps. Once hydrated, chop the moosir finely and mix with mayonnaise. If you cannot get your hands on this Persian shallot, then you can use garlic. I would recommend steeping the cloves in boiled water before mincing and adding to the mayonnaise to temper the raw garlic.

How to Make Sticky Pomegranate Chicken Wraps

  • Marinade the chicken thighs. Put the chicken, onion, garlic, turmeric, cinnamon, pomegranate molasses, tomato purée, sriracha, maple syrup, orange juice, seasoning and olive oil in a mixing bowl and mix to coat evenly. Cover, place in the fridge and let it marinate for a minimum of 4 hours (preferably overnight).
  • Make the Moosir Mayo. Place the mayonnaise in a bowl and add your minced moosir and refrigerate until you are ready to serve.
  • Cook the chicken thighs. Heat the oven to 200°C/180°C fan/gas 6. Transfer the chicken and its marinade to a shallow roasting tin. Roast for 40-45 minutes, until the chicken and onions have caramelised and are sticky. Remove the chicken from the oven and leave to rest for 10 minutes.
  • Prepare the wraps and condiments. Take your tortillas, wrap them in foil and place them in the oven to heat for about 15 mins. Then remove them from the oven and turn off the heat. Scatter the chicken with the fresh mint and pomegranate seeds.
  • Build the wrap. Take a wrap and spread a layer of moosir mayo on it. Then add shredded lettuce, sliced chicken (removed from the bone) and caramelised onions, topping with Torshi Soorati (pickled red cabbage and onion) or other pickle, the chopped fresh herbs and pomegranate seeds. Roll up the wrap and tuck in.
Serve these wraps with wedges – sweet potatoes are a great accompaniment.

Sticky Pomegranate Chicken Wraps

Prep Time10 minutes
Cook Time45 minutes
Total Time55 minutes
Course: Main Course
Cuisine: Persian, Iranian, Fusion
Keyword: easy recipe, chicken wrap
Servings: 4 (to 6)
Author: Mersedeh Prewer

Ingredients

For the chicken

  • 8 free-range chicken thighs (skin-on, bone-in)
  • 1 large red onion (finely sliced)
  • 4 cloves garlic (crushed)
  • 1/2 tsp turmeric
  • 1 tsp cinnamon
  • 3 tbsp pomegranate molasses
  • 1 tbsp tomato purée
  • 1 tbsp sriracha chilli sauce
  • 2 tbsp maple syrup
  • Juice of half an orange
  • 2 tbsp olive oil
  • Salt and pepper (to taste)

For the Moosir Mayo

  • 1/2 cup mayonnaise (8 tbsp)
  • 6 discs of dried moosir (rehydrate the moosir the night before by soaking in water. Rinse then pat dry before mincing and adding to mayo).

To Serve

  • 8 large tortilla wraps
  • Crunchy lettuce (Romaine or iceberg - shredded)
  • Torshi Soorati or other pickle of your choice
  • Fresh coriander, mint and parsley (chopped) and pomegranate seeds (for garnish and sprinkling in the wraps)

Instructions

  • Score each chicken thigh twice with a knife through the skin and into the meat. Then place in a bowl. Add onion, garlic, turmeric, cinnamon, pomegranate molasses, tomato purée, sriracha, maple syrup, orange juice, seasoning and olive oil and mix to coat evenly. Cover, place in fridge and let it marinate for a minimum of 4 hours (preferably overnight). About 1 hour before cooking, remove from the fridge and set aside to come up to room temperature.
  • Place mayonnaise in a bowl and add minced moosir. Stir and refrigerate until you are ready to serve.
  • Heat the oven to 200°C/180°C fan/gas 6.
  • Transfer chicken and marinade to a shallow roasting tin, then roast for 40-45 minutes, until chicken and onions are caramelised and sticky. Remove from oven and leave to rest for 10 minutes. Garnish chicken with the fresh mint and pomegranate seeds.
  • About 5 minutes before removing your chicken from the oven, take tortillas, wrap them in foil and place them in oven to heat for about 15 mins. Then remove them from oven and turn off heat.
  • Build a wrap by spreading a layer of moosir mayo on it, adding shredded lettuce, layering with sliced chicken (removed from the bone) and caramelised onions. Top with Torshi Soorati or other pickle, the chopped fresh herbs and pomegranate seeds. Roll up the wrap and tuck in. 

Omelette Gojeh Farangi (Persian Tomato Omelette)

Although called an omelette, this beloved Persian breakfast dish is closer to scrambled eggs due to the silky texture from the amount of tomatoes used. Sometimes referred to as Omelette Irani (The Iranian Omelette), it is the most commonly eaten egg-based breakfast in Iran whether in people’s homes or in cafes. 

The Persian Equivalent of Shakshuka

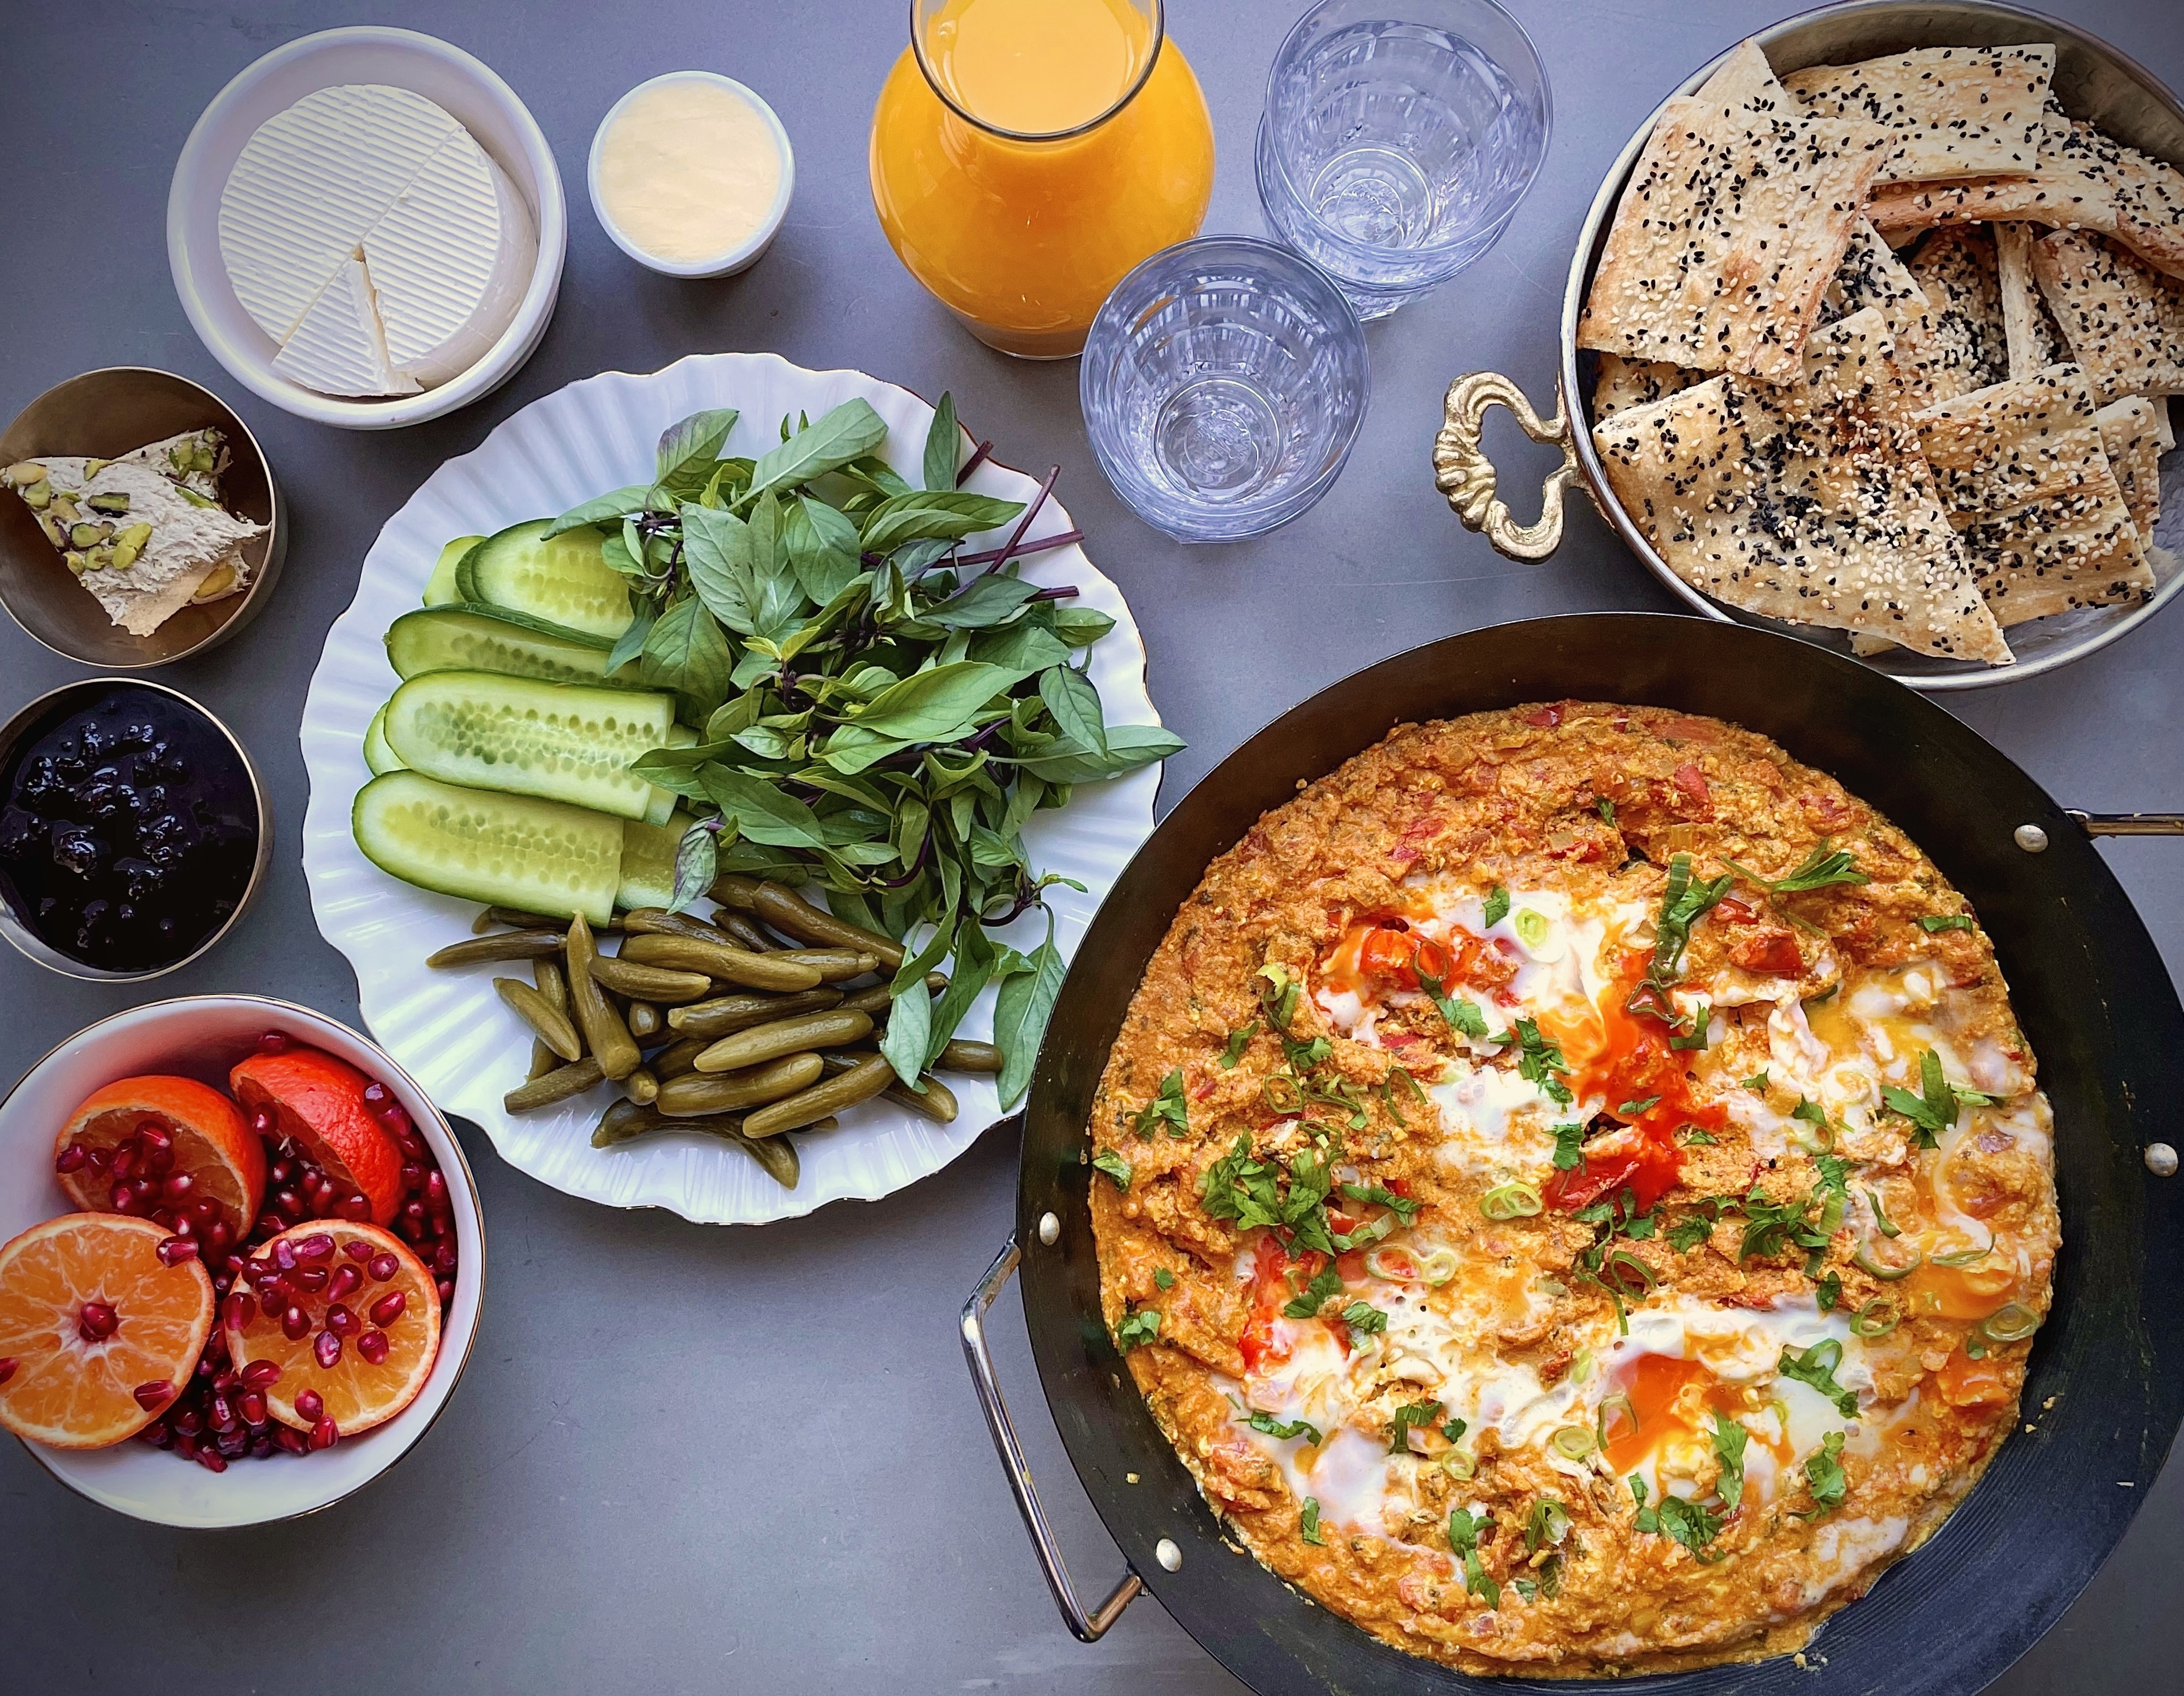
Omelette Gojeh Farangi is made by cooking eggs in a rich tomato sauce. The sauce is flavoured with aromatics and spices – garlic, cumin, turmeric and chilli. The tomato to egg ratio is quite high so the resulting texture is creamy.

It is usually eaten at breakfast or as a brunch option but can also be eaten as a lunch or dinner option. 

How to Serve Omelette Gojeh Farangi

Serve this dish with flatbread; feta; a sprinkle of fresh herbs, such as coriander or parsley; and Persian pickled cucumbers for an authentic Persian breakfast experience. You can also eat it with rice or chips when serving it at lunch or dinner.

Other Breakfast Recipes…


Omelette Irani

Persian tomato omelette
Prep Time15 minutes
Cook Time25 minutes
Total Time40 minutes
Course: Breakfast, Main Course, Brunch
Cuisine: Persian, Iranian
Keyword: tomatoes, vegetarian, egg recipes, omelette gojeh farangi
Servings: 4
Author: Mersedeh Prewer

Ingredients

  • 2 tbsp olive oil
  • 1 medium onion (finely diced)
  • 4 cloves garlic (crushed / minced)
  • 1 tsp turmeric
  • 1 tsp dried red chilli flakes
  • 1 tsp cumin seeds
  • 10 g fresh coriander (leaves and stalks chopped finely)
  • 1 tbsp tomato purée
  • 500 g cherry tomatoes (halved)
  • 125 ml water
  • 2 tsp balsamic vinegar
  • Salt and pepper (to taste)
  • 8 free range eggs
  • Chopped fresh coriander leaves to sprinkle as a garnish

Instructions

  • Take a large frying pan, add the olive oil and place over medium-high heat.
  • Add onions and cook until they turn golden.
  • Add garlic, all the spices and herbs and stir until their aromas are released.
  • Then add tomato purée, stir into the mixture and cook for a few more minutes.
  • Add the halved cherry tomatoes, followed by 125 ml of water and stir. Once the mixture starts to bubble, reduce heat to low-medium to allow to simmer, stirring occasionally. Once the cherry tomatoes have broken down and the mixture is looking like a sauce, add the balsamic vinegar and season with salt and pepper to taste.
  • Take 4 of the eggs and crack them into a bowl and beat them. Then pour into the tomato mixture in the pan and stir in gently to distribute evenly. You want the beaten eggs to be mixed into the tomatoes but not completely scrambled or cooked through.
  • Make 4 holes evenly distributed in the tomato mixture. Crack the remaining eggs into the holes.
  • Cover the pan and cook over medium-low heat for about 5 to 7 minutes, depending on how runny or cooked you prefer the eggs. Once the eggs are cooked to your liking, turn the heat off.
  • Season the eggs with a pinch of salt and pepper and sprinkle some chopped fresh coriander leaves on the dish prior to  serving with flatbreads, Persian pickled cucumbers and / or fresh herbs.

Khoresh Karafs – sabz (Lamb, Herby and Celery Stew)

This traditional Persian stew is made with lamb, slow-cooked with celery, mint and parsley resulting in a deliciously light yet comforting stew. 

Winter is the season of stews and Khoresh Karafs is a lovely introduction if you are new to Persian cuisine. Persian stews are relatively low maintenance to cook. They just need time to cook and for the flavours to fall into place.

What is Khoresh Karafs?

Khoresh Karafs is a Persian stew made with lamb, celery and fresh herbs (mint and parsley). ‘Karafs’ translated from Persian is ‘celery.’ And ‘Khoresh’ means ‘stew.’

We have two versions of Khoresh Karafs. The first one, the subject of this recipe and the better known version, is cooked with herbs. The second one is cooked with tomatoes and usually chicken. We refer to them by their colour: Khoresh Karafs-e-Sabz (‘sabz’ means green in Farsi); and Khoresh Karafs-e-Ghermez (‘ghermez’ means red in Farsi).

Ingredients In Khoresh Karafs

The ingredients for this khoresh (stew) are simple and easy to source with most items available at your local supermarket.

You will need:
  • Lamb – the best cut of lamb to use for this recipe is from the leg and from a butcher. Ask for the leg to be trimmed of the outer layers of fat and to be cut into stew size pieces with the bone.
  • Celery – use fresh celery to ensure you get the delicious peppery and savoury flavour profile  from this amazing vegetable.
  • Parsley & Mint – use fresh herbs. As a guide 2 large bunches or 250 grams of parlsey to 1 large bunch or 150 grams of mint.
  • Onion, Garlic, Turmeric, Saffron and Fresh Lime Juice – the aromatics and flavour enhancing elements of the stew.
  • Vegetable Oil – or any other neutral flavoured oil for cooking elements of the stew prior to adding the cooking liquid.
  • Water or Vegetable Stock – the cooking liquid for the stew.
  • Salt and Pepper – to season the stew.

Variations Khoresh Karafs

  • Some add dried limes (Limoo Amani) to their khoresh while cooking but I prefer it without.
  • You can use beef but make sure it is the cut of beef best for stewing i.e. braising beef such as skirt, chuck or blade.
  • You can also use chicken instead of red meat.

How to Serve Khoresh Karafs

As with all Persian stews, the flavour continues to mature and intensify if you leave it for a day before you reheat and serve. This is, therefore, a dish you can make on a Sunday evening and tuck into later in the week reducing the time spent in the kitchen and washing up afterwards. Serve it with Persian rice – Chelow and a lime dressed chopped salad like Salad Shirazi.

Leftovers

Store in an airtight container in the fridge up to 3 days. Khoresh Karafs can also be frozen up to 4 months. Defrost thoroughly before reheating. Gently reheat khoresh in a saucepan or in a microwave.


Khoresh Karafs

Lamb, herb and celery stew
Prep Time30 minutes
Cook Time1 hour 30 minutes
Total Time2 hours
Course: Main Course
Cuisine: Persian, Iranian
Keyword: mint, parsley, lamb, celery
Servings: 4 to 6
Author: Mersedeh Prewer

Ingredients

  • 4 tbsp vegetable oil
  • 250 g fresh parsley
  • 150 g fresh mint
  • 1 large head of celery (about 7 to 10 stalks cut into 2 to 3 inch chunks)
  • 1 medium onion
  • 2 cloves garlic (crushed)
  • 1 tsp turmeric
  • 0.6 to 1 kg lamb on the bone (preferably leg, portioned into chunks approx. 2 to 3 inches width)
  • 600 ml water or vegetable stock
  • 1/8 tsp ground saffron (bloomed in 2 tbsp of water)
  • Juice of 1 to 2 fresh limes
  • Salt and pepper (to taste)

Instructions

Gather and Prepare the Ingredients

  • Remove woody stems from herbs and discard. Wash herbs and place on a tea towel and dab them dry.
  • Finely chop herbs either by hand or using a food processor and set to one side until ready to use.
  • Finely dice your onion. Take the celery and chop into 2 inch chunks.

Prepare the Stew

  • Take a casserole dish / saucepan which has a lid and a minimum capacity of 3.5 litres and place over medium-high heat. Add 2 tbsp of oil and brown lamb and remove from pan.
  • Add diced onions to pan and cook until they turn golden. Add crushed garlic cloves and stir, being careful that the garlic does not turn brown or burn.
  • Add lamb, then turmeric and stir until distributed evenly.
  • Add water or vegetable stock and bloomed saffron (the liquid should just cover the meat so adjust if necessary). Place lid on pan and turn down heat to low and let simmer.

Saute the Celery and Herbs

  • Take a frying pan and add 1 tbsp of oil and place over medium-low heat. Add chopped herbs and stir until the herb mix has softened, being careful not to burn it. A few minutes will suffice. Then add the herb mix to the lamb and stir. Replace the lid.
  • Sauté celery over medium heat in frying pan used for the herbs with the remaining 1 tbsp of oil for no more than a few minutes. Just enough for the celery to take on some heat from the pan but not soften. Turn the heat off under your frying pan and add celery to the lamb and herb mixture.

Cook and Season the Stew

  • After 5 minutes of simmering, add the fresh lime juice (start with half the lime and then add more), salt and pepper and adjust according to taste.
  • Continue simmering the stew for a minimum of an hour, stirring gently every 15 minutes and checking the softness of the meat - ideally you want the meat to be falling off the bone.

Serve the Khoresh Karafs

  • When ready, turn off the heat and serve with chelow and either torshi or a salad with a citrus dressing.


Kabab Tabei (Pan-Cooked Kofte Kebabs with Roasted Tomatoes)

These Persian kofte kebabs can be cooked anytime of the year with no need for a BBQ or skewers. They are easy to make and retain all the juiciness you expect from a kebab.

What is Kabab Tabei?

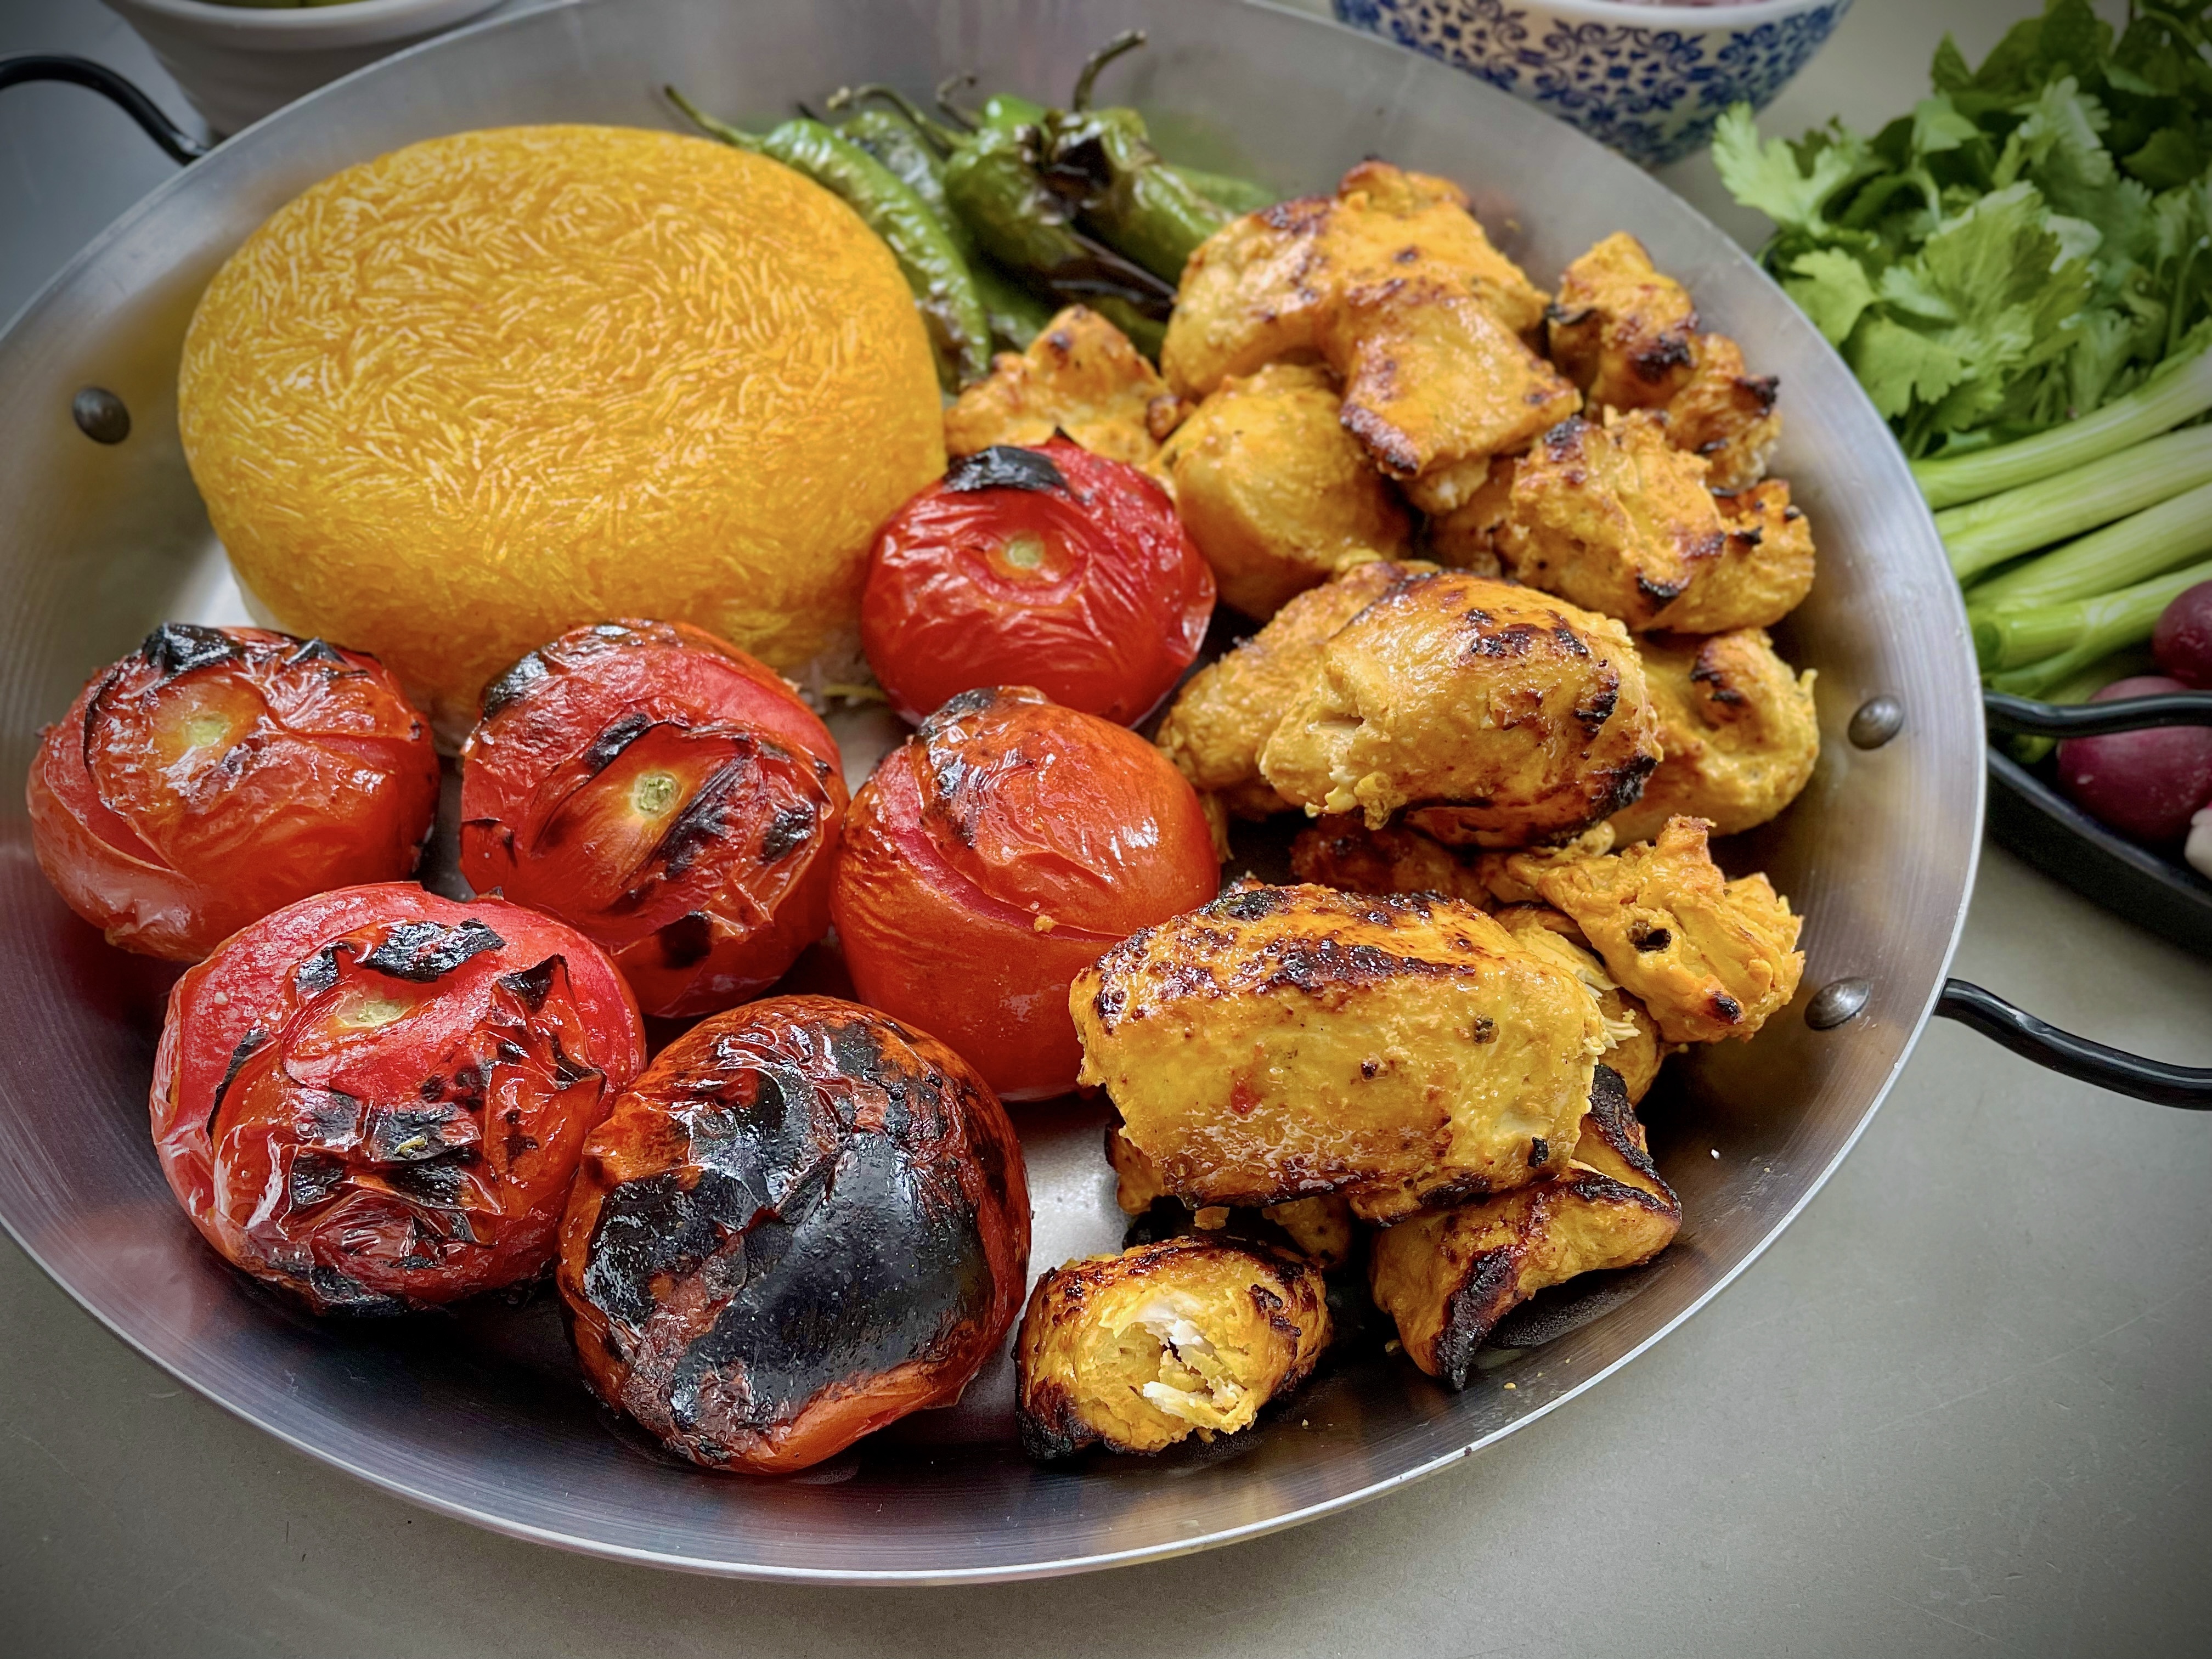
If you have eaten at a Persian restaurant, then you will be familiar with Kabab Koobideh. The long metal skewers of minced lamb cooked to juicy perfection over a charcoal flame. Kabab Tabei is the easy version, cooked in a pan with no skewers required, and accompanied with a side of roasted tomatoes.

Ingredients in Kabab Tabei

With the exception of saffron, the ingredients should be easy to source from your local supermarket. 

  • Minced Lamb or Beef – use mince with a 20% fat content to make the kebabs. This will ensure they are juicy.
  • Onion and Garlic – fresh aromatics for the dish adding to the flavour of the kebabs.
  • Turmeric and Saffron – spices used to flavour the kebabs.
  • Tomato Purée  – my secret ingredient which creates a juicy kebab.
  • Extra Virgin Olive Oil – used to cook the kebabs and to drizzle over the tomatoes before roasting.
  • Tomatoes – for the accompanying roasted tomatoes. Use small tomatoes on the vine like these.
  • Sumac, Salt and Pepper – used to season the kebabs.

Saffron can be found in most supermarkets nowadays. Remember to always grind the saffron strands to a fine powder after purchase because it makes the saffron go further. Bloom the amount of ground saffron directed in this recipe in water before adding to the Kabab Tabei mixture.

What to Serve with Kabab Tabei

Serve with Kateh or Chelo (Persian rice) and Salad Shirazi as pictured. They can also be eaten with flatbreads, salad, chilli and garlic sauce with a side of chips as part of a fake-away style meal!


Kabab Tabei Instagram Reel


Kabab Tabei

Pan-cooked kofte kebabs with roasted tomatoes
Prep Time20 minutes
Cook Time20 minutes
Total Time40 minutes
Course: Main Course
Cuisine: Persian, Iranian
Keyword: lamb, kebabs, easy recipe
Servings: 4
Author: Mersedeh Prewer

Ingredients

  • 500 g lamb or beef mince (approx. 20% fat)
  • 1 large onion
  • 3 cloves garlic (crushed)
  • 1/2 tsp turmeric
  • 1/8 tsp ground saffron (bloomed in 2 tbsp of water)
  • 1 tsp tomato purée
  • 2 tbsps olive oil
  • 2 tsp sumac
  • 500 g small or cherry tomatoes (on the vine)
  • Drizzle of olive oil (for the cherry tomatoes)
  • Salt and pepper (to taste)

Instructions

  • Place mince in a mixing bowl. Grate onion and squeeze most of the juice out. This will ensure the kebab does not fall apart when cooking but will tenderise the meat and be juicy once cooked.
  • Add grated onion, garlic, turmeric, saffron water, tomato purée, salt and pepper to the bowl with mince. Knead mixture well for a few minutes. Cover bowl and leave in fridge for no less than 4 hrs but preferably overnight. Take meat mixture out of fridge about 30 minutes before you want to cook it.
  • Heat oven to 180°C (fan oven). Place tomatoes on a baking dish and drizzle olive oil over them. Season with salt and pepper. Place in oven and roast for 20 minutes.
  • Shape meat mixture into patties of your choice. I shape them into an oval shape about the length and width of my hand (they will shrink a little while cooking).
  • Coat frying pan with oil and place over medium-high heat. After 2 minutes, place kebabs in pan. Sprinkle some sumac on the uncooked side and wait until the meat releases water and the water dries out in the pan before flipping. Sprinkle sumac on the cooked side. Wait until kebabs release further water and it is cooked off. Turn off heat.
  • Serve kebabs with the roasted tomatoes and rice or bread.

Notes

If you like your kababs spicy then try my Kabab Tabei-Tond (‘Tond’ means spicy in Farsi). Follow the recipe and method as set out above but at step 3 replace the tomato purée with 1 tsp of Harissa paste or 1 tsp of biber salcasi (Turkish spicy tomato paste), which you can buy from any local supermarket, and 1 tablespoon of chopped fresh coriander.

The Alternative Roast (Roast Chicken, Veg Stew & Dumplings)

Slow Roast chicken flavoured with lemon, garlic and herbs, served with a vegetable stew topped with cheesy, herby dumplings.  So delicious and comforting, you won’t miss the roast potatoes!

Why the Alternative Roast

I love a classic roast. Being born and raised in the UK, the Sunday roast is of course a recognised and loved tradition in my household. However, I don’t always love the amount of work and washing up involved. So this is my alternative to the traditional Sunday Roast resulting in less chaos in the kitchen!

What is the Alternative Roast

There are two elements to this recipe: (1) the slow roast chicken; and (2) the vegetable stew topped with herb and cheese dumplings.

(1) The Slow Roast Chicken

A whole chicken is placed in a roasting pan with lemons and herbs such as thyme, rosemary and sage. The chicken is rubbed with garlic butter and drizzled with olive oil. It is then slow roasted to juicy perfection for 3 hrs in the oven.

(2) The Vegetable Stew Topped with Herb & Cheese Dumplings

Vegetables (potatoes, carrots, parsnips, leeks, mushrooms and broccoli) are cooked in one pot. The cooking liquid is a white wine and herb infused gravy. Fluffy dumplings made with parmesan and parsley are made and popped on the top to cook.

How to Serve The Alternative Roast

For presentation purposes, serve in the dishes you have cooked the chicken, stew and dumplings in with a side of cranberry sauce. 

For serving individual portions, ladle some of the stew and dumplings onto each person’s dish. Carve the chicken and add. Serve with a dollop of cranberry sauce on the side.

This recipe is comfort food at its best!

Storing Leftovers

Once fully cooled, store leftovers in an airtight container in the fridge up to 3 days. Reheat in a medium heated oven or in a microwave.

Other Sunday Comfort Food Recipes

Check out some of my other comforting recipes to serve as Sunday lunch.


The Alternative Roast

Slow Roast Chicken served with a Vegetable Stew and Dumplings
Prep Time30 minutes
Cook Time3 hours 15 minutes
Total Time3 hours 45 minutes
Course: Main Course
Cuisine: British
Keyword: family recipes, roast dinner
Servings: 4 (to 6)
Author: Mersedeh Prewer

Ingredients

Roast Chicken

  • 1 large whole chicken (1.8kg - 2kg)
  • 1 lemon (halved)
  • 2 cloves garlic (crushed - for rubbing on the chicken)
  • Fresh mixed herbs roasting herbs (sage, thyme and rosemary - usually sold as a packet of roasting herbs)
  • 2 tbsp butter (room tempertaure)
  • Drizzle of olive oil
  • Salt and pepper

Vegetable Casserole

  • 2 tbsp olive oil
  • 3 cloves garlic (crushed)
  • 400 g new potatoes (washed and halved)
  • 1/2 tbsp plain flour
  • 2 medium leeks (washed and chopped into 2 inch chunks)
  • 4 parsnips (washed, peeled and chopped into 3 inch chunks)
  • 300 g Chantenay carrots (washed and halved)
  • 250 g mushrooms (cleaned and quartered)
  • 8 stalks purple sprouting broccoli
  • 225 ml white wine
  • 1.5 litre chicken stock
  • 2 bay leaves
  • 1 tbsp fresh thyme leaves
  • Salt and pepper  (I sometime use crushed / ground pink peppercorns as an alternative which gives a lovely note to the stew)

Dumplings

  • 140 g chilled butter (chopped into small cubes)
  • 250 g self-raising flour
  • 1 -2 tbsps grated parmesan
  • 125 ml water
  • Chopped fresh parsley for the dumplings and garnish

Instructions

Prepare and Roast the Chicken

  • Preheat oven to 120°C  (fan) / 140°C (conventional) / gas mark 1.
  • Place herbs in chicken’s cavity and around the chicken in a roasting tray. Add lemon halves and garlic bulbs to the tray.
  • Crush 2 garlic cloves and add to butter. Rub into chicken and drizzle with olive oil. Season and place in oven for 3 hrs. After it has been in the oven for 90 mins, baste with the juices and return to the oven.
  • About 15 mins before the end of the cooking time for the roast chicken, increase heat to 200°C (fan) / 220°C (conventional) / gas mark 7 to crisp skin. Once the skin is crispy, to your liking, leave to rest uncovered out of the oven for 15 mins.

Prepare and Cook the Vegetable Stew

  • While chicken is in the oven, heat oil in a casserole dish or other dish which can be placed in an oven (approx 3 litres capacity) over medium heat.
  • Add potatoes and cook for about 5 mins. Add flour and mix - this will help to thicken the gravy for the vegetable casserole.
  • Then add vegetables, with the slowest cooking veg going in first, with around 2 minute intervals between each addition (carrots, parsnips, leeks, mushrooms). Hold back on the broccoli for now.
  • Add bay leaves, thyme leaves and garlic and mix. Add wine, if using. Then add the stock and lower the heat and let simmer until vegetables are soft.
  • Season to taste. You can put the lid on the casserole once simmering or if you have cooked the casserole early on and intend to reheat prior to adding the dumplings.

Prepare the Dumplings

  • Rub butter into flour until it looks like bread crumbs. Add chopped parsley and parmesan. Add water and form into a dough. Divide and make 8 balls.
  • While the stew is simmering and about 5 mins before increasing the temperature of the oven to crisp the chicken skin, remove the lid of the casserole dish (you will have no further need for it during the remaining cooking steps). Add broccoli and dumplings and let the stew simmer.
  • Place stew in oven with chicken (200°C (fan) / 220°C (conventional) / gas mark 7) 15 minutes before roast chicken has finished cooking. Check in on dumplings half-way through cooking time i.e. when you take the chicken out to rest.
  • Leave stew in oven as the chicken is resting for a further 15 mins (overall about 30 mins in the oven) for dumplings to turn golden.

Serve The Alternative Roast

  • Serve vegetable stew with roast chicken and a side of cranberry sauce. Sprinkle the chicken and stew with some finely chopped parsley. Ladle vegetable stew and dumplings into pasta-style bowls, place a portion of carved chicken on top with a dollop of cranberry sauce and tuck away.