A soup for all seasons! This chunky chicken soup is packed full of pasta and colourful vegetables, flavoured with turmeric and the usual soup aromatics …
Maman’s Golden Chicken, Vegetable and Pasta Soup

COOKING WITH AROMATIC HERBS & SPICES
A soup for all seasons! This chunky chicken soup is packed full of pasta and colourful vegetables, flavoured with turmeric and the usual soup aromatics …


Traditionally tabbouleh is a salad made with finely chopped fresh parsley, mint, sumac, fine bulgur wheat, tomatoes, onion and is dressed with olive oil and lemon juice. It is a Levantine salad and is commonly served as part of a mezze in the Middle East.
This recipe is a variation of the traditional recipe. It swaps bulgur for giant couscous and also adds cucumber, fresh coriander and pomegranate arils to the salad. This is a great winter salad as it is hearty due to the giant couscous. Also, pomegranates are in abundance during the winter months in the UK.
I love this salad with the pomegranate arils looking like little jewels in the salad. If you can’t find pomegranates or you want to make this in the summer, this salad is still gorgeous without them.
The tiny couscous grains you are probably the most familiar with are a yellow-hued grain. They are traditionally made from the hard part of the durum wheat kernel (semolina). The semolina is mixed with water to form the small grains. It is steamed and dried, with a fluffy texture. Couscous originates in North Africa, and can be used in place of rice and pasta. Giant couscous are small balls of pasta. It is made by repeating the couscous-making process but gradually adds water to the semolina, rolling it to create larger grains. Giant couscous has a bouncy texture.

An incredibly versatile salad that complements many meals as a side salad. Also a great replacement for rice as the carb offering in a meal! Serve this salad alongside other mezze-style dishes. Pairs well with chicken kebabs like Persian saffron chicken kebabs (Jujeh Kabab). Also great with grilled salmon as pictured below.

Store in an airtight container in the fridge up to 3 days.

Rose flavoured chewy sweets dipped in dark chocolate and decorated with a little white chocolate. The dark chocolate perfectly balances the sweetness of the Turkish …


You may be familiar with dopiaza dishes from South Indian cuisine where this curry-style dish made with lots of onions commonly features. This dish actually originates from Khorasan (in present-day covering the East of Iran and the West of Afghanistan). It was apparently introduced to South Asia by the Mughals. It apparently then spread to countries with a South Asian diaspora. Regional variants have evolved in locales such as Hyderabad, India and several regions of Pakistan. The name Dopiyazeh translates into two onions (‘do’ meaning two in Persian; and ‘piyaz’ meaning onion) which makes reference to the amount of onions used in this dish.

Dopiayzeh is now firmly established as a traditional dish from Shiraz. It can be made with cubed or ground lamb/beef, chicken, shrimp, potatoes, and a copious amount of sliced onions. My recipe is made with prawns (‘meygoo’) and takes both the Persian origins and the South Asian development of this dish with a few extra additions of my own. There is a slight heat to my recipe, which you can leave out if you prefer.

This dish pairs well with my Sambuseh-e Sabzijaat (vegetable samosas) recipe, rice and some delicious pickles and chutneys such as mango chutney and turmeric pickle as pictured above. The rice I have made is Persian-style rice with naan tahdig but I have flavoured it with turmeric, cardamom pods, some cloves and cinnamon to make it a pilau-style rice.

We Persians are not known for our salad recipes. In fact we generally only have two known salad recipes. The first is Salad Shirazi – our chopped cucumber, tomato and red onion salad with a lime, olive oil and mint dressing. The second is Salad Olvieh – our take on a Russian potato salad dish.
This salad is very much a homage to ingredients that are associated with Persian cuisine. It is also a homage to the summer season with its refreshing feel and seasonal ingredients.
Make sure you use fresh ingredients for the salad.
A great accompaniment to kebabs such as Persian saffron chicken kebabs (Jujeh Kabab) or pan-cooked kofte kebabs (Kabab Tabei).
Also great served alongside any of the Persian frittata dishes – kuku!


This gorgeous hummus with a contrasting and complementary green topper came about by chance one weekend. I love both beetroot and hummus – the combination of the two brings about a delicious hummus with a slightly sweet yet earthy flavour profile. The colour, as you can see, is a vibrant pink and will look incredible at any dinner party as an appetiser for your guests.
After making a batch, my eyes kept being drawn to green items in my fridge which I felt would look incredible as a topper for the hummus. Luckily, the green items I had in my fridge all complemented a beetroot hummus perfectly including cucumber, olives, spring onions and dill. With the addition of feta (also a great friend of beetroot) and a few extra sprinkles (nigella seeds) and spice (cumin), a dash of olive oil and lemon juice, this hummus was complete.


Fried chicken in any form has a special place in my heart (and my belly)! I am continuously looking for ways to bring new joy to me eating crispy fried chicken, from my curried chicken schnitzel recipe to my shwarama flavoured crispy goujons, it was only a matter of time before I found a way to make a Persian version of a fried chicken burger and here it is in all its glory.
Chicken thighs marinated in a blend of buttermilk, saffron, turmeric, chili sauce, onions and garlic. Then coated with flour flavoured with Persian mixed spice (Advieh), Za’atar, onion and garlic powder and then deep fried to perfection. Served in a toasted brioche bun with lashings of moosir mayonnaise, crispy onions, Persian pickled cucumbers, Thai basil, tomato and lettuce. This amazing variation to the classic crispy chicken burger really is worth going the extra mile to get your hands on three Persian elements which are not readily available in your local supermarket.
The Persian equivalent of mixed spice. It is used in many dishes with the combination of spices varying from region to region in Iran. Advieh is a fragrant mix of spices and can be compared in use to garam masala in Indian cooking, whereby its addition seasons the dish and adds a further layer of aromatics. It can simply be sprinkled on a plain rice dish, added to stews and marinades for meat. The one I use is a mixture of nutmeg, rose petals, cumin, cardamom, coriander, cinnamon and black pepper.
I buy it online from a supplier on Etsy. However, advieh can also be picked up from most Iranian or Middle Eastern food shops. This spice forms part of the flour dredge for the chicken thighs and takes the flavour profile to another level of delicious.
Described in English as a Persian shallot, it is similar to a Solo or Elephant garlic. It has a flavour profile similar to garlic but slightly sweeter and softer in its spiciness. They grow wild in the foothills of the Zagros Mountains, and have to be found and dug out of the earth – a similar process to truffles. It adds an amazingly distinctive flavour to dishes.
You can buy moosir from most Middle Eastern food shops or online. It is available in its dried form and needs to be rehydrated by soaking in water overnight. Whilst we usually use this for our yogurt dip Maast O’Moosir, I started adding it to my mayonnaise and have not looked back. It is so delicious. I am pretty sure once you try it, you will also never want to have mayonnaise any other way. The Moosir Mayo compliments this chicken burger brilliantly.
They are baby cucumbers pickled in salt, vinegar and flavoured with tarragon. Our pickled cucumbers are not sweet like British pickled cucumbers and they really compliment this burger. You can buy them online or in most Middle Eastern supermarkets, but if you cannot get your hands on them then normal dill pickles usually used in burgers are absolutely fine.
With the exception of three items above, you should be able to source all the other ingredients from your local supermarket. Both Tescos and Waitrose now have Thai basil available but if you can’t get your hands on Thai basil, then Italian basil is totally fine.
Serve this burger with some french fries for the perfect fakeaway!
https://www.instagram.com/reel/Cf4yljVIKlg/?utm_source=ig_web_copy_link


Focaccia is a flat leavened oven-baked Italian bread. It can be served as a side dish or as sandwich bread and it can be round, rectangular, or square shape. I love making focaccia in the summer and this recipe feels particularly summery with its warming saffron notes and the use of sun-drenched tomatoes.
Sun-drenched tomatoes have had less time in the sun (to remove some of their water content) and are slightly less chewy and more juicy than sun-dried but you can totally substitute with sun-dried tomatoes. Feel free to add rosemary or other herbs to the focaccia. The sun-drenched tomatoes I use come in an oil and basil dressing so I just use that.
You achieve a rise from a no-knead focaccia by leaving the dough it in the fridge over night. But if you want the focaccia quicker, then mix all the dough ingredients and knead by hand for 10 to 15 minutes. Leave to prove until it has doubled in size (up to 2 hrs) and then follow steps 3 to 5 below.
Serve with a charcuterie-style board of Italian cold cuts and picky bits as pictured above. Also great served as part of a Mezze offering in light of the Middle Eastern flavours.

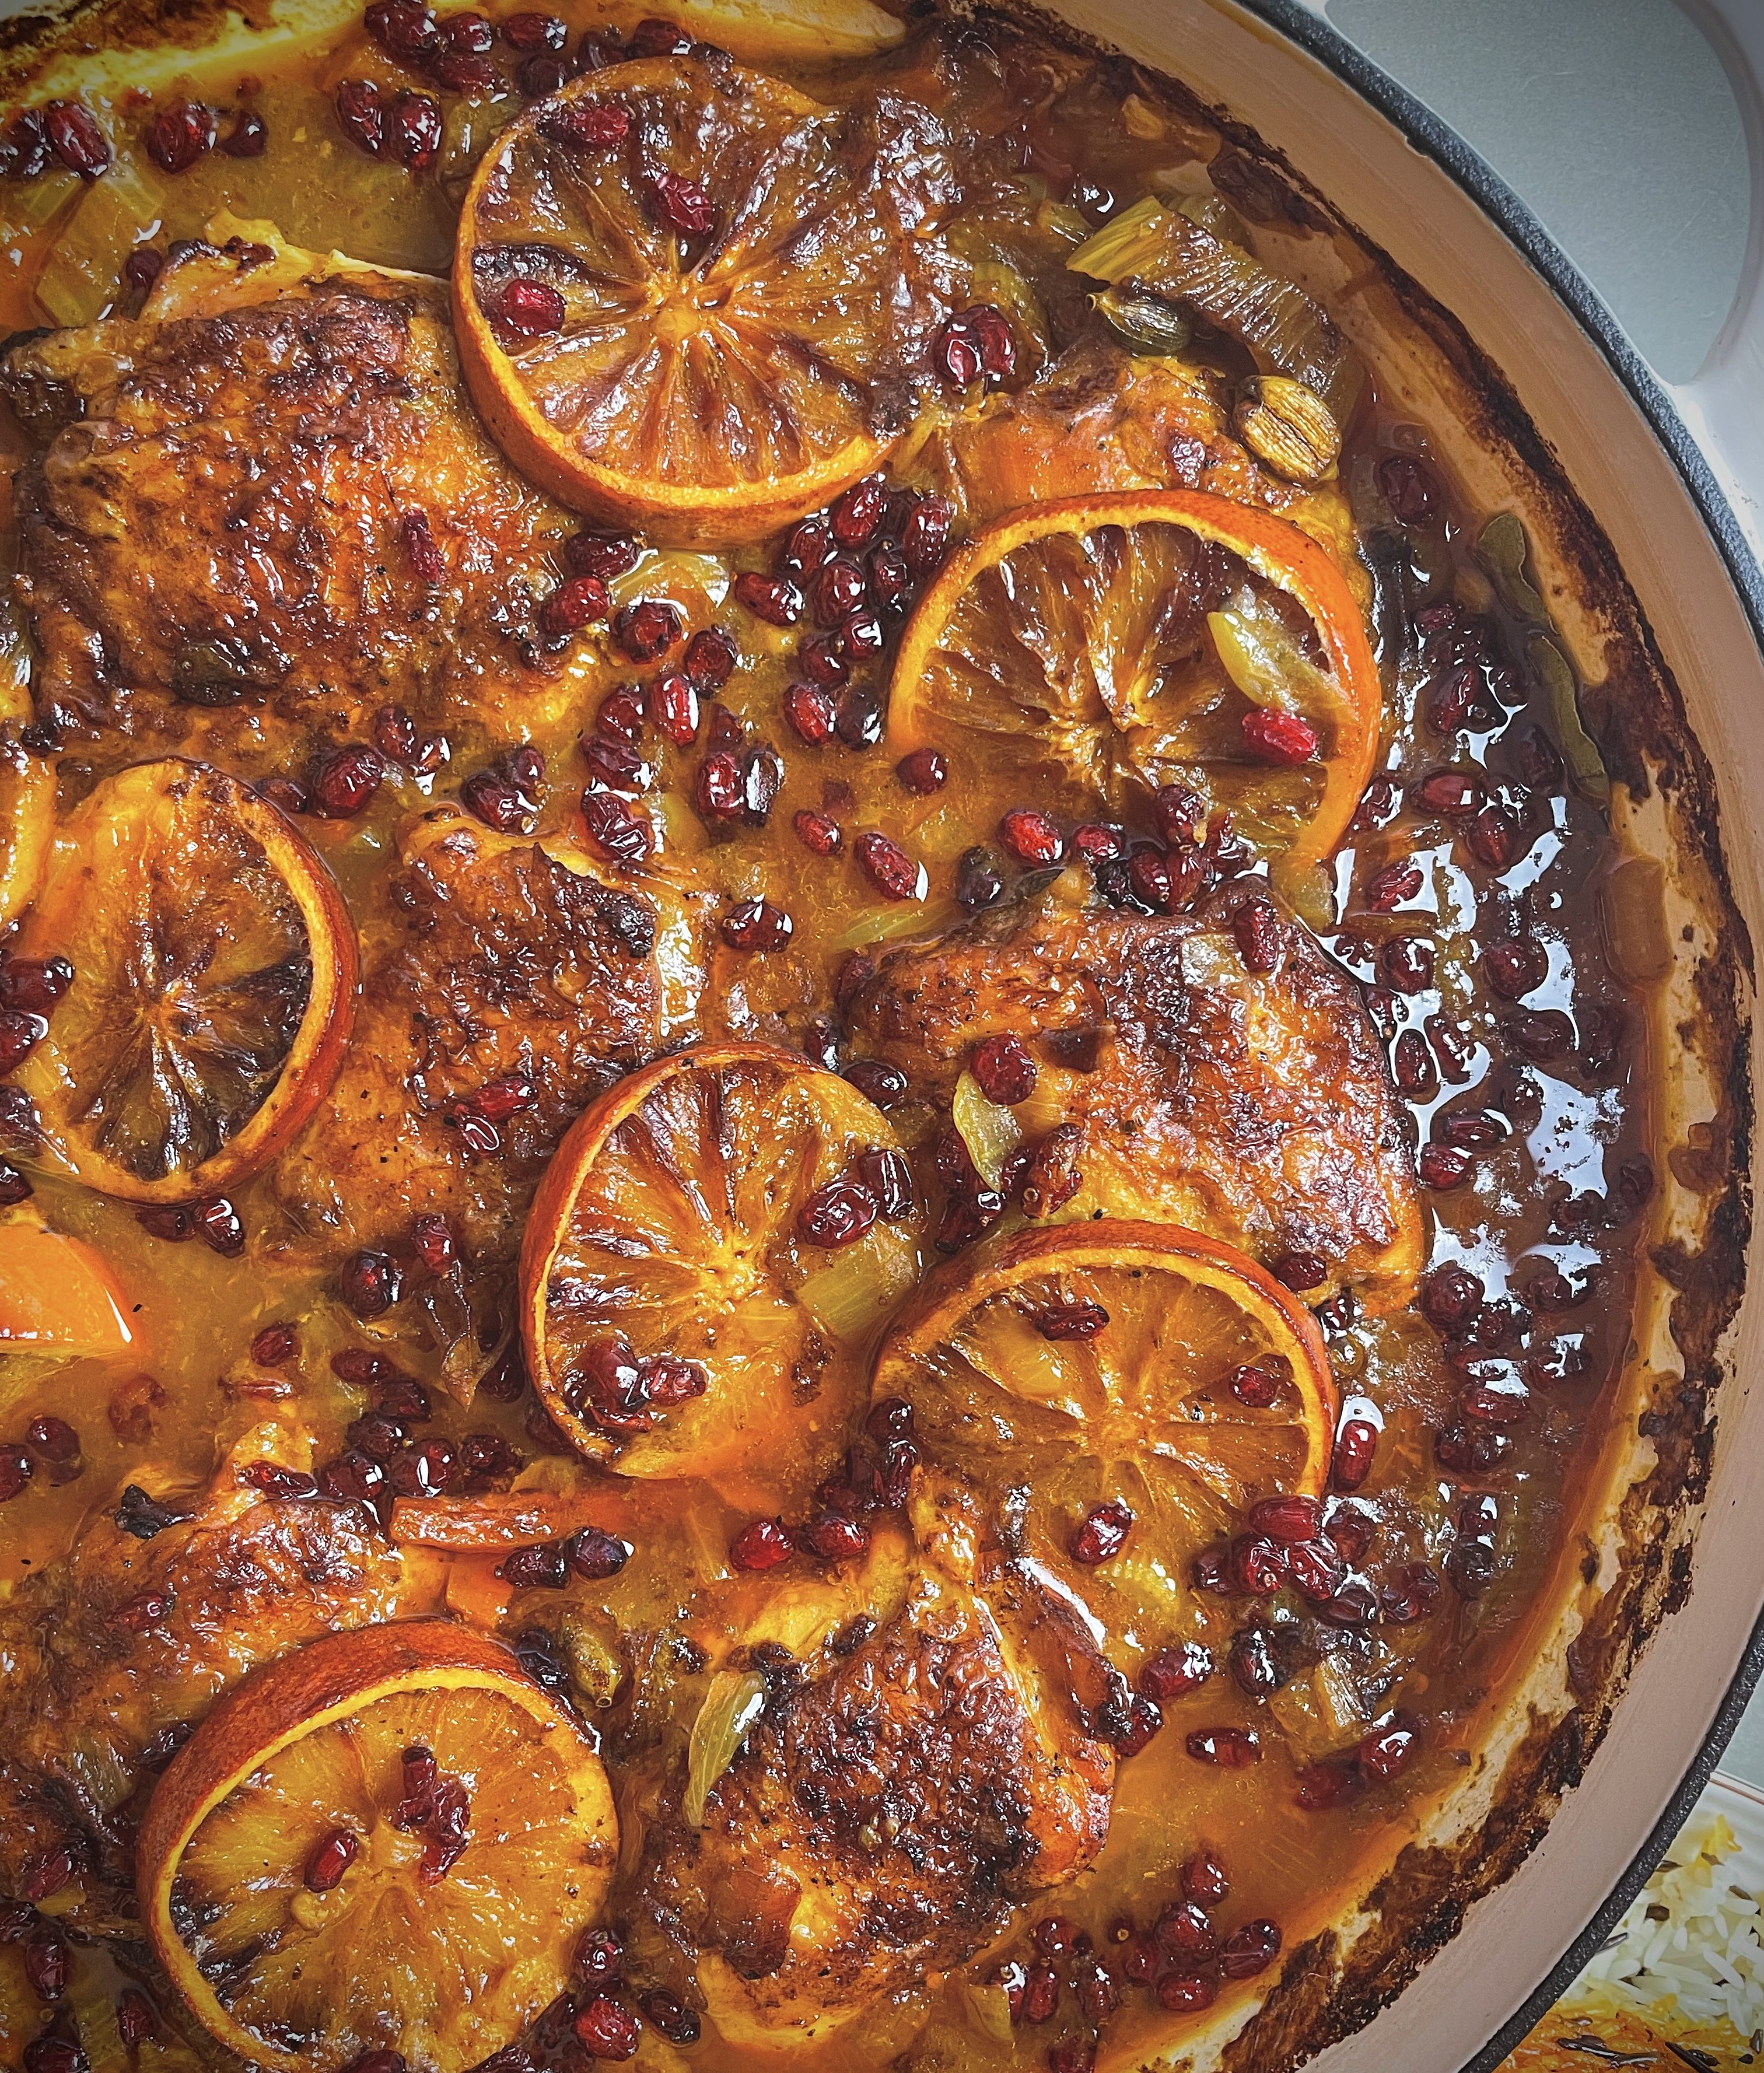
Slow cooked chicken thighs with fennel, oranges & barberries


A while ago I ate an incredible Middle Eastern inspired salad bowl from Grain Kitchen – a lunchtime salad bar based in London, E1. They had a number of different themed salad bowl options such as the California Bowl or the Mediterranean Bowl but obvs I chose the Middle Eastern bowl!
Part of the salad offering was a charred red cabbage wedge with a cashew and carrot dressing. I fell in love with the vibrant colour and taste of this component and set about trying to recreate it in my own home. And after a few goes the recipe below is the one I am happy to share with you. This dish is very versatile, not complicated to make and will really brighten up your plate. The dressing recipe yields a fair bit, we usually use all of it but if any remains just drizzle over a green salad – it will last up to a week if kept in the fridge.


Check out some other vegetarian recipes written by the same author by clicking the links below.


The ingredients for this powerhouse marinade are simple:
Just add to chicken breast or other cut and leave to marinade for a minimum of 4 hours (preferably overnight) and then cook.
For those of you who may not be familiar with za’atar, it is a herb grown in some Middle Eastern countries, like Lebanon, with a flavour like a cross between thyme and oregano. It is also the name for a spice and herb mixture used like a condiment. Use oregano as an alternative if you cannot get your hands on za’atar,
Harissa originates from North Africa. While every region has its own variation and take on the paste, it’s particularly associated with Tunisia. It is a hot chilli pepper paste, the main ingredients of which are roasted red peppers, Baklouti peppers, spices and herbs such as garlic paste, caraway seeds, coriander seeds, cumin and olive oil.
Rose harissa contains dried rose petals, and, usually, rosewater too. This softens the heat and adds a subtle floral note to the dishes it is added to. The use of yoghurt in the marinade also tempers the heat a little further making this a recipe that can be enjoyed by the whole family. Using a shop bought paste like this really helps to reduce thinking and preparing time so I welcome these shortcuts. A little addition of extras like lime, garlic and yogurt make it more personal.
One of my favourite ways to eat this chicken is an element to a salad bowl (kind of like a Buddha Bowl) with the fragrant and smokey flavours from North Africa and the Middle East, as pictured below.

But it can be eaten with anything or any way you want, whether you want to eat it as a kebab roll with the chicken wrapped in some flatbread with salad, pickles and some garlic and / or chilli sauce alongside some chips; or with some rice or Tabbouleh or other healthy grain based salad.

See my how to reel on Instagram via the link below…
https://www.instagram.com/reel/Cghf7BaISkY/?utm_source=ig_web_copy_link


This recipe came about one evening when I had a jar of chickpeas, a can of coconut milk and a pillow of herbs starting to look a little pathetic in my fridge. The resulting dish totally bowled my family over and is now in the top 5 of our go to vegan dishes.
The recipe below yields enough to feed 4. If you have fewer people to feed, honestly, don’t revise the measurements down! As with most curry-style or Persian khoresh (stew) dishes, leaving it a day for the flavours to intensify by the ingredients getting to know each other better makes the experience of eating leftovers even more spectacular than your first bite of this dish straight after cooking!

The spices used for this curry are turmeric and coriander seeds with the addition of red chilli, garlic, ginger and coconut milk to give those familiar aromatic curry notes. The use of herbs such as dill, parsley, coriander and fenugreek bring a about a flavour profile more common to Middle-Eastern cuisine. This dish is deeply savoury but with a kick of citrus from the use of fresh lime juice to make it an all-round delightful meal.
Other than the amazing herbs and spices, the real key to this dish is the type of chickpeas you can get your hands on. I always find that the chickpeas that are available in jars are larger and more buttery than tinned chickpeas. So I recommend finding them over canned ones if you can.

Serve with rice such as kateh or chelo and a side of salad, such as Shirazi, and flatbread.
The curry can be stored in the fridge for up to 5 days. It can also be stored in the freezer for up to 3 months. Remember to cool the curry down completely before storing and use an airtight container.
To reheat, make sure the curry is fully defrosted, and heat gently in a saucepan over a low heat or in the microwave in an approporiate dish.


This recipe is pure summer on a plate! A light and easy meal – I often cook it the night before we want to eat it and store it in the fridge. It can be eaten warm or cold and it is a great way to get a hit of goodness into you.
Kuku (also spelled ‘kookoo’) is an egg-based, vegetarian dish from Iran made with beaten eggs, folding in various ingredients. It is similar to the Italian frittata, the French quiche or an open-faced omelette, but it typically has more vegetables than its Western counterparts. It is served either hot or cold as a starter, side dish or a main course, and is accompanied with bread and either yogurt, salad and / or rice.
The two most well known kuku recipes are Kuku Sabzi (made with herbs and barberries and / or walnuts); and Kuku Sibzamini (made with potatoes). Ultimately, you can make kuku with any vegetables you like.
This kuku recipe materialised after an Oddbox delivery. Oddbox is a wonderful company that rescues surplus or imperfect vegetables and fruit, which would otherwise not make it to the shopper, and offers it by way of a home delivery subscription services. It’s a fantastic initiative that helps me to eat more vegetables and fruit, while helping to save our planet. It is also been great for challenging my recipe ideas as sometimes I can fall into the routine of buying the same ingredients and cooking the same recipes.
One of my Oddbox deliveries had some kale and red peppers, which lead me down the path of experimenting with the medium of kuku. Kale has become very popular in the UK due to the health benefits. Our supermarkets are always well-stocked with kale and red peppers, potatoes and red onions – the vegetables used to cook this dish. I use garlic, smoked paprika and chillies for the aromatic notes, which results in a smoky and gently warming feel to eating this even when eaten cold.
Traditionally kuku is fried and flipped over to brown on the other side, but I prefer to oven bake mine so the recipe below is geared towards baking but feel free to fry it if you prefer, either omelette-style or like fritters.

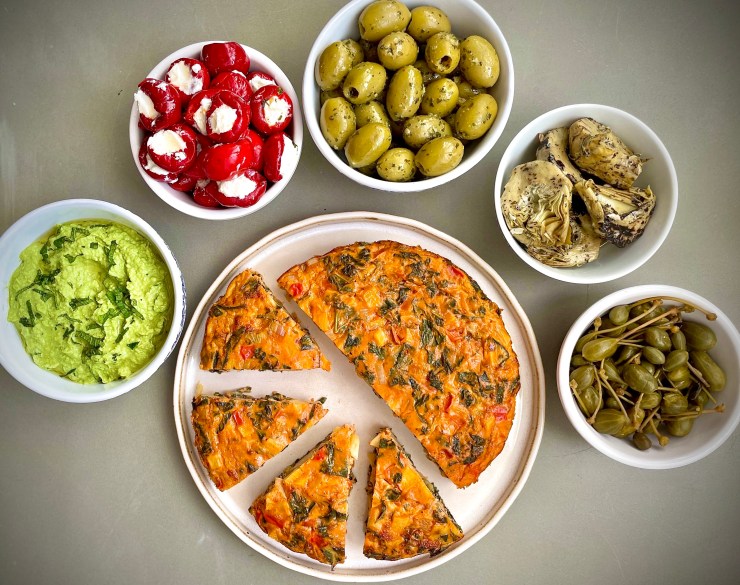
The beauty of kuku is that you can make a batch one evening and have it as a quick lunch on your working days. It is also a well-loved addition to a mezze-style meal or served with bowls filled with lots of antipasti.
I have paired this kuku recipe with a pea, mint and feta dip, making the overall experience fresh, light and summery.
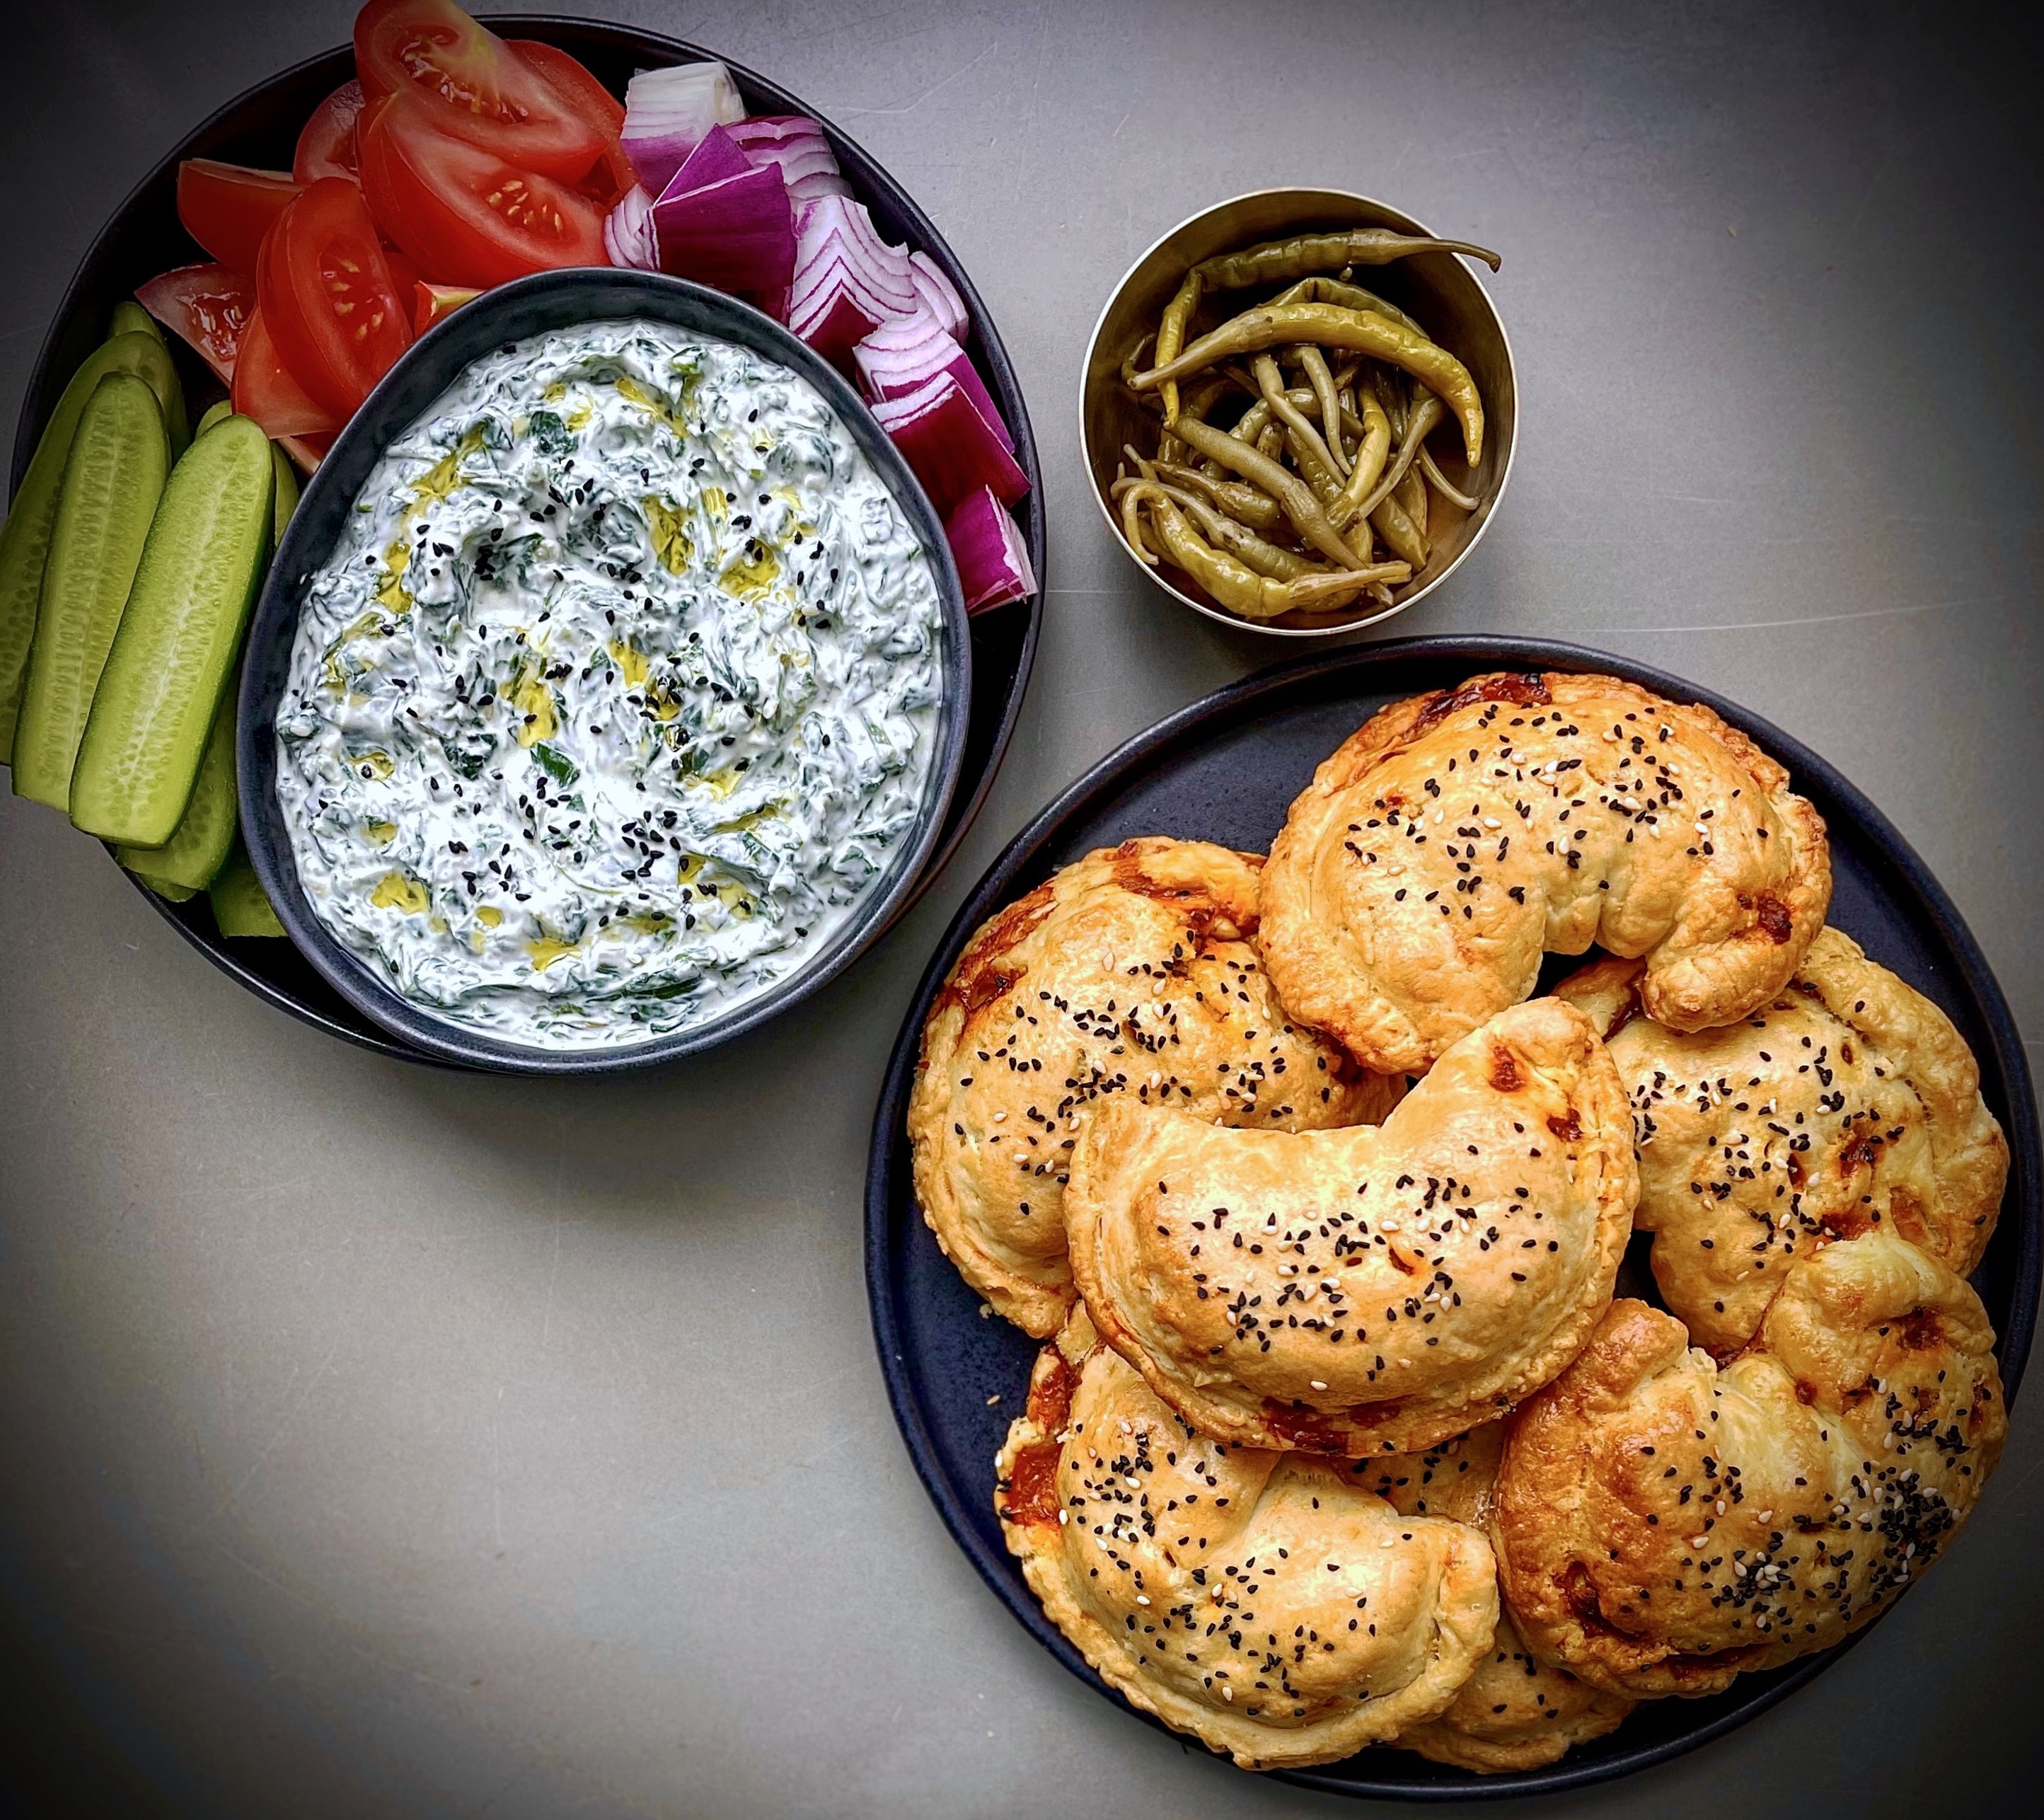

A pasty is a British baked pastry associated with Cornwall, South West England, but has spread all over the British Isles. It is typically made by placing an uncooked filling, usually meat and vegetables, in the middle of a flat shortcrust pastry circle, bringing the edges together in the middle, and crimping over the top to form a seal before baking. The humble pasty has been made with so many different fillings including chicken tikka or steak and blue cheese. The variations are endless and always welcomed!
The recipe below calls for pre-made and rolled shortcrust pastry making it very easy to make. You can buy this type of pastry from most leadking UK supermarkets. The pastry is filled with a cooked mixture of halloumi, potatoes, onions, pepper and fresh herbs cooked in a spicy tomato based and red pepper sauce. The pies are then baked to golden perfection.
The feel of this meal is very much Mediterranean-inspired and we happily eat this in the warmer seasons for either lunch or dinner. The pasties fare well eaten cold and we often eat the leftovers for our packed lunches on ensuing work days.

For the purposes of my recipe offering to you, I have paired the borani with some spicy halloumi pasties.
Borani Esfenaj is a delicious Persian dip made simply with yoghurt and spinach and flavoured with garlic, a little lemon or lime juice and some salt and pepper.
I have fond memories of this dip as my khaleh (maternal aunt) would make it regularly when I was a child. This dish and Nargessi (a Persian breakfast / brunch dish made with garlicky spinach and eggs) are the reasons I love spinach so much. Spinach cooked with lots of garlic is a perfect combination and, with the addition of thick creamy yoghurt, makes this dip a lovely addition to a table full of appetisers for your guests to dip in and out of or a mezze-style offering.
Borani Esfenaj can either be made with frozen or fresh spinach. If you are making it with frozen spinach use 500g for the recipe below. Using frozen spinach creates a creamier dip and is perfect if you are serving it alongside crisps or other crudites for people to dip in and out of. If you are serving it as part of a meal, as in this recipe, then the chunkier dip with fresh spinach works well both in texture and aesthetics.
I like to make the borani the day before so the flavours can intensify.

In addition to serveing alongside the Borani, I love serving these two dishes with pickles, olives or salad-type ingredients to pick at too. If you want some extra carbs with this dish, then roasted sweet potato wedges work really well and can be dipped into the borani as well.
Both the pies and the Borani will keep in an air tight container in the refrigerator up to 5 days.
The pies can be frozen and kept up to 3 months. Make sure the pies have fully cooled before freezing or palcing in the fridge. Make sure th epies a re fully defrosted before baking them if frozen.
Re-heat the pasties in a medium oven circa 160°C in a fan oven.
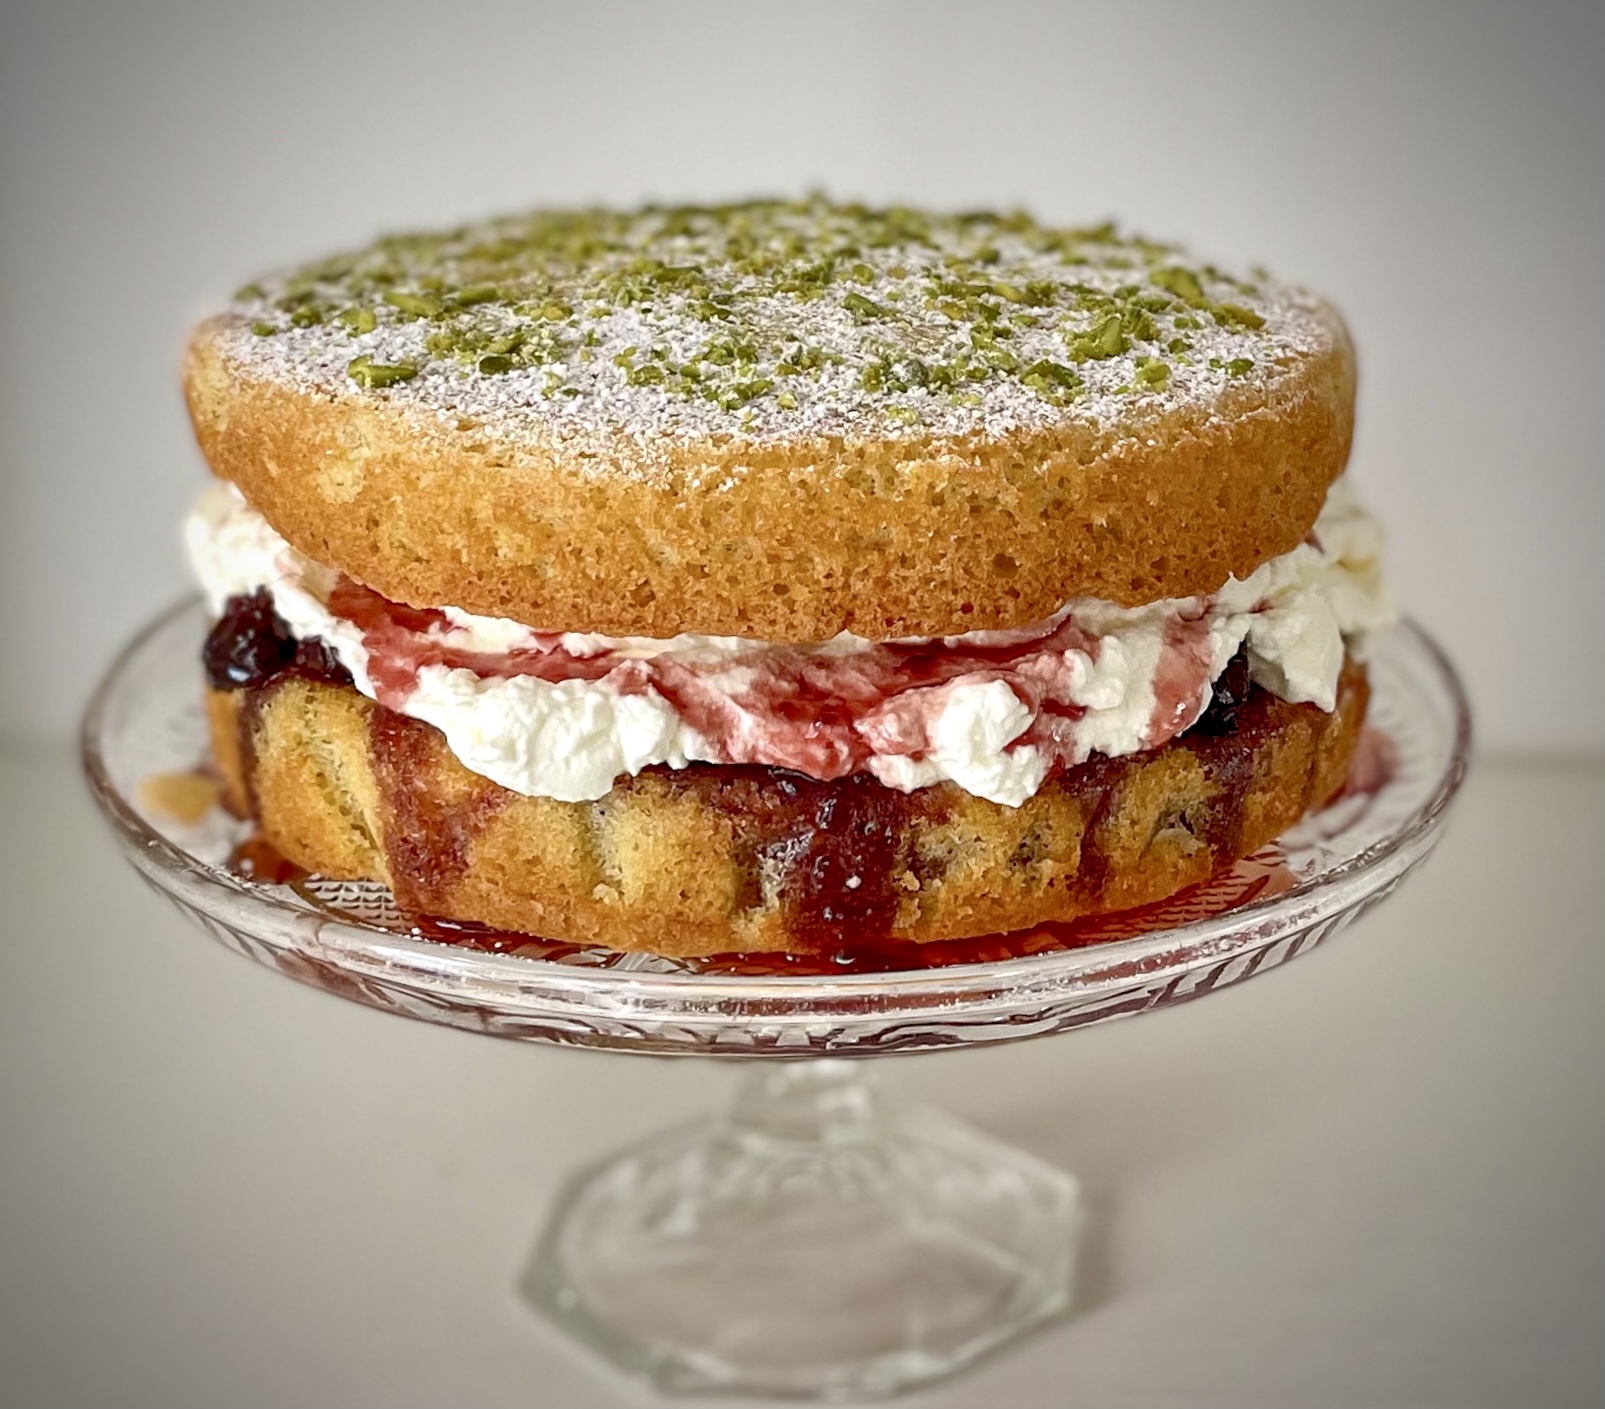

Once in a while I channel Mary Berry and produce a home-baked goody. One such moment resulted in this delight. I really fancied a Victoria Sandwich, mostly because it brings so much joy with very little baking effort. The only problem was I only had Persian sour cherry jam in my cupboard as opposed to strawberry or raspberry.
I briefly contemplated heading out to the nearest shop for jam but it was a Sunday, my pyjamas felt snug and frankly I couldn’t be bothered. I rummaged around my kitchen cupboards for flavour inspiration to match with the sour cherry jam. I landed on lime and vanilla for the sponge, rose water flavoured whipped cream and ground pistachios for the decoration. The experiment was a success and my Persian version of the British classic Victoria Sandwich is a firm favourite in my household.
The cake batter is the standard cake sponge recipe of:
A little baking powder is added to help the rise. Vanilla paste and lime zest flvour the sponge. The filling is made using sour cherry jam and whipping cream flavoured with rosewater.
It’s a great cake batter and one where even the novice baker will yield the perfect crumb. I also use this for my Persian Delight Cupcakes.
You can get your hands on sour cherry jam, rose water and pistachios from most Middle-Eastern food shops or online. The brand of sour cherry jam I use is ‘1&1‘ but ‘Anjoman‘ is also an excellent alternative. If all else fails just use a good quality cherry jam from your local supermarket which will also have rose water and pistachios.


Slice and serve with a nice cup of chai or coffee. It makes a wonderful addition to an afternoon tea-style offering.

Most people are familiar with this incredible and versatile dip. For those who are new to velvety dip, hummus is a savoury Middle-Eastern dip made from cooked, chickpeas blended with olive oil, tahini (sesame paste), lemon juice, and garlic. It is difficult to pinpoint the exact origins of hummus as multiple different theories and claims of origins exist in various parts of the Middle-East but apparently the earliest known written recipes for a dish resembling it are recorded in Egyptian cookbooks written in the 13th century.
It can either be made with a chunky or smooth texture and comes in a variety of different flavours and different toppers. From plain hummus with a drizzle of olive oil and sprinkling of za’atar to Beetroot Hummus with Feta and Anything-Green Topper, the variations to the offering of hummus are endless.
For those of you who may not know, harissa originates from North Africa, while every region has its own variation and take on the paste, it’s particularly associated with Tunisia. It is a hot chilli pepper paste, the main ingredients of which are roasted red peppers, Baklouti peppers, spices and herbs such as garlic paste, caraway seeds, coriander seeds, cumin and olive oil.
Rose harissa contains dried rose petals, and, usually, rosewater too. This softens the heat and adds a subtle floral note to the dishes it is added to. I use Belazu rose harissa. They also do an apricot version which can be used as a substitute in the recipe below as can the standard harissa paste.
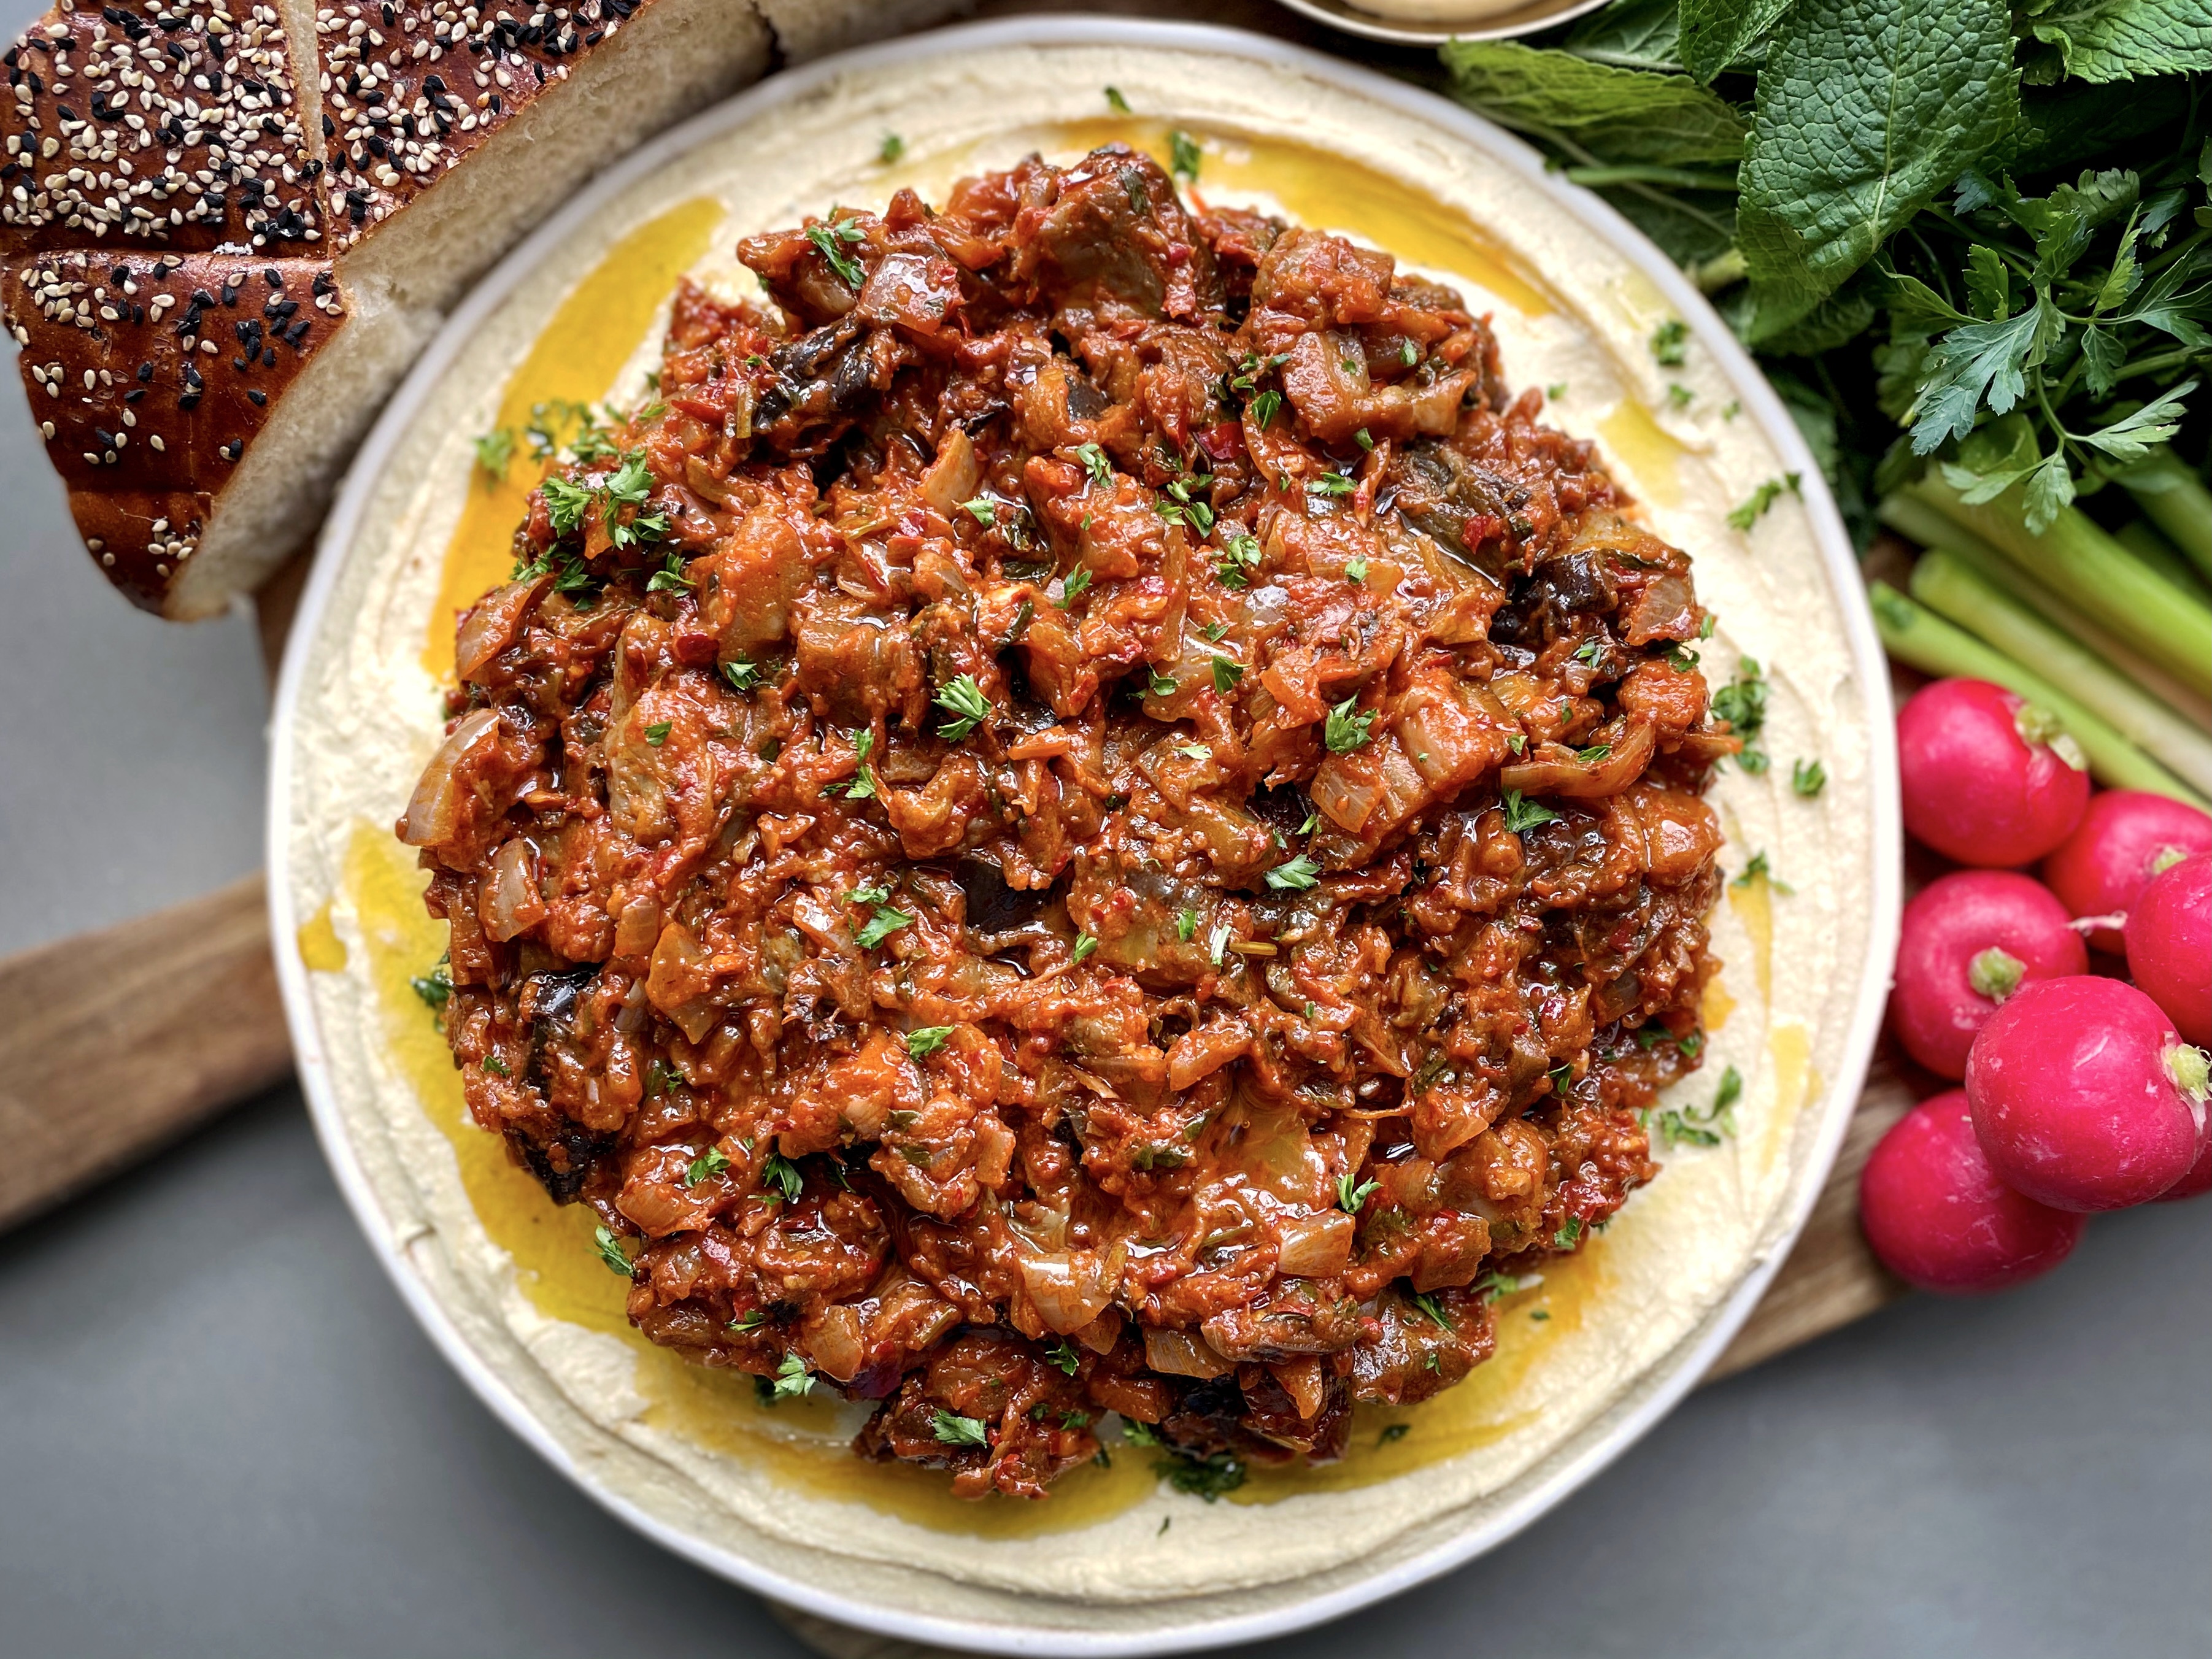
The topper to this hummus dish is simply sautéed aubergines and onion with the addition of rose harissa, garlic, tomato purée, balsamic vinegar and fresh coriander to create an aromatic dish with a little heat.
The aubergine mixture, which you can either have cold or warm, is then layered on hummus and served with some bread to dip into it. You can buy your favourite brand of hummus as opposed to making it from scratch but the recipe for hummus below is so easy, resulting in a beautifully creamy and smooth hummus, I can’t recommend it enough.
It is a really easy dish to prepare and one that can easily be cooked up after work. It is vegan so a great option for a ‘Meat Free Monday’ meal. Served with other mezze-style offerings such as bread, olives or, as pictured, a fresh herb and feta cheese platter, this dish can generously feed 4 people.
If there are any leftovers, place in an airtight container and store in the fridge up to 3 days. Makes a great sandwich or wrap filler.


Sholeh Zard is a Persian rice pudding dessert flavoured with saffron, rose water, sugar and decorated with almonds, pistachio and cinnamon. It is a delicious and comforting dessert and loved by Iranians.
After a light bulb moment, I decided to experiment with the flavours of Sholeh Zard with the concept of overnight oats. Overnight oats have become very popular over the last decade. A quick, healthy and delicious way of preparing rolled oats. With no cooking required, it is prepared by mixing rolled oats, liquids and other ingredients and leaving them in the fridge overnight.
The process is simple. Soak oats and chia seeds in milk, Greek yogurt, saffron, rose water and honey. Leave in the fridge overnight. Add flaked almonds and some strawberries the next day and give it a good stir. Serve it in a bowl topped with more strawberries, crushed pistachios and a sprinkle of cinnamon. The resulting breakfast dish is fresh, light and delicious. My family love it and it is one of our regular breakfast options. It’s so low maintenance to knock up and washing up is easier than the mess cooked porridge creates!
I have included chia seeds in the recipe due to the nutritional benefits including adding fibre and protein. Feel free to leave them out if you are not a fan. You can also make this with non-dairy milk and yogurt and replace the honey with maple syrup if you are vegan. If you would prefer to substitute the honey / maple syrup with a wholesome way to sweeten the oats, then grate pear or apple into the oat mixture prior to leaving in the fridge overnight.


I discovered a love for dal over the last ten years. My husband introduced me to the world of dal during one of our early dates. He is a big fan of Indian cuisine and always orders a dal dish to accompany his meal. I was reluctant at first but, after a spoonful, I fell in love with the creamy texture and the aromatics of the dish. I wanted to make a dal dish with a Persian twist so I started experimenting!
This dish is made with yellow split peas (Channa Dal) using the holy trinity of Persian cooking – onion, turmeric and saffron. I also added other familiar flavours from our cuisine during the recipe development including limoo amani (dried lime), advieh (Persian mixed spice) and nigella seeds. The resulting dish is deliciously savoury, packing an umami punch and satisfying even the die-hard carnivore.
Limoo amani can be bought online or from most Middle-Eastern food shops. It adds a musky and citrusy flavour to the dish. Be careful when piercing a hole into the dried lime as you do not want the seeds to fall out while it is cooking as it can make the dish bitter – just a gentle shallow poke into the lime with the end of a sharp knife.
Advieh can also be bought from most Middle-Eastern food shops – I buy mine online from Freshly Spiced on Etsy. The combination fo spices are nutmeg, rose petals, cardamom, cumin, black pepper, goriander, and cinnamon.
I like a little heat in my food so I add red chilli to my dal, but feel free to leave it out.
Serve it with roti or naan, rice if you want a hearty meal with fresh herbs, torshi or a yoghurt dip on the side such as Maast o’Moosir (yoghurt and Persian shallot dip) or Maast O’Khiar (Persian yoghurt and cucumber dip).
This dal dish will last in the fridge up to 5 says if kept in an airtight container. Always cool dishes completely before refridgerating.
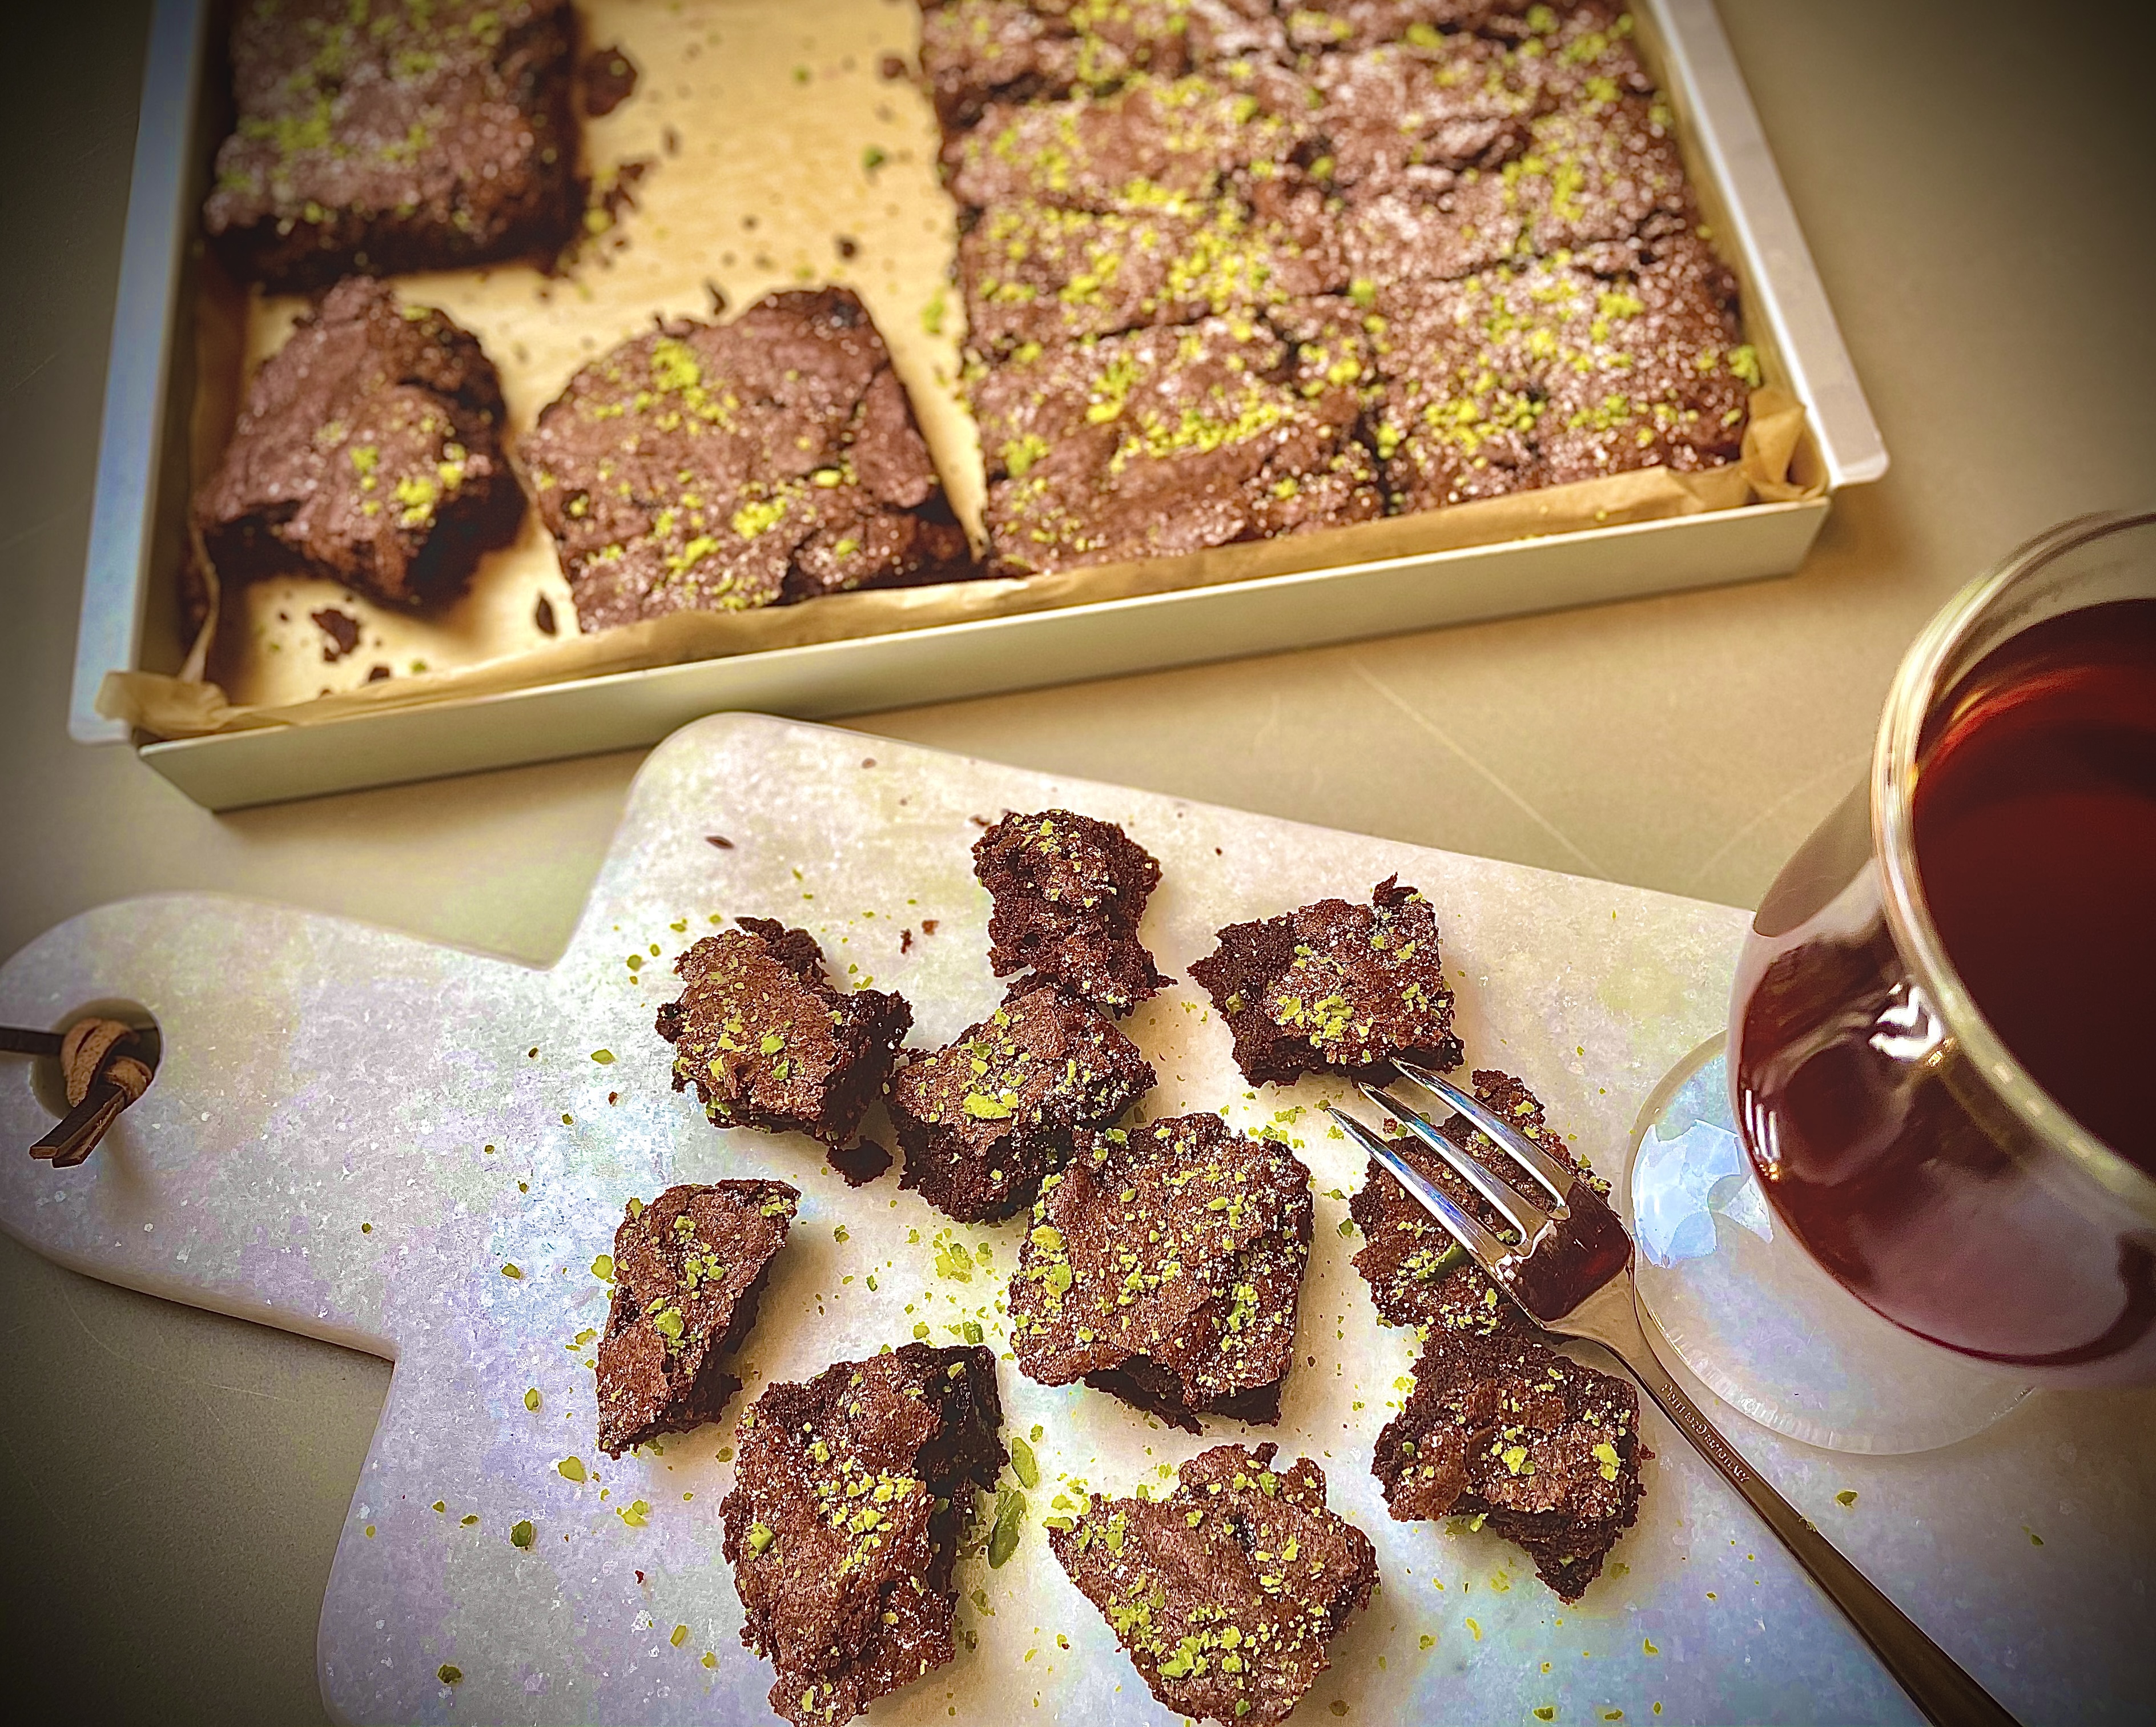

This brownie recipe is one I created to add to the selection of tea-accompanying sweet treats for the chocolate lovers in my family. I have adapted a standard brownie recipe and added Luxardo Maraschino Cherries and fresh pistachios to add a little Persian touch to a familiar friend.
For those of you who have not come across Luxardo Maraschino Cherries, these are candied cherries soaked in Luxardo marasca cherry syrup. Often used by mixologists for their cocktails, replacing those bright red cocktail cherries, with a deep purple, slightly sour cherry. They are incredible in cocktails, but also an amazing addition to baking recipes or just being poured (with the syrup) over a vanilla ice cream. Using them in a brownie recipe adds to the gooey texture and balances the sweetness with a subtle sour note.
These brownies can be eaten as a dessert with cream or custard, should you fancy. I break mine down into little bites and enjoy them with a glass of hot Persian tea.
We Iranians love our tea (chai). As far back as I can remember my maman has always had a samovar in her kitchen. Samovars are traditionally used to make tea. Originating in Russia, the samovar has spread through Russian culture to other parts of Europe and the Middle-East, including Iran. Samovars are typically crafted out of metal such as plain iron, copperp or polished brass. It usually consists of a body, base and chimney, steam vent and teapot. The body shape is usually like a barrel and the water is boiled in this section.

Many samovars have a ring-shaped attachment around the chimney to hold and heat a teapot filled with tea concentrate (tea leaves with water). The tea pot is placed on the chimney and is steamed by the boiling water in the body of the samovar. The tea is then poured into a glass and then hot water is poured in to dilute the tea to your liking i.e. the right colour. No milk is added to our tea. Modern samovars now look like giant kettles and are made using plastic.
Most Iranian households will have a special blend of tea leaves that they mix themselves from varieties such as Early Grey, Darjeeling and Assam. I remember my maman pouring all her chosen tea leaves into a large bowl and mixing them by hand with the aroma of the leaves filling the kitchen. That aroma is amplified into another level of joy while it steams in the little tea pot on the samovar. Then when the fragrance hits your nose before you take your first sip.
Part of tea drinking ritual is having sugar cubes or sweet nibbles served alongside our tea. The veteran tea drinker will place a sugar cube in their mouth and sip their tea, with the cube breaking down and sweetening each intake of the beverage. Some of us like our tea with the well-known Middle-Eastern sweet treat, Baklava. With a table full of Persian treats ranging from biscuits to nougat, we are often spoiled for choice.
Despite the array of these Persian delights my heart always belongs to chocolate! Being born and brought up in the UK, chocolate was introduced to me at a young age and if it is on offer I always choose it first over other sweet treats. Whether it is the posh stuff that a Swiss-based relative has brought over as soghati (a gift from their travels) or the cheap stuff we gorged on as kids – I am not picky!
Check out some other sugary treats!


I first made these cupcakes over 10 years ago for a friend’s wedding and they have been a firm favourite ever since.
I experimented with many flavours but these were the favourite amongst my family. Not surprising really as they are flavoured with rose water and pistachio. Had I found a use for saffron in the recipe, then I would have had the holy trinity of Persian desserts! But I felt the pink and ivory tones were perfect for the cupcakes’ presentation and that the yellow effect of incorporating saffron would not have been as aesthetically pleasing.
Cupcakes enjoyed a lot of attention and glamour following the episode in Sex and the City featuring Magnolia Cupcakes. The UK saw Violet’s Cakes, Hummingbird Bakery and Lola’s Cupcakes as the UK’s representation in the delicious world of luxury cupcakes.
Most people I speak to have baked cupcakes before but even if you are a first-timer, despite how pretty these mini cakes look, they are very easy to create. Many of us have cake-making equipment in our kitchen nowadays, such as electric beaters or stand mixers and if not it’s a great workout for the arms!

My go-to recipe for a basic cake batter is what I call the 4:225 ratio. For 4 eggs, I use a weight of 225 grams for the dry ingredients and butter.
The above are the ingredients for a basic vanilla sponge. I then add other flavours, such as rose for this recipe or lime zest for my cherry and lime flavoured victoria sandwich. This standard cake batter recipe creates a lovely crumb and yields 12 cupcakes in a muffin-style tray or 1 x two layer victoria sandwich (8″ diameter).
For the decoration, I use a standard buttercream icing flavoured with vanilla and rosewater. I use crushed fresh pistachio slivers and edible rose petals, which are both available from Iranian and Middle-Eastern supermarkets. If you cannot get your hands on rose petals, then crushed fresh pistachios are equally lovely for decorating.
Store cupcakes in an airtight container for up to 3 days.
https://www.instagram.com/reel/CnjyceKAXQE/?utm_source=ig_web_copy_link
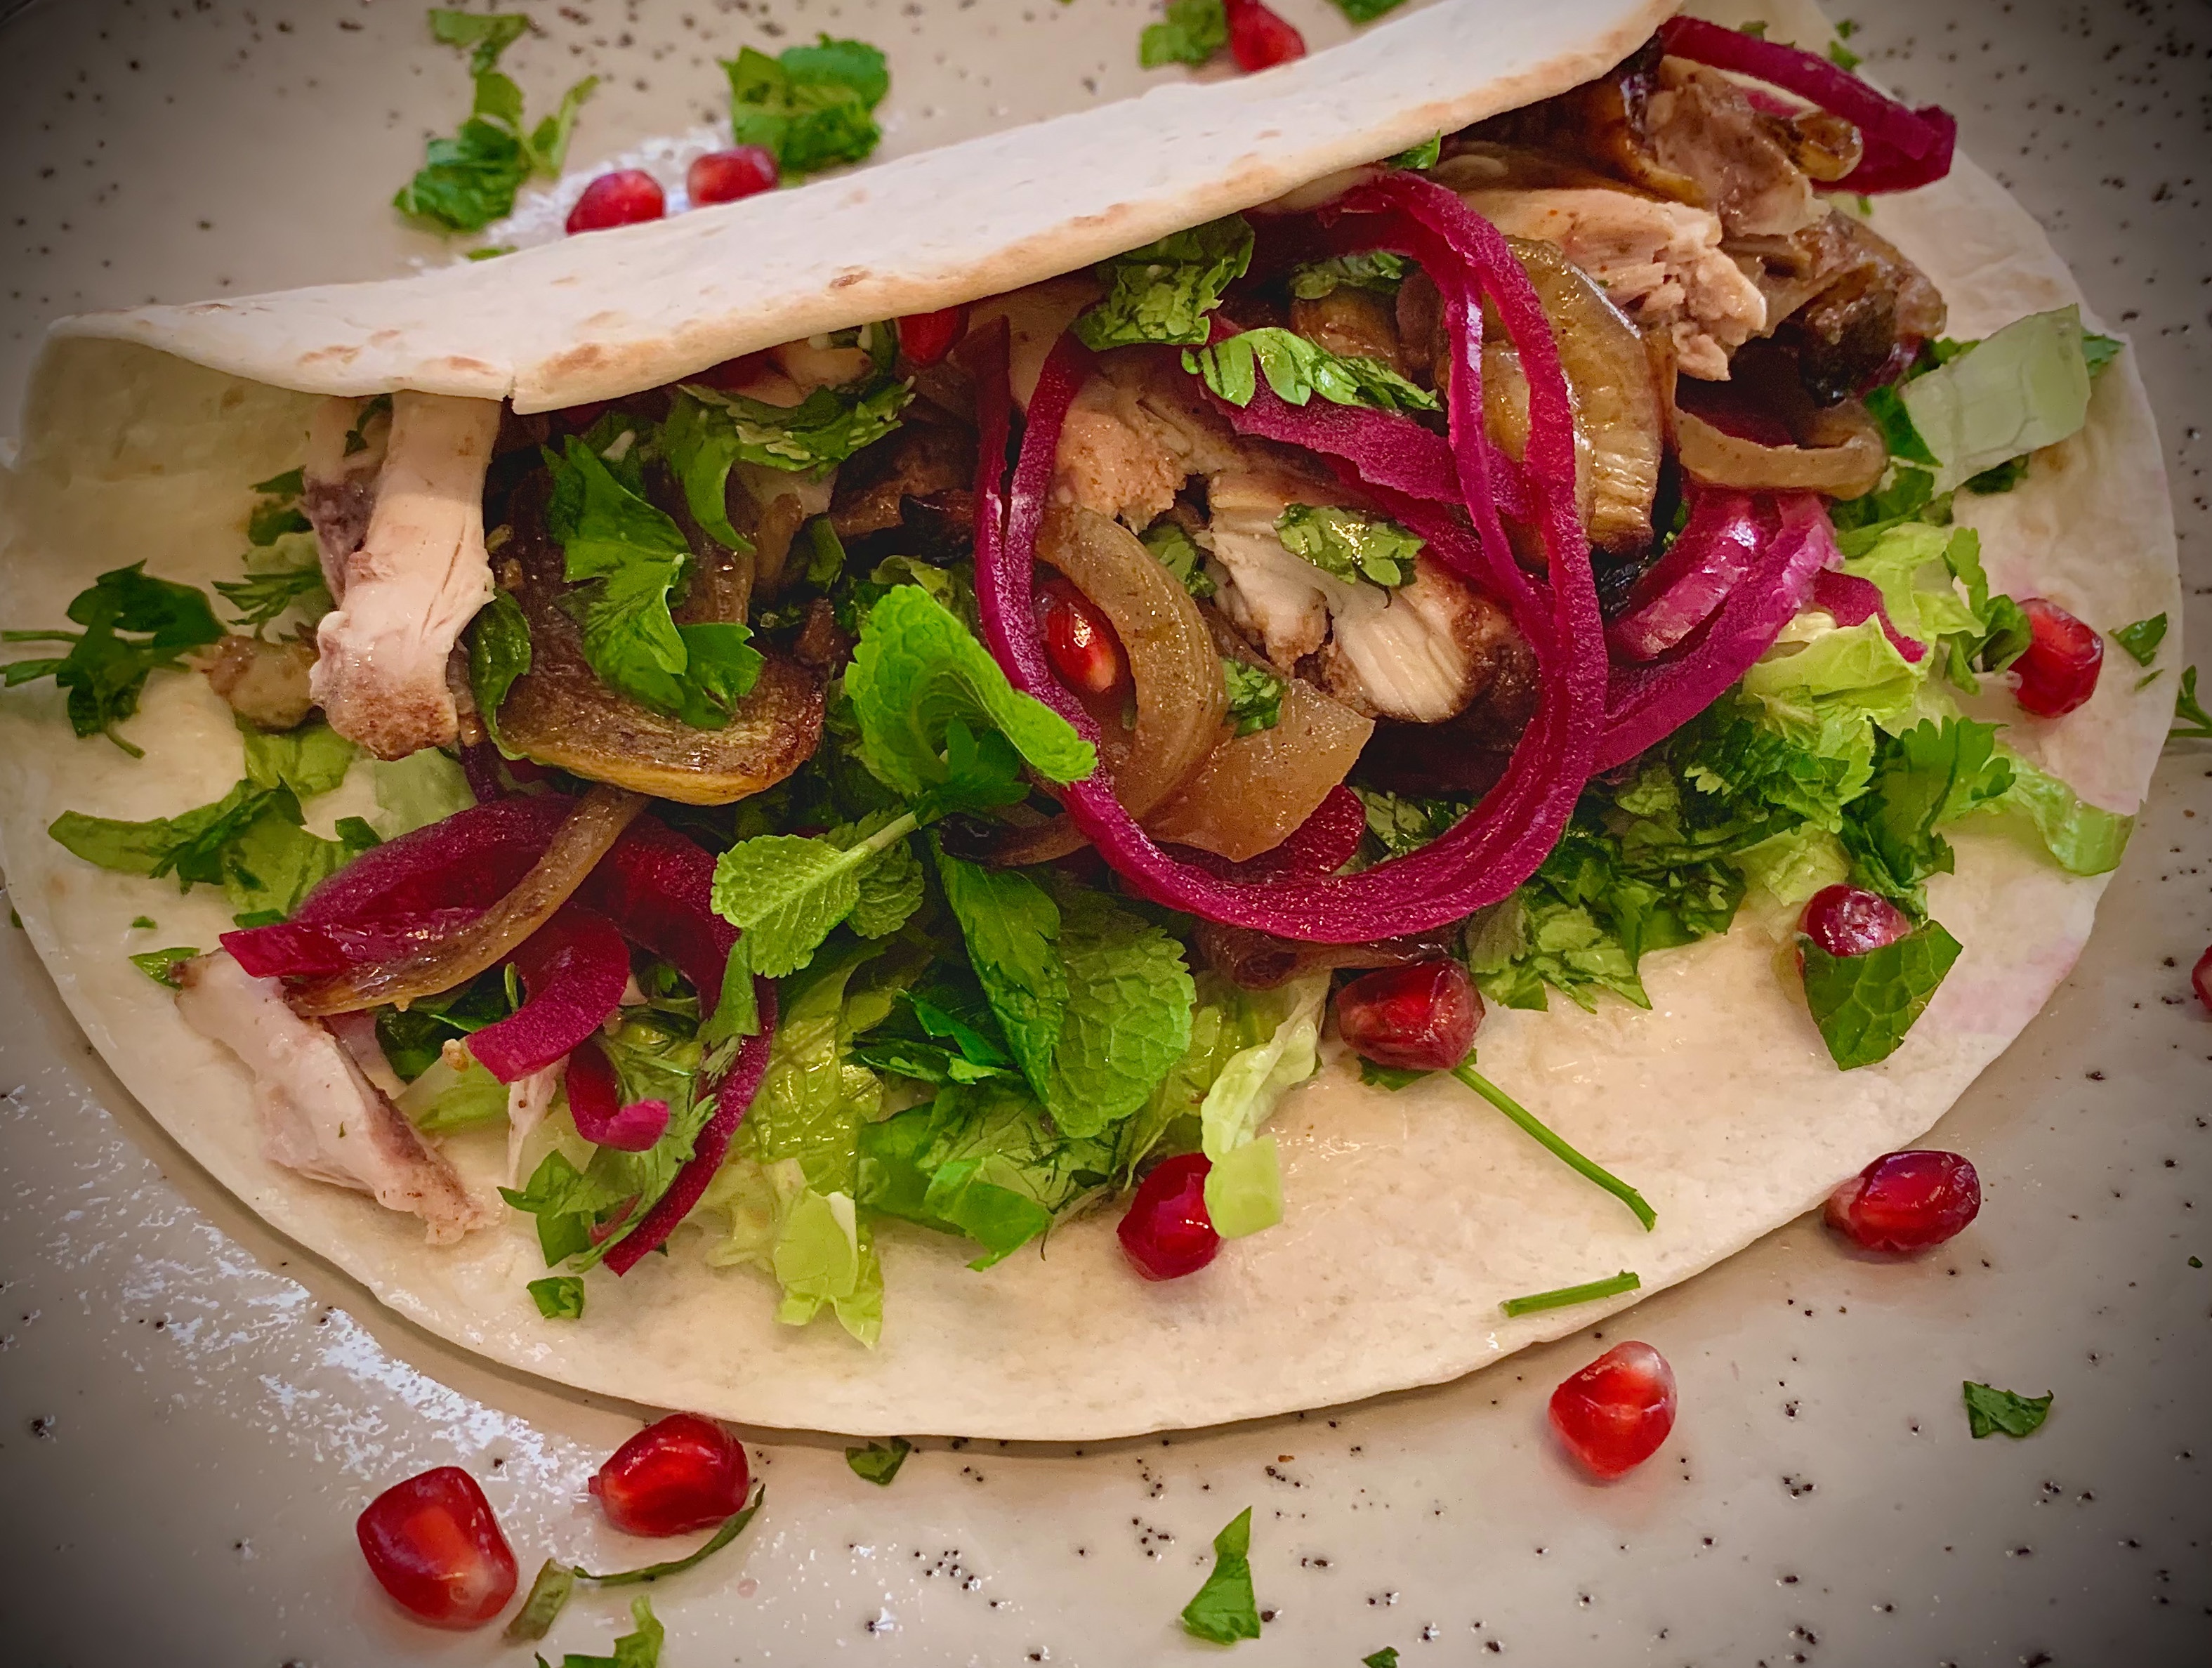

This is an easy recipe and will be familiar territory for you if you have, as most people have these days, cooked and / or eaten some kind of wrap. If not, it is still an easy recipe to follow and worth getting your hands on the two ingredients you may not have to hand – pomegranate molasses and moosir (Persian shallots).

Pomegranate molasses is a thick syrup with a dark grape colour made from reducing pomegranate juice. The juice is obtained from a tart variety of pomegranate. You can pick up pomegranate molasses (rob-e-anar) from most Middle-Eastern food shops, online or even at some local supermarkets.
It is deliciously tart but the addition of maple syrup and freshly squeezed orange juice balances the favours perfectly for this marinade and complements the chicken. As with all marinades, the longer you leave it the better. So if you have time to marinate your chicken overnight (thighs with skin on and bone in preferably) this will allow the chicken to absorb all the delicious flavours.

Moosir is a Persian shallot and has a flavour profile similar to garlic but slightly sweeter and less spicy. They grow wild in the foothills of the Zagros Mountains. They have to be found and dug out of the earth – a similar process to truffles. Commonly used in a yoghurt dip called Maast-o-Moosir, this ingredient adds an amazingly distinctive flavour to dishes. You can buy moosir from most Middle-Eastern food shops or online.
Moosir is bought in its dried form and will need to be rehydrated before use. Soak the moosir in water for 3 to 24 hours. Drain, then rinse in cold water and pat dry. Check the moosir and cut out any stems that remain hard after soaking. I have added the moosir to the mayonnaise for the chicken wraps. Once hydrated, chop the moosir finely and mix with mayonnaise. If you cannot get your hands on this Persian shallot, then you can use garlic. I would recommend steeping the cloves in boiled water before mincing and adding to the mayonnaise to temper the raw garlic.


I love a classic roast. Being born and raised in the UK, the Sunday roast is of course a recognised and loved tradition in my household. However, I don’t always love the amount of work and washing up involved. So this is my alternative to the traditional Sunday Roast resulting in less chaos in the kitchen!
There are two elements to this recipe: (1) the slow roast chicken; and (2) the vegetable stew topped with herb and cheese dumplings.
A whole chicken is placed in a roasting pan with lemons and herbs such as thyme, rosemary and sage. The chicken is rubbed with garlic butter and drizzled with olive oil. It is then slow roasted to juicy perfection for 3 hrs in the oven.

Vegetables (potatoes, carrots, parsnips, leeks, mushrooms and broccoli) are cooked in one pot. The cooking liquid is a white wine and herb infused gravy. Fluffy dumplings made with parmesan and parsley are made and popped on the top to cook.

For presentation purposes, serve in the dishes you have cooked the chicken, stew and dumplings in with a side of cranberry sauce.
For serving individual portions, ladle some of the stew and dumplings onto each person’s dish. Carve the chicken and add. Serve with a dollop of cranberry sauce on the side.
This recipe is comfort food at its best!
Once fully cooled, store leftovers in an airtight container in the fridge up to 3 days. Reheat in a medium heated oven or in a microwave.
Check out some of my other comforting recipes to serve as Sunday lunch.