Showing: 1 - 21 of 21 RESULTS

Hearty Tabbouleh (with Giant Couscous)

This fresh salad is a hearty take on the traditional Middle Eastern Tabbouleh. Bulgur is replaced by giant couscous, which is mixed with fresh herbs, tomatoes, cucumbers and pomegranate seeds. It is then dressed with dried mint, sumac, lemon juice, and olive oil. A great winter salad.

A Variation on a Theme

Traditionally tabbouleh is a salad made with finely chopped fresh parsley, mint, sumac, fine bulgur wheat, tomatoes, onion and is dressed with olive oil and lemon juice. It is a Levantine salad and is commonly served as part of a mezze in the Middle East. 

This recipe is a variation of the traditional recipe. It swaps bulgur for giant couscous and also adds cucumber, fresh coriander and pomegranate arils to the salad. This is a great winter salad as it is hearty due to the giant couscous. Also, pomegranates are in abundance during the winter months in the UK.

I love this salad with the pomegranate arils looking like little jewels in the salad. If you can’t find pomegranates or you want to make this in the summer, this salad is still gorgeous without them.

What is Giant Couscous?

The tiny couscous grains you are probably the most familiar with are a yellow-hued grain. They are traditionally made from the hard part of the durum wheat kernel (semolina). The semolina is mixed with water to form the small grains. It is steamed and dried, with a fluffy texture. Couscous originates in North Africa, and can be used in place of rice and pasta. Giant couscous are small balls of pasta. It is made by repeating the couscous-making process but gradually adds water to the semolina, rolling it to create larger grains. Giant couscous has a bouncy texture.

Serve this Dish With…

An incredibly versatile salad that complements many meals as a side salad. Also a great replacement for rice as the carb offering in a meal! Serve this salad alongside other mezze-style dishes. Pairs well with chicken kebabs like Persian saffron chicken kebabs (Jujeh Kabab). Also great with grilled salmon as pictured below.

Storing Leftovers

Store in an airtight container in the fridge up to 3 days. 


Hearty Tabbouleh (with Giant Couscous)

Prep Time25 minutes
Cook Time15 minutes
Total Time35 minutes
Course: Appetizer, Salad
Cuisine: Middle-Eastern
Servings: 6
Author: Mersedeh Prewer

Ingredients

  • 150 g giant couscous (also known as Israeli or pearl couscous)
  • 5 spring onions
  • 200 g cherry tomatoes
  • 1 medium cucumber
  • 40 g fresh parsley
  • 40 g fresh coriander
  • 1 medium pomegranate
  • 1 tsp sumac
  • 1 tsp dried mint
  • 1 lemon
  • Olive oil
  • Salt and pepper (to taste)

Instructions

  • Cook the Giant Couscous:
    Place a medium saucepan over high heat, add 1 tablespoon olive oil and toast giant couscous for a few minutes. Pour water over to cover with 2 inches clear and bring to a boil. Cook couscous until soft circa 10 mins. Drain and leave to one side to cool down and until ready to use.
  • Prepare the other Salad Ingredients:
    Finely dice cucumber and cherry tomatoes. Finely slice spring onions. Finely chop fresh coriander and parsley. Remove arils from pomegranate. Add all ingredients plus couscous to a serving bowl.
  • Dress and Serve the Hearty Tabbouleh:
    Add dried mint, sumac, salt and pepper to the salad. Drizzle generously with olive oil and add juice from 1 lemon. Toss, taste and adjust seasoning or dressing to taste. Serve the salad.

Ful Medames (Egyptian Fava Bean Stew)

This breakfast dish common to North Africa and the Middle East is made with fava beans and warming spices then topped with a citrus-dressed chopped salad. Perfect for scooping up with warm fluffy flatbread.

What is Ful Medames?

This ancient breakfast dish, originating in Egypt and then migrating to other countries such as Lebanon, Iraq, Ethiopia, Sudan and Morocco, is traditionally made by mashing fava beans cooked with cumin and then serving with olive oil, garlic, lemon juice and chopped fresh parsley.

The recipe below has some some swaps, variations and extra additions to the traditional recipe and is very much loved by my family. My version of this recipe starts by frying onions with garlic and cumin, Pul Biber and oregano. I add chopped tomatoes and then the fava beans before mashing to coarse dip consistency. The final dish is served with a topper – a medley of chopped tomatoes, cucumber, red onions, fresh parsley and coriander dressed in olive oil and lime juice.

Ingredients in Ful Medames

  • Fava Beans  – use tinned fava beans to make the dish super-quick to prepare and cook because you won’t need to soak and cook dried fava beans. You can find tinned fava beans in most supermarkets. I use this variety.
  • Water – a little cooking liquid for the fava beans.
  • Cumin – ground cumin to give the Ful a warm and nutty flavour.
  • Pul Biber or Aleppo Pepper – dried dark red pepper flakes with a mild smoky flavour and moderate heat. Alternatively use a little chilli or leave it out completely.
  • Oregano – my addition to the classic recipe for an earthy and peppery profile.
  • Garlic – used to enhance the aromatics in the dish.
  • Onion – one brown onion to cook the fava beans with; and one red onion for the topping.
  • Olive Oil – good quality extra virgin olive oil, used both during the cooking process and for serving the dish.
  • Lime Juice – used during cooking to flavour the fava beans.
  • Lemon Juice – used for the topper dressing.
  • Tomatoes – I cook my fava beans with tomatoes as it gives a further depth to the flavour. Tomatoes are also required for the topper.
  • Cucumber – for the topper.
  • Fresh herbs – I use a combination of fresh parsley and coriander for my Ful Medames topper. Feel free to use only parsley or coriander if you prefer.
  • Salt and Pepper – seasoning for the dish.

How to Serve Ful Medames

Serve Ful Medames with either boiled or fried eggs with a side of fluffy pitta bread or Sesame and Nigella Seed Flatbread (as pictured above) and tahini to drizzle over as well. Alternatively top further with crumbled feta to add another delicious layer to this dish.

Ful Medames is a vegan dish so a perfect addition to your recipes for vegan friends or family; or for the yearly commitment to ‘Veganuary.’ Just serve the Ful as the recipe sets out below with vegan bread.

Leftovers

Once the Ful has cooled down, store leftovers in an airtight container in the fridge for no more than 3 days. It can either be reheated gently in a saucepan or a microwave.


Ful Medames

Egyptian fava bean stew
Prep Time10 minutes
Cook Time25 minutes
Total Time35 minutes
Course: Breakfast, Brunch
Cuisine: Mediterranean, Egyptian
Keyword: vegetarian, vegan
Servings: 4 to 6 people
Author: Mersedeh Prewer

Ingredients

For the Ful Medames

  • 2 tbsp olive oil
  • 2 tins (400g each) fava beans (drained and rinsed)
  • 1 onion (finely diced)
  • 4 cloves garlic (crushed or minced)
  • 150 g tomatoes (finely chopped)
  • 2 tsp cumin
  • 1 tsp oregano
  • 1/2 tsp Pul Biber
  • Juice of 1/2 lime
  • Salt and Pepper (to taste)

Ful Medames Topping

  • 150 g tomatoes (finely diced)
  • 1 medium red onion (finely diced)
  • 1/4 cucumber (finely diced)
  • 1 small bunch parsley and coriander (finely chopped)
  • 1 - 2 tbsp olive oil (plus extra to drizzle over the final dish)
  • Juice of 1 lemon
  • Salt and Pepper (to taste)

Instructions

  • Make the Ful Medames:
    Take a large frying pan and place over medium-high heat. Add olive oil. Once it glistens, add onion. Fry until golden.
  • Add garlic and stir until aromatics released. Add cumin, oregano, Pul Biber and stir into the onion mixture. Add chopped tomatoes to pan and cook until they have broken down and thickened. 
  • Add fava beans to tomato mixture with 1 cup water. Season generously, add lime juice and, using a masher or the back of a fork, press down on the beans and mash until they roughly breakdown. Turn heat to medium-low and simmer until the mixture thickens (it should look like a coarse dip). Make the toppings while the Ful simmers.
  • Make the Toppings:
    Finely dice cherry tomatoes, cucumber and onions. Add fresh finely chopped parsley and coriander. Dress with olive oil, lemon juice, salt and pepper and leave to one side until ready to use.
  • Serve the Ful Medames:
    Spoon the Ful into a serving dish and heap the toppings on top. Drizzle with more olive oil and serve with fluffy, warm flatbread.

Other Breakfast Inspiration


Sambuseh-e Sabzijaat (Persian Vegetable Samosas)

The Persian version of the samosa. This triangular snack takes lavash bread and fills it with a spicy vehetable mixture before frying to crispy perfection! PS they are vegan too!

A Little History on this Triangular Snack

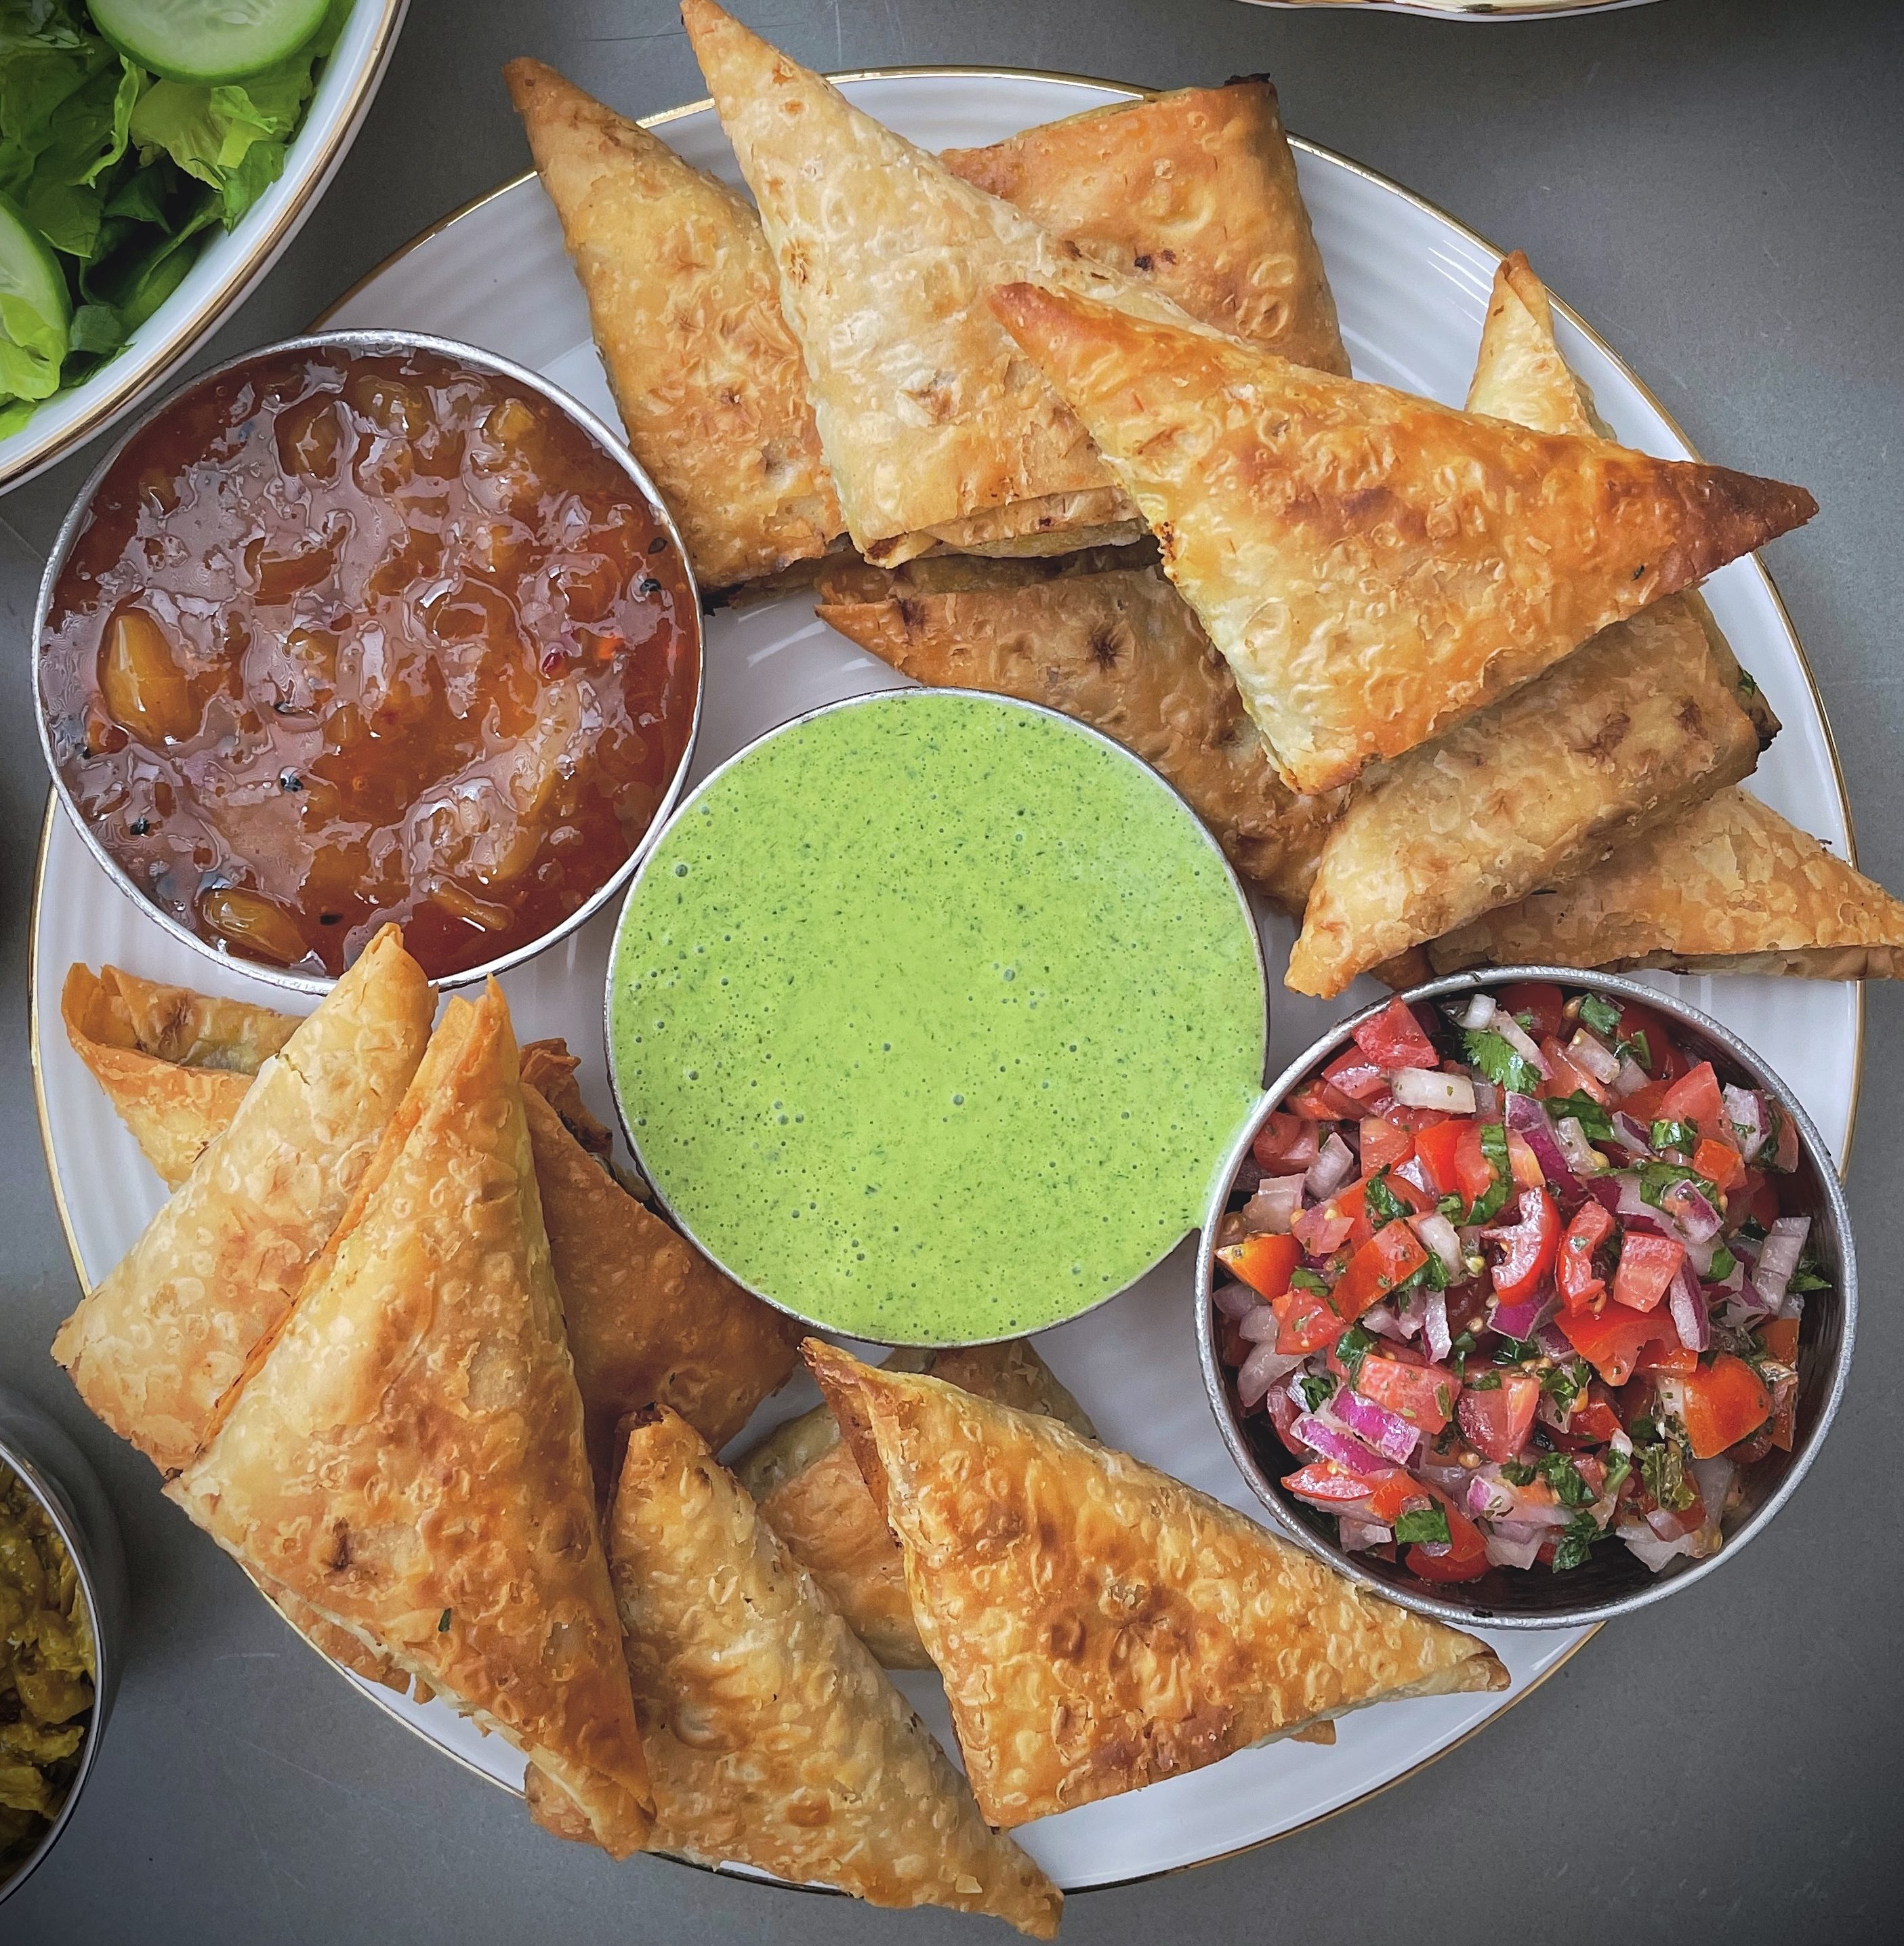
Did you know that the samosa has a Central Asian origin? The earliest recipes are found in 10th–13th-century Arab cookery books, under the names sanbusaksanbusaq, and sanbusaj, all deriving from the Persian word sanbosag. In Iran, we have a version which we call Sambuseh. These delightful little parcels filled with meat and / or vegetables were introduced to the Indian subcontinent in the 13th or 14th century by chefs from the Middle East and Central Asia.

The Persian Version

The key difference with the Persian sambuseh is that we use lavash bread (a thin flatbread usually served with kebabs) as the outer casing. In Iran the lavash bread has large air pockets so it creates an amazing pattern on the Sambuseh that looks a little like bubble wrap in crispy fried bread form.

The fillings for sambuseh vary from meat and vegetable to vegetables only. My preferred filling for a samosa / sambuseh is veggie so the recipe I have developed below is virtuously meat-free. In fact the sambuseh, themselves, are vegan. The accompanying dip can be adapted by using a plant-based yogurt to make this recipe fully vegan. I have also been drawn to spices more common to South Asian cuisine including the use of chilli, mustard seeds, garam masala and ginger. The coriander and mint dip I have accompanied the sambuseh with is also inspired by South Asian cuisine.

Feel free to experiment with vegetables and / or meat fillings. And leave out and / or include spices as desired. I encourage people to experiment with and put their stamp on recipes. What I hope I am providing you is ideas for you to expand your catalogue of recipes, which you can dip in and out of.

How to Serve Sambuseh

The sambuseh can be served with any sauces and pickles you fancy. This recipe has a coriander and mint dip to go with it but I also serve mine with mango chutney and some chopped tomatoes and red onion, dressed with fresh coriander and a squeeze of lime juice.

You can also serve this alongside with Meygoo Dopiyazeh(Persian prawn, pepper & onion curry).


You can find a short video of me folding the Sambuseh to help with the recipe through the link to my Instagram below.


Just scroll across and you can see the video…


Sambuseh-e Sabzijaat

Persian vegetable samosas served with a coriander & mint dip
Prep Time20 minutes
Cook Time45 minutes
Total Time1 hour 30 minutes
Course: Snack, Appetiser, Accompaniment
Cuisine: Persian, Iranian, Cross-cultural
Keyword: vegetarian, vegan option
Servings: 20 (to 25)
Author: Mersedeh Prewer

Ingredients

Sambuseh

  • 3 tbsp vegetable oil
  • 2 tsp mustard seeds
  • 1 tsp cumin seeds
  • 1 red onion (finely diced)
  • 4 cloves garlic (crushed or minced)
  • 1 thumb size ginger (grated)
  • 1 tsp turmeric
  • 1/2 tsp dried red chilli flakes
  • 1 tbsp tomato purée
  • 450 g cooked potatoes (boiled and peeled) (finely diced)
  • 85 ml water
  • 1 cup peas
  • 1 cup sweetcorn
  • 1 tsp garam masala
  • Juice of half a lime
  • Small bunch fresh coriander (finely chopped)
  • Salt and pepper (to taste)
  • 10 sheets lavash bread
  • Vegetable oil (to fry the sambuseh)

Coriander & Mint Dip

  • 70 g fresh coriander (stalks included)
  • 10 g fresh mint leaves
  • 6 tbsp Greek yoghurt
  • Juice of 1 lime
  • Salt and pepper (to taste)
  • 1 clove garlic
  • 1/2 tsp sugar

Instructions

  • Coriander & Mint Dip:
    Add all ingredients to a blender / nutribullet / food processor and blend until smooth. Taste and adjust seasoning and / or lime juice to taste. Pour into a container (i.e. jar) cover and place in fridge until you are ready to serve the sambuseh.
  • Sambuseh:
    Place a frying pan or skillet on medium-high heat and add oil. Add mustard seeds and cumin seeds and heat until they start to sizzle.
  • Add red onion and cook until they start to caramelise. Add garlic and stir in and repeat process with ginger, turmeric and chilli.
  • Add tomato purée and stir until the mixture is evenly coated. Add the cooked, finely diced potatoes and water and stir into the mixture. Follow with peas and sweetcorn. Lower the heat and stir the mixture until the potato is a little mashed into the mixture.
  • Add garam masala, lime juice, fresh coriander, salt and pepper and stir. Taste and adjust seasoning / lime juice to your preference. Turn the heat off and let it cool before filling the lavash bread pockets.
  • To make the lavash bread pockets - cut into long strips about 10 cm in width. Lay the long rectangle strip on your work surface with the short edge facing you. Fold over the right half of the lavash strip to form a triangle with the long edge facing downwards, then fold the bottom of the triangle up so the long edge faces up. Then take the left corner of the triangle and fold up to the right hand corner to make the final triangle pocket. You will be left with a flap to tuck in after filling the sambuseh. Fill the sambuseh pocket with some filling, making sure not to overstuff. Then trim the flap of the sambuseh pocket and cut diagonal strip off one of the corners of the flap so you can tuck it in. Tuck the flap in and put the finished sambuseh aside until you are ready to cook. Repeat the process until you have used all the filling (makes between 20 to 25 sambuseh).
  • To cook the sambuseh, half-fill a deep, heavy-based pan with vegetable oil and heat until a cube of bread dropped in sizzles and turns golden-brown in 30 seconds (please be careful with the hot oil and do not leave unattended). Fry the samosas in small batches for 4-5 minutes, or until golden-brown and crisp. Remove from the oil with a slotted spoon and drain on kitchen paper.
  • Serve with the mint and coriander dip, mango chutney and some chopped tomato and onion, dressed in fresh lime juice as pictured above.


Saffron & Sun-Drenched Tomato Focaccia

A Middle Eastern inspired simple no-knead focaccia recipe with the addition of saffron and sun-drenched tomatoes. Wonderfully fluffy and moreish.

What is Focaccia?

Focaccia is a flat leavened oven-baked Italian bread. It can be served as a side dish or as sandwich bread and it can be round, rectangular, or square shape. I love making focaccia in the summer and this recipe feels particularly summery with its warming saffron notes and the use of sun-drenched tomatoes.

The Difference between Sun-Drenched and Sun-Dried Tomatoes?

Sun-drenched tomatoes have had less time in the sun (to remove some of their water content) and are slightly less chewy and more juicy than sun-dried but you can totally substitute with sun-dried tomatoes. Feel free to add rosemary or other herbs to the focaccia. The sun-drenched tomatoes I use come in an oil and basil dressing so I just use that.

The Magic of ‘No Knead’

You achieve a rise from a no-knead focaccia by leaving the dough it in the fridge over night. But if you want the focaccia quicker, then mix all the dough ingredients and knead by hand for 10 to 15 minutes. Leave to prove until it has doubled in size (up to 2 hrs) and then follow steps 3 to 5 below.

How to Serve

Serve with a charcuterie-style board of Italian cold cuts and picky bits as pictured above. Also great served as part of a Mezze offering in light of the Middle Eastern flavours.

Picture above – before the focaccia is popped in the oven.

Other Bread Recipes


Saffron & Sun-Drenched Tomato Focaccia

No-knead focaccia
Prep Time20 minutes
Cook Time20 minutes
Total Time40 minutes
Course: Appetizer, Side Dish, Appetiser
Cuisine: Cross-cultural
Servings: 10
Author: Mersedeh Prewer

Ingredients

  • 400 g strong white bread flour
  • 5 g fast-acting dried yeast
  • 4 tbsp olive oil (plus extra for greasing)
  • 160 g pack sun-drenched tomatoes (I use Waitrose ones which have a basil dressing)
  • 1 tbsp sea salt flakes
  • 250 ml tepid water plus 1/4 tsp of ground saffron (bloom the saffron in the water for about 5 minutes before adding to flour)

Instructions

  • Add flour, yeast, 1 tbsp olive oil and 1 tsp salt into a large bowl. Add 250ml saffron water and mix with a wooden spoon to make a sticky dough. Cover with cling film and put in the fridge overnight or up to 24 hrs.
  • Once the dough has doubled in size, remove from the fridge and leave in a warm place for no less than 1 hr to bring up to room temperature.
  • Oil a 23cm (ideally square) roasting tin and scrape the dough in. Oil your hands and push the dough out towards the edge of a tin to create a rough square shape. Cover and leave for about an hour or two in a warm place.
  • After this further proving time, the dough will be very soft and airy and filled the tin comfortably. Scatter and push in the tomatoes, sprinkle the remaining salt over and drizzle with a little olive oil. Use your fingertips to create dimples in the dough, pressing in the tomatoes and spreading the dough to the corners. Cover and leave to rise for another 1 hr.
  • Heat oven to 220C/200C fan/gas 7 at least 15 mins before cooking the bread. Uncover the dough, drizzle with the remaining oil and bake on the middle shelf for 20 mins or until golden brown. Cool in the tin for about 10 mins before transferring to a wire rack, or eat warm.

Adasi (Persian Lentil Stew)

This traditional Persian breakfast dish is made with lentils slow-cooked with fresh aromatics and spices to create a stunning wholesome dish.

What is Adasi?

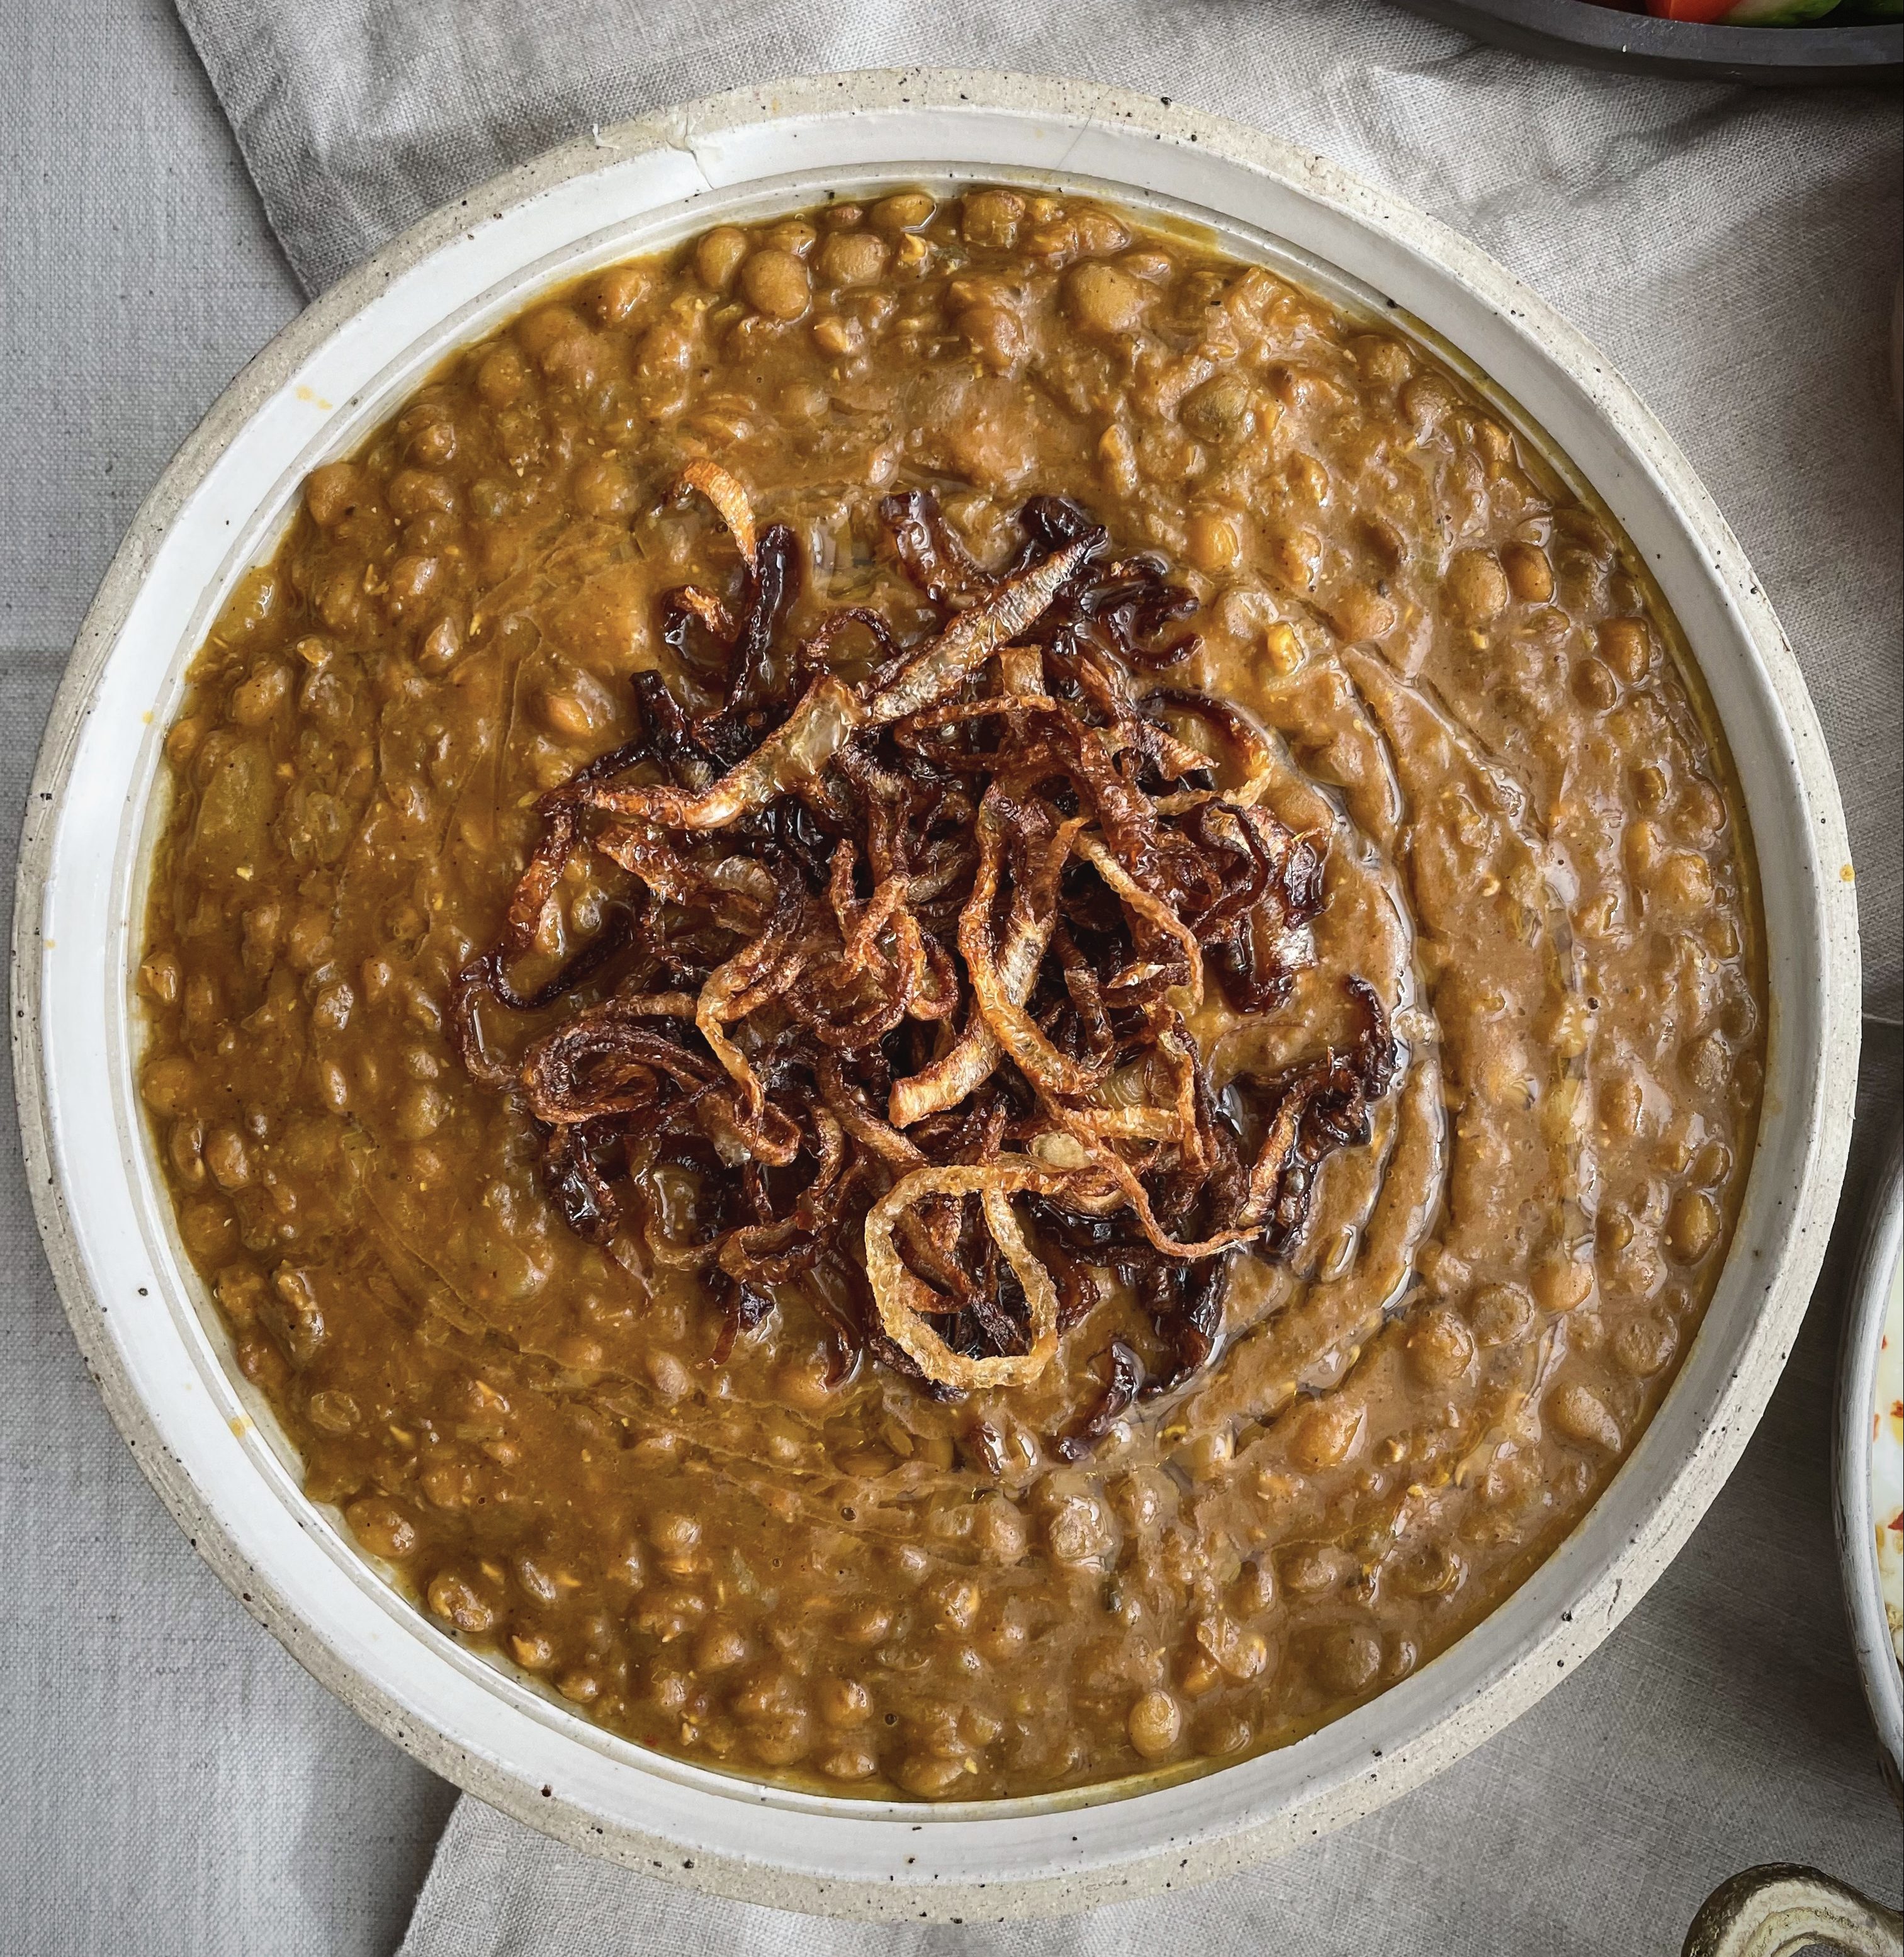
Adasi is a wholesome vegan dish, commonly eaten for breakfast in Iran. It is made with green lentils, onions and spices and is often described as a soup by Persians. I personally consider it is closer to the dal recipes from the Indian sub-continent but to compromise between the two I have called it a stew. Some add cubed potatoes to make it heartier but the version below excludes, but feel free to add them after step 1 below.

It is often topped with fried onions and a ground spice called Golpar or Persian Hogweed or Angelica.

Ingredients in this Recipe?

You will require the following ingredients for this recipe.

  • Dried Green Lentils. You can find large bags at a reasonable price form most supermarkets.
  • Olive Oil. Use extra virgin olive oil to cook the stew with and to drizzle over the final dish.
  • Onions. Used both in the lentil stew and as a garnish for the final dish. Adds depth to the lentils.
  • Garlic and Ginger Paste. Fresh aromatics to complement the flavours of this dish. They add both a sweet, zesty and spicy tone to the dish.
  • Turmeric, Cumin, Cinnamon and Bay. The spices used for this dish. They add a warming, woody, peppery and musky tones to the dish.
  • Tomatoe Purée. Thickens the stew and adds a mild tomato flavour to the dish.
  • Vegetable Stock. The cooking liquid. You can also use plain water in the alternative.
  • Lime. Lifts and complements the flavour profile of the Adasi by adding citrus notes.
  • Salt & Pepper. Seasoning for the dish.
  • Ground Golpar. An unsual spice which add a gorgeous depth of muskiness to this dish. Totally optional if you cannot find it. You can usually find it in Middle Eastern food shops or online.
  • Vegetable Oil. To fry the onions for the garnish.

I cook this recipe  the day before I want to eat it as the flavours intensify overnight. The recipe below yields a big batch (up to 8 people) and lasts up to 5 days if refridgerated, so it is a great dish to make and dip in and out of for various meals during a working week.

How to Serve Adasi

Serve  with flatbread such as Persian Noon-e-Sangak or Sesame and Nigella Seed Flatbread. Pairs well with eggs (poached, boiled or fried) and some fresh herbs as set out in the picture above. It can also be served with rice (chelo or kateh) for a heartier meal.


Adasi

Persian Lentil Stew
Prep Time15 minutes
Cook Time1 hour 15 minutes
Total Time1 hour 30 minutes
Course: Breakfast, Main Course, Brunch, lunch
Cuisine: Persian
Keyword: vegetarian, vegan
Servings: 6 (to 8)
Author: Mersedeh Prewer

Ingredients

For the Adasi

  • 400 g dried green lentils (washed and soaked in water for 2 hours)
  • 2 tbsp olive oil
  • 1 large brown onion (finely diced)
  • 1 tbsp garlic and ginger paste
  • 1 tsp turmeric
  • 1 tsp ground cumin
  • 1 tsp cinnamon
  • 2 tbsp tomato purée
  • 1.2 litres vegetable stock
  • Juice of 1 lime
  • 1 bay leaf
  • Salt and pepper (to taste)

For the Garnish

  • 1 large brown onion (finely sliced)
  • Vegetable oil (to fry the onions)
  • Ground golpar (Persian hogweed - optional)
  • Olive oil (to drizzle on top)

Instructions

  • Place a large saucepan over a medium-high heat. Add olive oil and heat until it glistens. Then add onions and cook, stirring regularly until they start to turn golden.
  • Add garlic and ginger paste, followed by turmeric, ground cumin, cinnamon and stir until evenly distributed into the onion mixture. Then stir in tomato purée.
  • Drain and add in pre-soaked lentils and stir until evenly mixed with the onion mixture.
  • Pour in the stock, lime juice and bay leaf and bring to a boil. Then turn heat down, put the lid of the saucepan on and let the Adasi simmer for approximately an hour or until the lentils are tender.
  • Whilst the Adasi is cooking fry finely sliced onion in vegetable oil over a high-medium heat until crispy.
  • When the Adasi is cooked take a stick blender and blitz some of the lentil mixture to thicken (about 1/3). Taste and season as required with salt and pepper (stock usually has salt in it so further salt may not be necessary). Squeeze some more lime juice if desired. Then ladle into a bowl, top with the crispy onions, a sprinkling of ground golpar and a drizzle of olive oil.

Roasted Red Cabbage with an Orange, Carrot & Cashew Dressing

The contrasting colours of the purple cabbage against the orange dressing make this a stunning and vibrant showstopper side dish. The roasted cabbage has a sweetness which is complemented by the citrus flavours of the dressing.

Inspiration for this Recipe

A while ago I ate an incredible Middle Eastern inspired salad bowl from Grain Kitchen – a lunchtime salad bar based in London, E1. They had a number of different themed salad bowl options such as the California Bowl or the Mediterranean Bowl but obvs I chose the Middle Eastern bowl!

Part of the salad offering was a charred red cabbage wedge with a cashew and carrot dressing. I fell in love with the vibrant colour and taste of this component and set about trying to recreate it in my own home. And after a few goes the recipe below is the one I am happy to share with you. This dish is very versatile, not complicated to make and will really brighten up your plate. The dressing recipe yields a fair bit, we usually use all of it but if any remains just drizzle over a green salad – it will last up to a week if kept in the fridge.

How to Serve this Dish

You can eat this dish as part of a mezze-style offering…

Or you can make your own little salad bowl…

You can even eat it as an accompaniment with a pie and chips..

Other Vegetarian Recipes

Check out some other vegetarian recipes written by the same author by clicking the links below.


Roasted Red Cabbage with an Orange and Cashew Dressing

Prep Time20 minutes
Cook Time40 minutes
Total Time1 hour
Course: Side Dish
Cuisine: Inspired by....
Keyword: vegetarian, vegan option
Servings: 4 (to 6)
Author: Mersedeh Prewer

Ingredients

Cashew and Orange Dressing

  • 75 g raw cashew nuts (soaked overnight)
  • 100 ml orange juice
  • 1 large carrot
  • 50 ml olive oil
  • 50 ml water
  • Juice of 1 lime
  • 2 tsp maple syrup or honey
  • 1 tsp grated ginger
  • 2 garlic cloves
  • Salt and Pepper (to taste)

Roasted Red Cabbage

  • 1 whole red cabbage (c. 1kg)
  • Olive oil (to drizzle over cabbage before roasting)
  • Finely chopped fresh parlsey (to garnish)

Instructions

  • Prepare the dressing by putting all the ingredients in a blender (if you have a nutribullet then blitz in that as it blends the almonds to a smoother consistency). Blitz until smooth. Pour into a container, cover and place in the fridge until ready to use.
  • Cut red cabbage into eighths so you have wedges. Then place in a saucepan of salted water and bring to a boil over a high heat. Cook until tender approx 8 minutes in boiling water.
  • While the cabbage is cooking, preheat oven to 200°C / Fan 180°C / gas 6.
  • When the cabbage is tender, remove from heat and drain water from saucepan. Drizzle the cabbage with olive oil until all the wedges are lightly coated. Place the wedges on a baking tray and place in the oven to roast for approx 20 mins until slightly charred on edges.
  • Remove the cabbage from the oven, plate up, drizzle with the dressing and sprinkle the finely chopped parsley. Can be eaten hot, warm or cold.

Coconut and Herb Chickpea Curry

This recipe came about one evening when I had a jar of chickpeas, a can of coconut milk and a pillow of herbs starting to look a little pathetic in my fridge. The resulting dish totally bowled my family over and is now in the top 5 of our go to vegan dishes.

The spices used for this curry are turmeric and coriander seeds with the addition of red chilli, garlic, ginger and coconut milk to give those familiar aromatic curry notes. The use of herbs such as dill, parsley, coriander and fenugreek bring a about a flavour profile more common to Middle-Eastern cuisine. This dish is deeply savoury but with a kick of citrus from the use of fresh lime juice to make it an all-round delightful meal.

The recipe below yields enough to feed 4. If you have fewer people to feed, honestly, don’t revise the measurements down! As with most curry-style or Persian khoresh (stew) dishes, leaving it a day for the flavours to intensify by the ingredients getting to know each other better makes the experience of eating leftovers even more spectacular than your first bite of this dish straight after cooking!

Other than the amazing herbs and spices, the real key to this dish is the type of chickpeas you can get your hands on. I always find that the chickpeas that are available in jars are larger and more buttery than tinned chickpeas. So I recommend finding a good deli or  posh shop somewhere to buy these. I actually buy mine from Amazon – a little pricey but hands down worth it!


Coconut and Herb Chickpea Curry

Prep Time10 minutes
Cook Time50 minutes
Total Time1 hour
Course: Main Course
Cuisine: Cross-cultural
Keyword: chickpeas, curry, vegetarian, vegan
Servings: 4
Author: Mersedeh Prewer

Ingredients

  • 2 tbsp vegetable oil
  • 1 large onion (finely diced)
  • 4 cloves garlic (crushed or minced)
  • 1 tsp turmeric
  • 2 tsp coriander seeds (crushed in a pestle and mortar)
  • Thumb size ginger (grated)
  • 2 tsp dried fenugreek
  • 1 bay leaf
  • 400 ml coconut milk
  • 720 g jar of chickpeas (drained weight aprox. 420g)
  • 1 vegetable stock cube (dissolved in 250ml water)
  • 30 g fresh dill (finely chopped either by hand or in a food processor)
  • 30 g fresh parsley (finely chopped either by hand or in a food processor)
  • 30 g fresh coriander (finely chopped either by hand or in a food processor)
  • Juice of 1 largish lime
  • 1 red chilli (sliced finely and diagonally along the chilli - remove seeds for a milder version)
  • Salt and Pepper (to taste)
  • Some extra fresh herbs and / or sliced red chilli to garnish (coriander or parlsey or dill or mint - or a sprinkling of all of them)

Instructions

  • Place a medium-sized pan on medium / high heat and add 2 tbsp of oil. Add finely diced onion and cook until it starts to caramelise.
  • Add garlic and turmeric and stir into mixture until the aromas are released. Then add crushed coriander seeds, followed by grated ginger and stir in.
  • Stir in the dried fenugreek and place bay leaf into the pan. Then pour in coconut milk and stir (lower the heat if required to get it to a gentle simmer).
  • Leave to simmer for 5 minutes and then add drained chickpeas and stock. Simmer for a further 10 minutes.
  • Add chopped fresh herbs, lime juice and sliced red chilli and stir the curry until evenly distributed. Place a lid on the curry and let simmer for a minimum of 20 mins.
  • Taste the curry and adjust seasoning and / or lime juice. Garnish with some more sliced chilli and / or fresh herbs. Serve with rice and / or naan.

Sweet Potato & Leek Bolani with Coriander Chutney

Afghan flatbread filled with sweet potato & leek, served with a coriander chutney

Bolani (also called Periki) is a stuffed flatbread from Afghanistan. It is commonly cooked by frying and it has a thin crust, which can be filled with a variety of ingredients, such as potatoes, lentils, leeks or minced meat. It is usually served with a yoghurt and / or a coriander chutney. Bolani is made for special occasions but is also a popular street food available in Afghanistan.

It can be eaten as an appetiser, accompany a main meal or eaten as a snack. If you have ever eaten a stuffed Indian paratha or a Mexican quesadilla, then you will be familiar with the presentation of this dish. The main differences being that the Bolani is not flaky and layered like a paratha and not cheesy like a quesadilla, however the premise of of a stuffed type of flatbread is the same.

This recipe is one of a series of recipes posted which forms an element of a larger family meal for my lot.  The others are Qorma-e-Lubia (Afghan red kidney bean curry) which I serve with rice, and  Maast O’Khiar (a yoghurt dip made with cucumber, mint and garlic). Whilst Maast O’Khiar is the Persian name for this dip, you may be familiar with the Mediterranean versions such as Tzatziki (Greek version), Cacik (Turkish version), Talattouri (Cypriot version). The Afghan version is called Jaan-e-ama and often eaten with Bolani.

The recipe below is vegan and, despite having to make the dough yourself, is relatively quick and easy. I have developed my Bolani recipe to include sweet potato, leek and coriander for the filling (see picture below). It is flavoured with dried red chillies, garlic, turmeric, ground coriander, cinnamon and fresh lime juice. Although not the traditional filling, the combination of the ingredients for the mixture is delicious and one that I am sure you will love. I have also made Bolani in the past with the more traditional fillings such as (1) leeks, spring onion, chilli and coriander; and (2) potato, spring onions, coriander and chili and you should feel free to experiment with yours.


Sweet Potato & Leek Bolani with Coriander Chutney

Afghan flatbread filled with sweet potato & leek, served with a coriander chutney
Prep Time45 minutes
Cook Time45 minutes
Resting time for dough30 minutes
Total Time2 hours
Course: Appetizer, Main Course, Side Dish, lunch, Accompaniment
Cuisine: Middle-Eastern, Afghan
Keyword: vegetarian, vegan
Servings: 4 (to 6)
Author: Mersedeh Prewer

Ingredients

Coriander Chutney

  • 1 bunch fresh coriander (about 100 grams)
  • 3 cloves garlic (crushed or minced)
  • The green ends of 4 spring onions
  • 1 to 2 green chilli peppers
  • 1/3 cup walnuts
  • 1/2 cup apple cider vinegar
  • 1 tbsp olive oil
  • 1/2 tbsp sugar
  • 1 tsp salt
  • 1/2 tsp pepper

Bolani Filling

  • 2 medium sweet potatoes (peeled and chopped into medium sized chunks)
  • 3 tbsp vegetable oil
  • 2 medium leeks (quartered and sliced)
  • 3 cloves garlic (crushed or minced)
  • 1 tsp turmeric
  • 1 tsp ground coriander
  • 1/2 tsp dried red chilli flakes
  • 1/4 tsp cinnamon
  • Juice of 1 lime
  • 3 tbsp chopped fresh coriander
  • Salt and Pepper (to taste)

Bolani Dough

  • 200 g plain flour
  • 100 g atta (chapati flour) (you can use wholemeal flour instead)
  • 1/2 tsp salt
  • 1 tbsp vegetable oil (plus extra to fry the Bolani)
  • 180 ml water

Instructions

Coriander Chutney

  • Make the chutney ahead (minimum 2 hrs before eating) to let the flavours settle.
  • Add coriander, garlic, walnuts, chillies and scallion ends to a food processor and pulse until finely chopped.
  • Add the vinegar and pulse a few more times - the chutney should have a coarsely chopped appearance. Add olive oil, sugar, salt and pepper and taste. Adjust seasoning if necessary. Pour chutney into a sterilised jar with a lid. Place in the fridge until you are ready to use. Any left over chutney keeps for 2 months in the fridge and can be used for other dishes including grilled meats, roast vegetables or curries.

Bolani Filling

  • Steam or boil the sweet potatoes until cooked / soft.
  • Add 3 tbsp of vegetable oil to a large frying pan / skillet and place over a medium / high heat. Add leeks and cook until softened. Add garlic and turmeric and stir into the leeks until evenly distributed and aroma released.
  • Add ground coriander, dried red chilli flakes and cinnamon and stir.
  • Add sweet potato and mash into the mixture until the leek mixture is fully integrated into the mashed sweet potato.
  • Add fresh lime juice and the finely chopped fresh coriander leaves. Add salt and pepper and taste, adjust seasoning if required. Take off the heat and set aside to cool until you are ready to stuff the Bolani dough.

Bolani Dough

  • Stir flours and salt together in a large mixing bowl. Make a well in the center and add the vegetable oil and water. Form a shaggy dough with your hands, then turn out onto a clean work surface. Knead the dough for 5-10 minutes until you have a smooth dough. Place the dough in the mixing bowl and cover. Set aside to rest for 30 mins,
  • Divide the dough into 6 equal pieces. Roll one piece of dough on a clean surface until the dough is 15cm in diameter.
  • Divide the sweet potato filling into six and fill half of the round of dough by spreading into a thin layer, leaving a 1cm empty space around the edge. Fold the empty top half of the dough over the filling and press down to seal, stretching parts of the dough to create an even crescent shape. Place on baking paper until ready to cook.
  • Heat a large non-stick frying pan or skillet over medium-low heat. Add 1 tsp of vegetable to the pan. When the oil is hot, add 1 Bolani and fry for about 2 minutes on each side until golden brown. Then place on a paper towel to soak up oil while the others fry. Feel free to keep the cooked Bolani in a low / medium heat oven to keep warm while you fry the others.
  • Serve the Bolanis warm / hot with the coriander chutney and / or yoghurt based (or non-dairy yoghurt) dip.


Qorma-e-Lubia

Afghan Kidney Bean Stew

This vegan stew heralding from Afghanistan is a gorgeous dish full of goodness and one that I am sure will become a firm favourite in your household, as it has in mine. With simple ingredients (kidney beans, onions, tomatoes and some herbs and spices), this dish is easy to prepare (especially if you use canned kidney beans as opposed to dried ones).

Afghan cuisine includes dishes and cooking techniques also seen in Persian, Central Asian and Indian cuisines due to Afghanistan’s close proximity and historical cultural connections. As neighboring countries with cultural ties, there has been a long history of population movements between Iran and Afghanistan, indeed parts of Afghanistan formed part of the Persian Empire, which lasted from approximately 559 B.C.E. to 331 B.C.E. Sadly modern day Iran has not treated Afghan immigrants well, with widespread reports of Iranian mistreatment of Afghan migrants and their human rights – the community is very marginalized in Iran. 

The two official languages spoken in Afghanistan are Dari and Pashto. Dari is the official name of the variety of Persian language spoken in Afghanistan. It is often referred to as Afghan Persian. Although still widely known as Farsi (the official language of Iran) to its native speakers, the name was officially changed to Dari in 1964 by the Afghan government. Pashto is an Eastern Iranian language of the Indo-European family. It is also the second-largest provincial language of Pakistan, spoken mainly in the northwestern province of Khyber Pakhtunkhwa and the northern districts of the Balochistan province.

I remember the first time I heard someone speaking Dari (1980 something). I asked my mother why I could understand a language which seemed familiar but unfamiliar at the same time. The words made sense to me but the rhythm the language was being spoken in was different to the Farsi I had grown up with. And that is when I learnt about Afghanistan, their languages and the relationship with Iran. My journey into Afghan cuisine came later in my life but as with learning about our connections in language, their cuisine has brought me great joy and continues to do so. There are many Afghan dishes that feel familiar to me due to my Persian background, but there are also a huge amount of dishes new to me which I have loved learning to cook! And the first I am introducing to you is my version of Qorma-e-Lubia. For those of you familiar with Indian cuisine, you will note this recipe is very similar to the North Indian dish Rajma Masala. Pakistan and Nepal also have a version of this dish.

So what is Qorma? Qorma is the Afghan name given to an onion and tomato-based stew or casserole, usually served with rice (challow, Persians call their rice chelow). First, onion is caramelized, for a richly colored stew. Then tomato is added, along with a variety of meat, lentils, spices, and vegetables, depending on the recipe. The main ingredient, which can be meat, beans or vegetables, is usually added last. There are many different qormas including:

  • Qorma e gosht  – a meat stew usually served at gatherings;
  • Qorma e nadroo – lamb or veal, yogurt, lotus roots and coriander;
  • Qorma e alou-bokhara wa dalnakhod – veal or chicken, sour plums, lentils and cardamom;
  • Qorma e sabzi – lamb, sautéed spinach and other greens;
  • Qorma e lawand – chicken, lamb, or beef, plus yogurt, turmeric and coriander;
  • Qorma e shalgham – a sweet and sour qorma made with lamb, turnips and sugar.

Qorma-e-Lubia is simply made with red kidney beans as the protein element and cooked with an onion and tomato base flavored with garlic, turmeric, coriander, cumin and dried mint. I also add a little garam masala to mine. Serve it with flatbread, rice (kateh or chelow), a nice crunchy salad with a citrus dressing and / or a yoghurt or non-dairy dip (I have served mine with Maast O’Khiar, the Persian yoghurt and cucumber dip, as pictured below).

The flavour of this qorma (as with many stew style dishes) gets better if eaten the day after cooking. Therefore, I recommend making it a day before you want to serve it and then heating it up. The flavours really fuse together brilliantly with a little more time to get to know each other.

Just as a side note, if you are using dried kidney beans you will need approximately 250 grams. Remember to wash, soak, drain and then cook the beans before adding them at step 7 below. Kidney beans are toxic if not prepared properly when starting with the dried form and can cause tummy upsets, so make sure you follow the instructions on the packet or google it.

The flatbread pictured below is Bolani, an Afghan stuffed flatbread and the recipe will be posted soon – so watch out for it!


Qorma-e-Lubia

Afghan Kidney Bean Curry
Prep Time20 minutes
Cook Time1 hour 15 minutes
Total Time1 hour 35 minutes
Course: Main Course
Cuisine: Afghan
Keyword: vegetarian, vegan
Servings: 4
Author: Mersedeh Prewer

Ingredients

  • 3 tbsp vegetable oil
  • 2 tsp coriander seeds
  • 1 tsp cumin seeds
  • 1 large onion (finely diced)
  • 3 cloves garlic (crushed or minced)
  • 1 tsp turmeric
  • 1/2 tsp dried red chilli flakes
  • 1 tsp dried mint
  • 3 medium tomatoes (roughly chopped)
  • 3 tbsp tomato purée
  • 600 ml vegetable stock
  • 2 x 400 g cans of kidney beans (or 250 grams of dried kidney beans cooked in accordance with package instructions)
  • 1/2 tsp garam masala
  • Juice of 1 lime or half a lemon
  • Salt and Pepper (to taste)
  • Chopped fresh coriander leaves and sliced sping onions (to stir through / garnish before serving)

Instructions

  • Place a medium to large saucepan (which has a lid) on a medium / high heat and add the oil.
  • Bash the coriander and cumin seeds in a pestle and mortar and then add to the saucepan. Cook for about a minute. Keep a close eye on them so they don't burn. Lower the heat to medium, if necessary.
  • Then add chopped onions and cook until they brown / caramelise.
  • Add the garlic and turmeric and stir to distribute evenly into the onions. Then add dried mint and dried chilli flakes (feel free to exclude chilli or revise chilli levels down if half a teaspoon feels a bit too much for you).
  • Add the chopped tomatoes and stir now and again until they break down (roughly 5 to 10 minutes).
  • Add the tomato purée and stir until evenly distributed and follow with the vegetable stock. Give the mixture a good stir and let it come to a boil and then reduce the heat to low / medium to allow to simmer. Place the lid on the saucepan and let the sauce simmer for a minimum of 30 min or longer - ideally when you start to see the oil form a little round the edges of the sauce.
  • Then add your cooked kidney beans, garam masala, the lime (or lemon) juice, salt and pepper and stir. Leave to simmer with the lid on for a further 15 to 30 mins.
  • Taste and adjust seasoing if required. Before serving, stir through some fresh chopped coriander. Spoon the Qorma into your serving dish and sprinkle with the sliced spring onions. Serve with flatbread and / or rice, yoghurt-style dip and / or salad and pickles (torshi).


Simit (Turkish Sesame Encrusted Bread)

Also know as the Turkish Bagel, these beautifully doughy yet crunchy sesame encrusted bread rings are perfect for a Turkish-style breakfast or as sandwich bread.

What Is Simit?

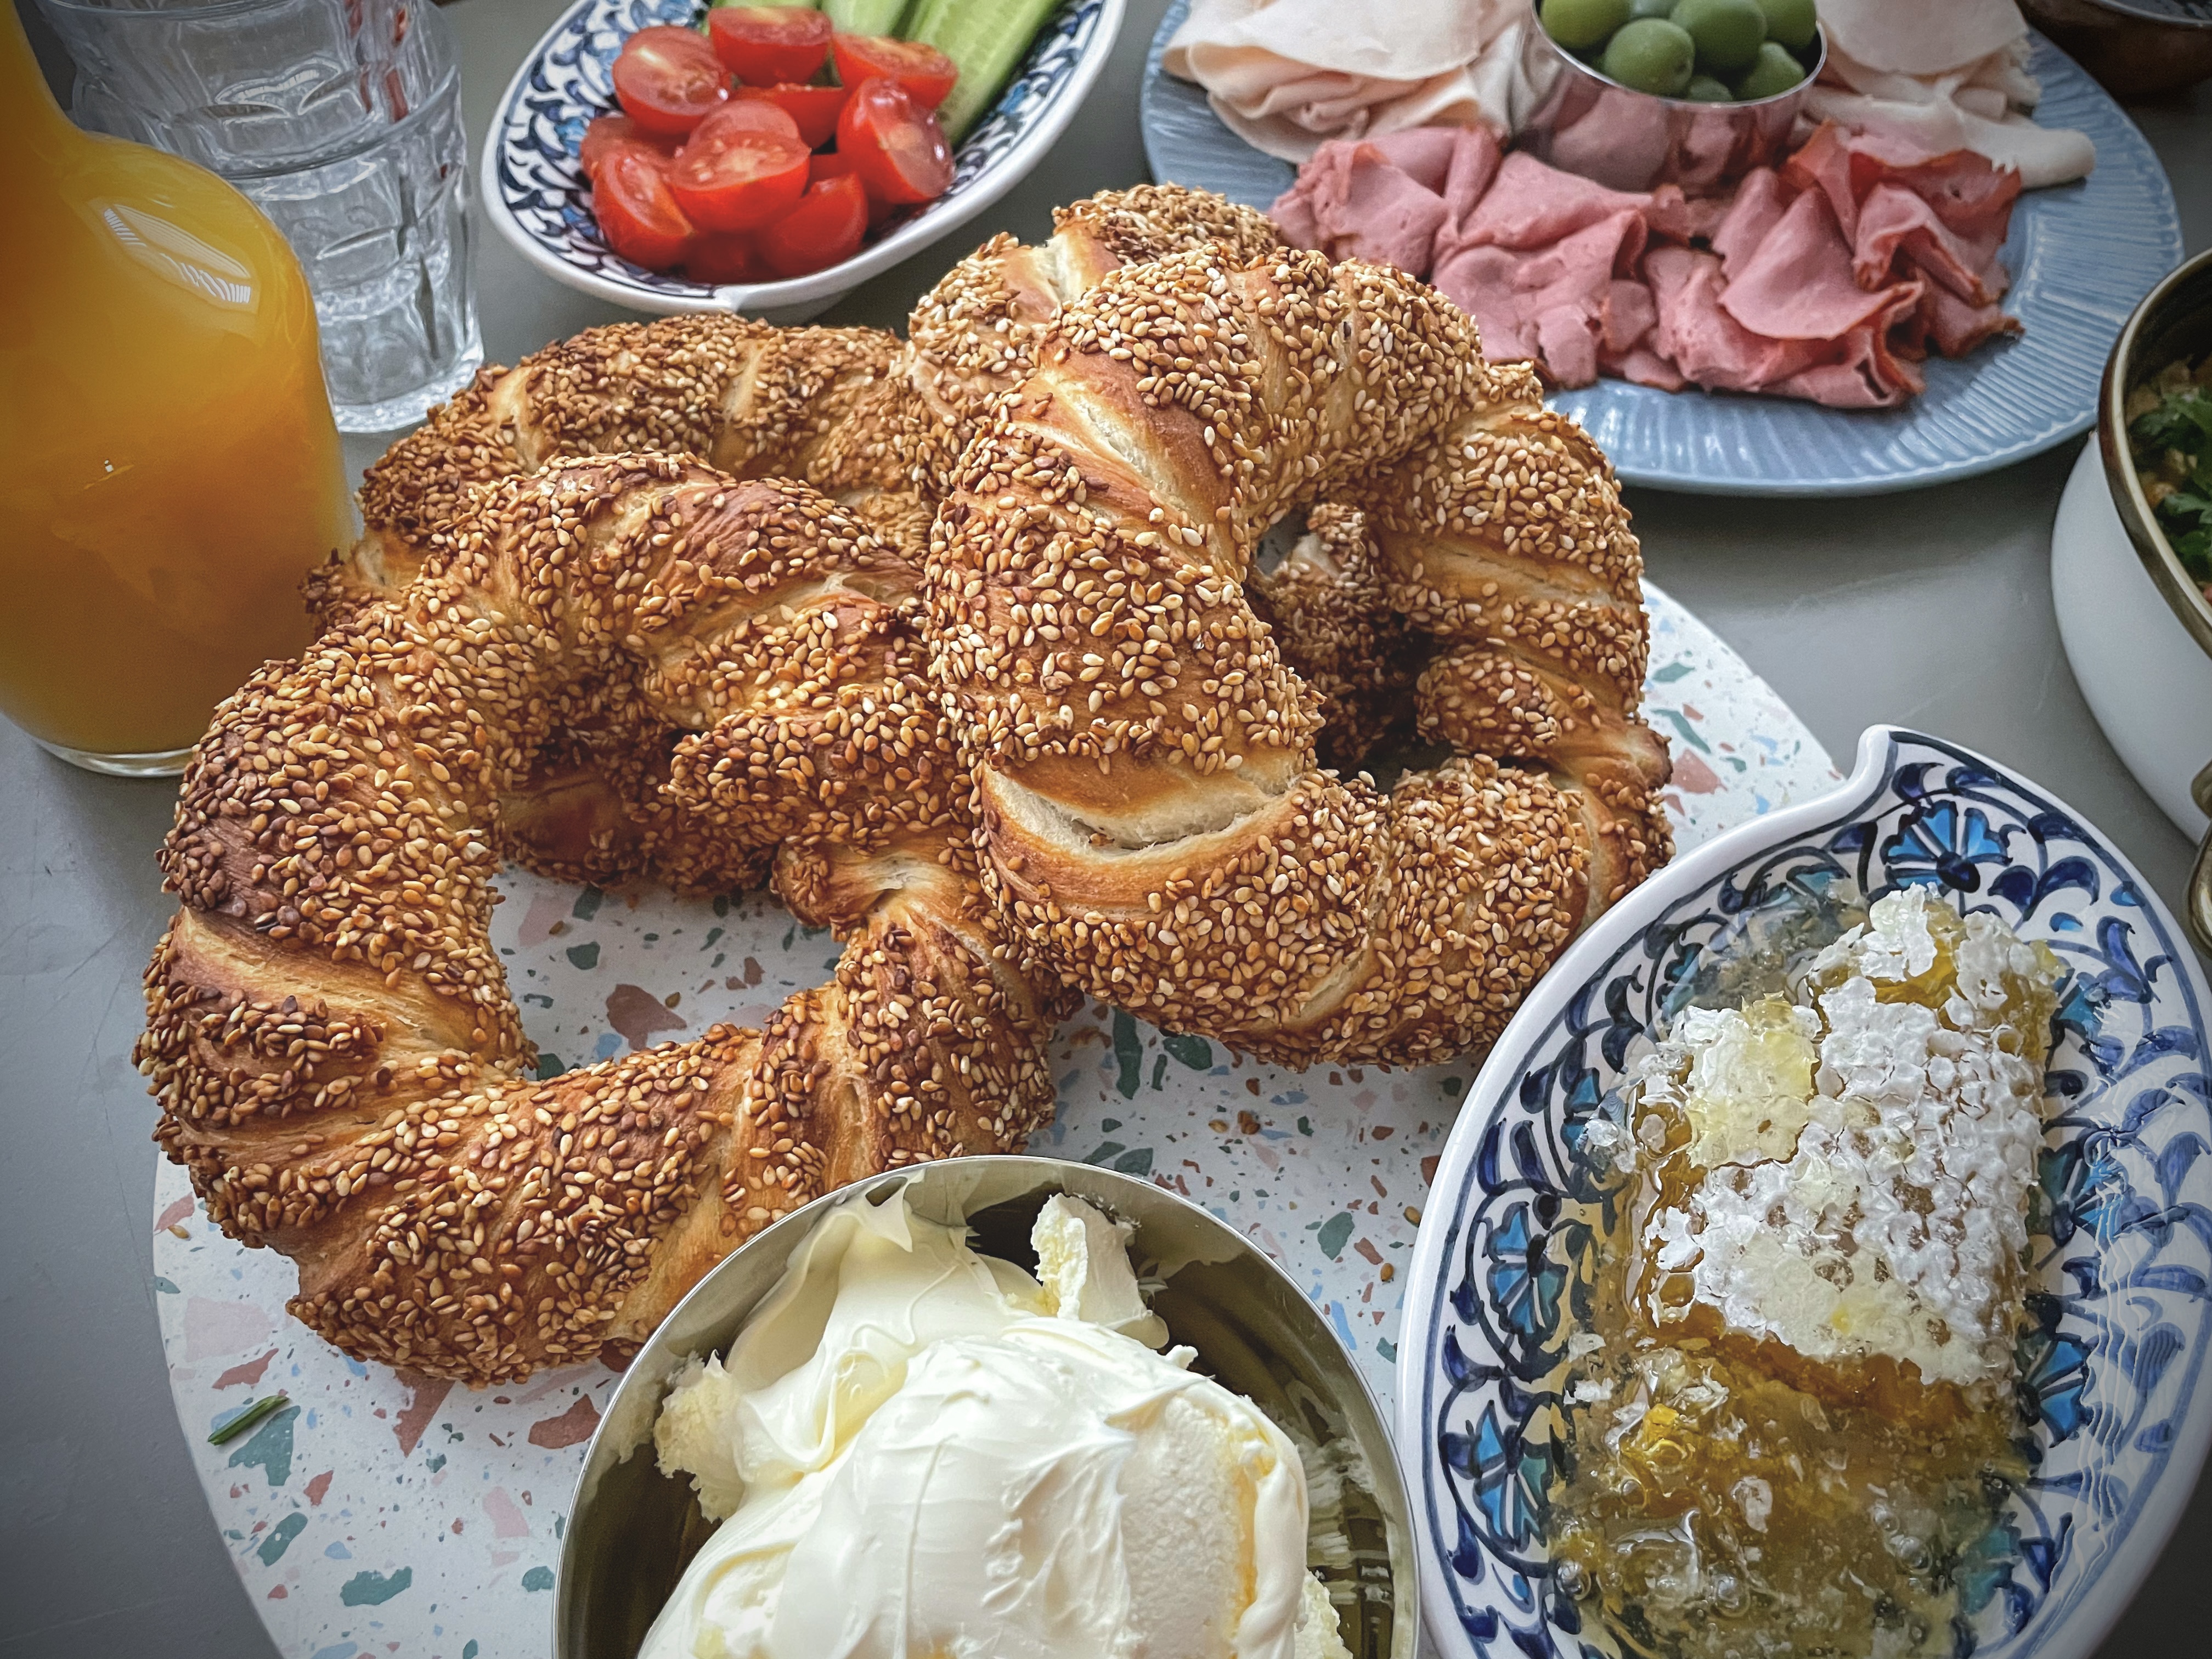
Simit is a circular bread encrusted with sesame seeds, which is common to the cuisines of the former Ottoman Empire and the Middle-East. It is widely known as a Turkish bagel in the USA and Koulouri in Greece. They are commonly eaten at breakfast and are a much loved street food available on many corners in Istanbul. They have a crispy exterior and a soft doughy interior, which can be created using a standard bread dough mixture.

The distinctive taste of Simit comes from a combination of toasted sesame seeds and a grape molasses glaze. Grape molasses can be found online or at Middle-Eastern supermarkets. Sesame seeds are widely available in their raw form, so you will need to toast them in a dry frying pan before coating the Simit rings.

Kahvalti

I was first introduced to Simit during one of our holidays in Turkey. Many of us Iranians love holidaying in Turkey as it feels familiar but with the freedoms we cannot enjoy in our own motherland. In fact, I have travelled to Turkey more than I have to Iran. The hospitality, the food and the weather make for the perfect destination for my family and it feels like home. 

The variety of baked goods available in Turkey is incredible and Simit is no exception. You will often find it offered as part of the Turkish breakfast spread offering known as Kahvalti. The commitment to breakfast is incredible in Türkiye. Kahvalti translates to “before coffee” and is all about gathering and sharing dishes with your family. Turkish restaurants and families at home prepare many little dishes to fill the breakfast table, allowing you to sample them at your leisure .

How to serve Simit

When I bake them at home, we either eat them with feta and halva or with clotted cream and honey. We also love having them as an accompaniment to egg dishes (as pictured below). The recipe for Nargessi (Persian spinach Eggs as pictured) can be found here.

For a traditional Turkish breakfast serve alongside with Menemen (Turkish scrambled eggs with tomatoes).

Storing Simit

Simit is at its best fresh out of the oven. Store in an airtight container up to 3 days once it is cool. Just bake in  a medium to hot oven for 5 to 10 mins to refresh or slice and toast.


Simit

Turkish Bagels
Prep Time20 minutes
Cook Time20 minutes
Proving Time x 21 hour 30 minutes
Total Time2 hours 10 minutes
Course: Breakfast, Accompaniment
Cuisine: Turkish
Keyword: Simit, Turkish Bagel, Gevrek, Koulouri
Servings: 6
Author: Mersedeh Prewer

Ingredients

Simit Dough

  • 500 g strong white bread flour (plus extra for sprinkling on your surface when shaping the Simit)
  • 7 g fast-action yeast
  • 1 tsp salt
  • 300 ml tepid water
  • A little olive oil (to oil the bowl the dough proves in)

Simit Topping

  • 100 ml grape molasses (üzüm pekmezi)
  • 50 ml water
  • 2 tsp flour
  • 300 g toasted sesame seeds

Instructions

  • Mix strong white flour, salt and fast-action yeast in a large bowl making sure the salt and yeast are kept apart at this initial stage. Make a well in the centre, then add 300 ml water, and mix well.
  • Tip onto a lightly floured work surface and knead for around 10 mins. Once the dough is smooth, place it in a lightly oiled bowl and cover with cling film. Leave to rise for 1 hour or until doubled in size.
  • Mix the grape molasses, water and flour in a large bowl.
  • Prepare the toasted sesame seeds. Take the raw sesame seeds, toast in a dry pan until golden, shaking and stirring the pan regularly. Take care not to burn the seeds. It should only take a few minutes to toast the sesame seeds.
  • Preheat the oven to 220°C / fan 200°C / gas 7 / 425°F. Place a baking tray in the oven.
  • Once the dough has proved, cut into 12 equal sized pieces. Sprinkle some flour on the surface and roll each piece into a long sausage about 25cm long. Take two of the rolled dough pieces and place them alongside each other. Squeeze the ends together and roll the ends in opposite directions, causing them to braid. Squeeze the two ends together to form a ring. Repeat with the remaining dough.
  • Dip the simits into the grape molasses mixture until covered. Cover completely with sesame seeds. Stretch the dough a little as you do this to ensure the Simit is even but don't worry if it is not perfect - rustic is a great look! Place the ready Simits on a piece of baking paper, cover with a tea towel and let prove for a further 30 mins.
  • Bake for 15 to 20 mins until cooked through and golden brown on the outside. Check the Simit occasionally to make sure it doesn't burn and turn the heat down if necessary.
  • Leave to cool on a cooling rack. Simit is best eaten while still warm so if you don't eat them straight away, reheat in the oven before consuming.

Rose Harissa Aubergines & Hummus

This is one of my ‘inspired by…’ recipes. In other words it is dish I have developed but one that has been inspired by all that I have learnt from the rich tapestry of living in a time where we can tap into many different cultures across the world by the people we meet, the restaurants we have eaten at, the ever expanding offerings from supermarkets, and / or the information and education we can access.

It is a really easy dish to prepare and one that can easily be cooked up after work. It is vegan so a great option for a ‘Meat Free Monday’ meal. Served with other mezze-style offerings such as bread, olives or, as pictured, a fresh herb and feta cheese platter, this dish can generously feed 4 people and more if offered up as a dip. It keeps well, if there are any leftovers, for a few days so we often make wraps or sandwiches with it too.

The aubergine mixture is simply aubergines and onion cooked in vegetable oil with the addition of rose harissa, garlic, tomato purée, balsamic vinegar and fresh coriander to create an aromatic dish with a little heat. The aubergine mixture, which you can either have cold or warm, is then layered on hummus and served with some bread to dip into it. You can buy your favourite brand of hummus as opposed to making it from scratch but the recipe for hummus below is so easy, resulting in a beautifully creamy and smooth hummus, I can’t recommend it enough.

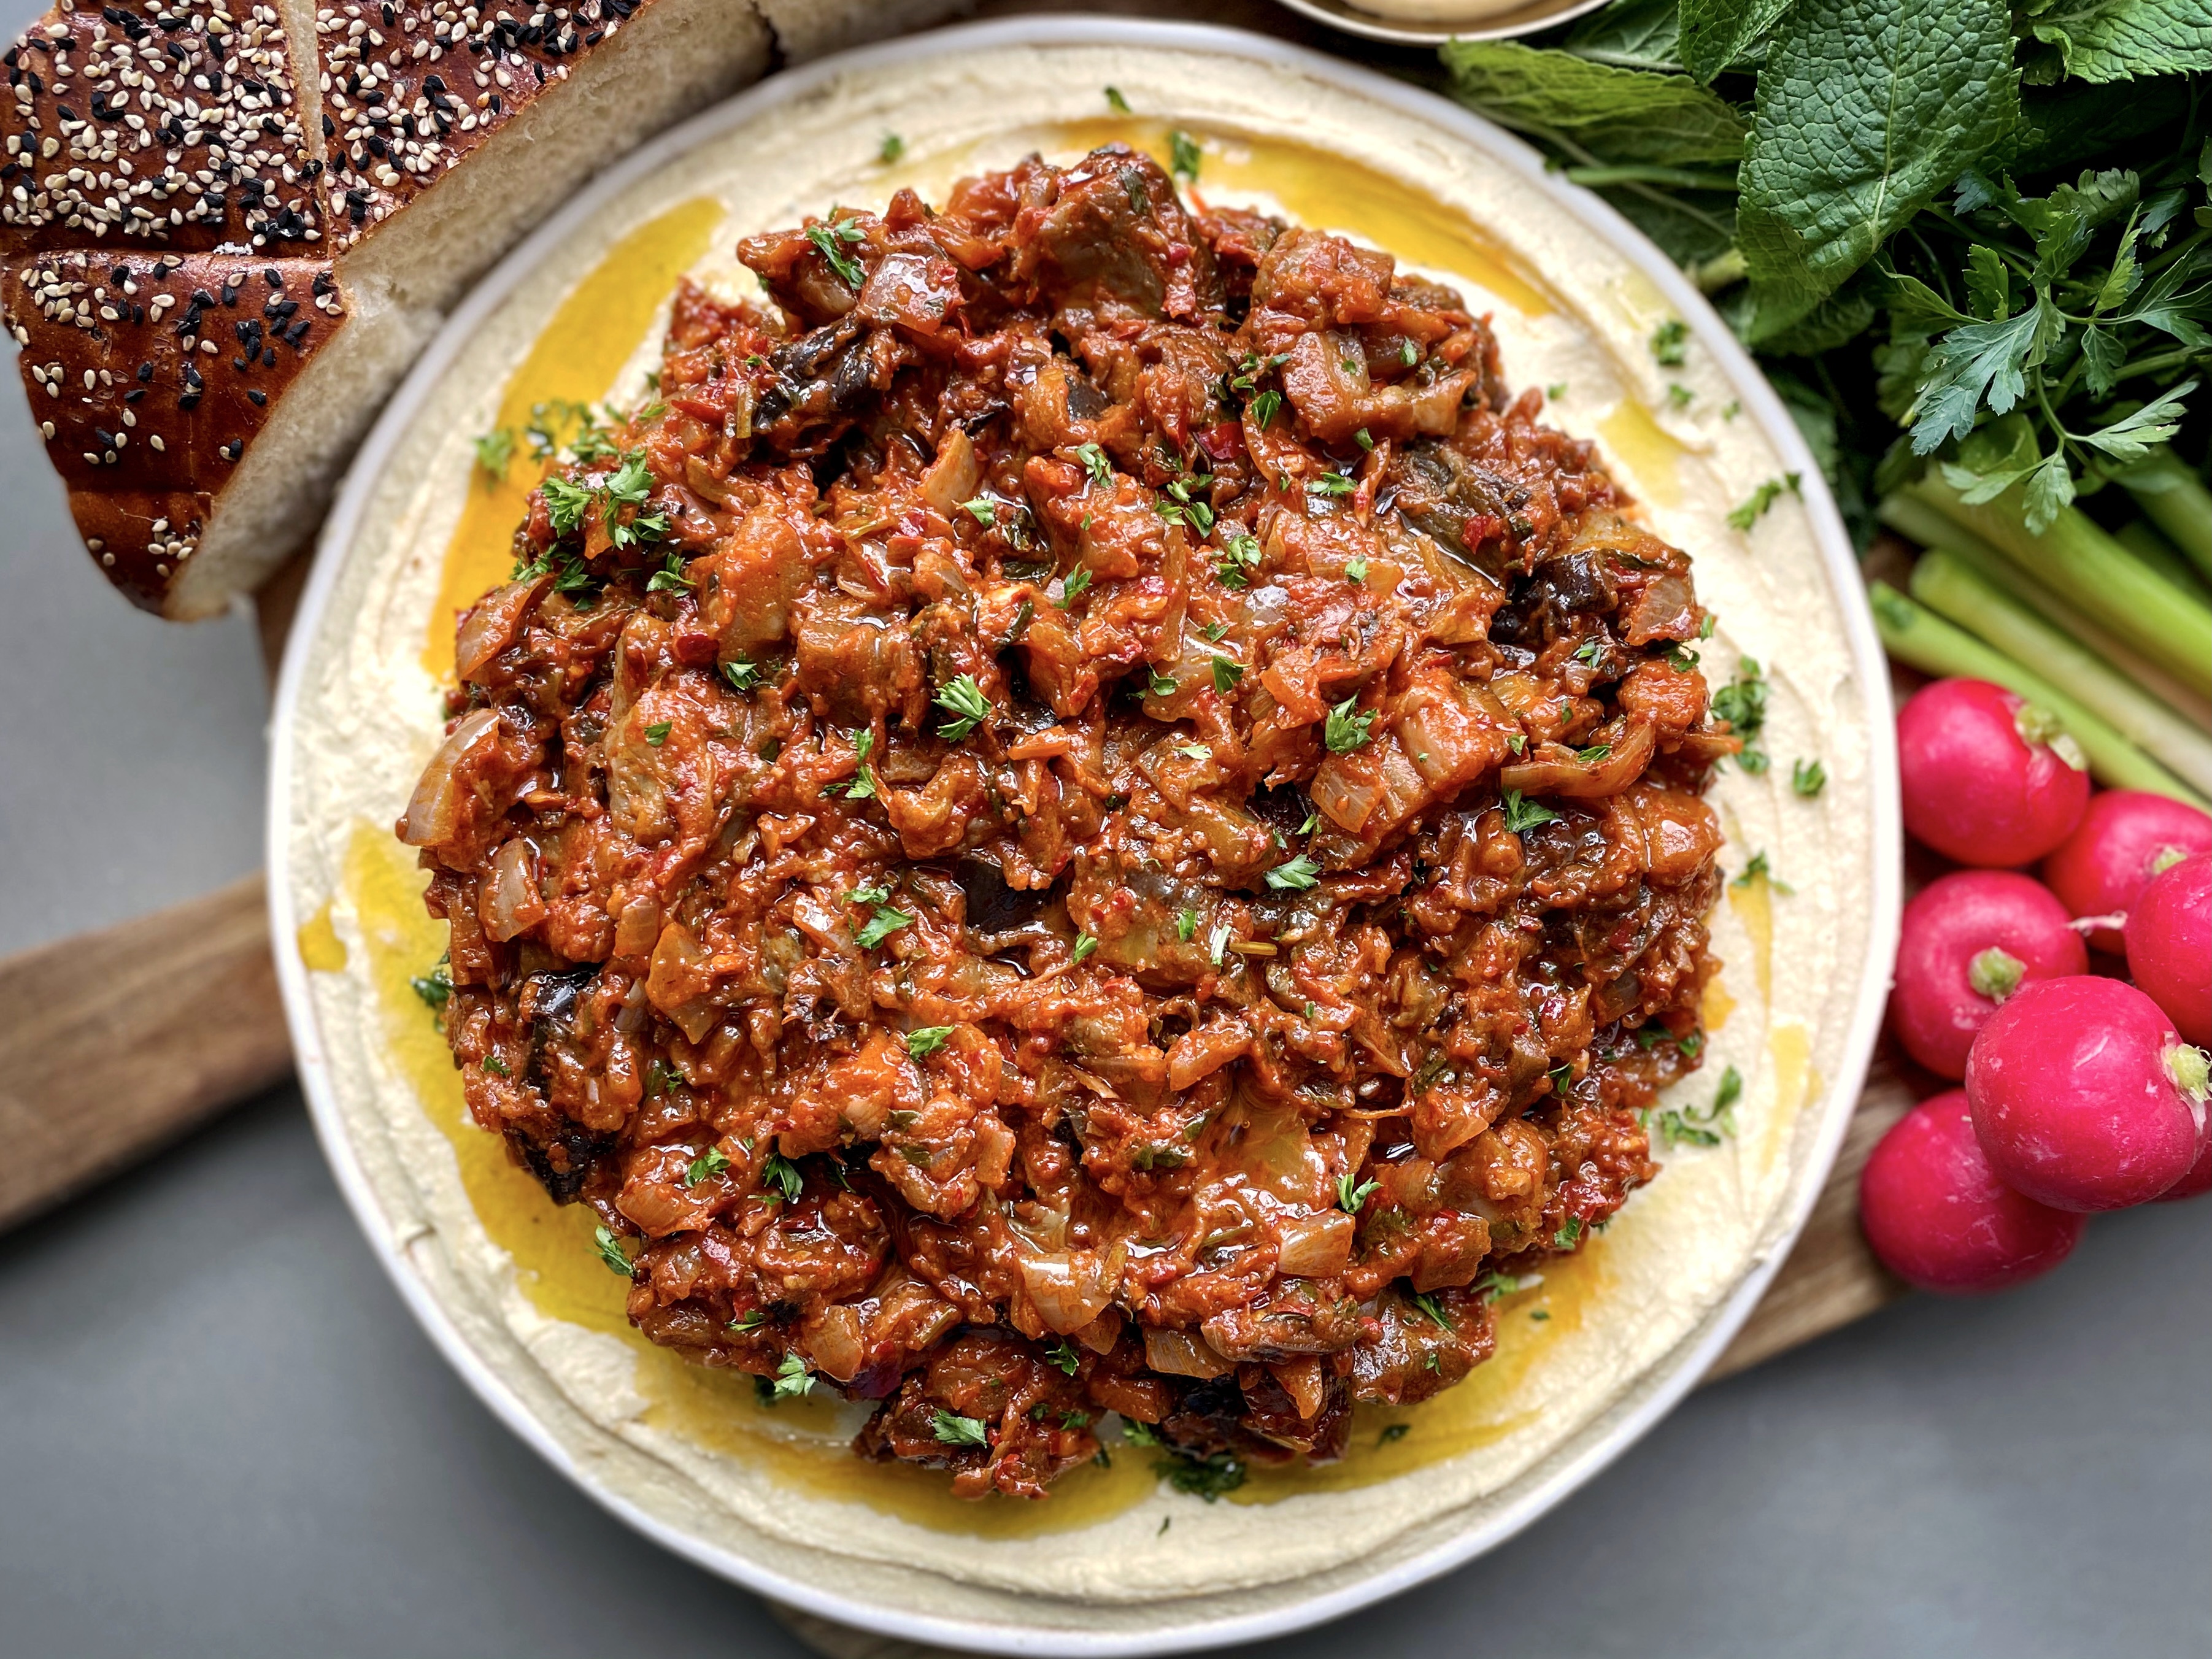
For those of you who may not know, harissa originates from North Africa, while every region has its own variation and take on the paste, it’s particularly associated with Tunisia. It is a hot chilli pepper paste, the main ingredients of which are roasted red peppers, Baklouti peppers, spices and herbs such as garlic paste, caraway seeds, coriander seeds, cumin and olive oil. Rose harissa contains dried rose petals, and, usually, rosewater too. This softens the heat and adds a subtle floral note to the dishes it is added to.

Hummus is a savoury Middle-Eastern dip made from cooked, chickpeas blended with olive oil, tahini (sesame paste), lemon juice, and garlic. It is difficult to pinpoint the exact origins of hummus as multiple different theories and claims of origins exist in various parts of the Middle-East but apparently the earliest known written recipes for a dish resembling hummus bi tahina are recorded in cookbooks written in Cairo, Egypt in the 13th century.

This dish is becoming one of our family favourites and I hope you find it as delicious as we do! Please do tag me in your Instagram pictures of this or any of my other recipes you cook.


Rose-Harissa Aubergines & Hummus

Prep Time20 minutes
Cook Time30 minutes
Total Time50 minutes
Course: Main Course, Appetiser
Cuisine: Middle-Eastern, Cross-cultural
Keyword: vegetarian, vegan
Servings: 4 (as part of a mezze-style meal or appetiser)
Author: Mersedeh Prewer

Ingredients

For the Rose Harissa Aubergines

  • 3 tbsp vegetable oil
  • 2 large aubergines (chopped into 2 inch chunks. If you have time salt them and leave them for 30 mins to extract water - this will reduce the amount of oil needed to cook them)
  • 1 large onion (finely diced)
  • 2 cloves garlic (crushed or minced)
  • 2 tbsp rose harissa paste
  • 2 tbsp tomato purée
  • 250 ml water
  • 20 g fresh coriander (finely chopped including stems)
  • 1 tbsp balsamic vinegar
  • Salt and Pepper (to taste)
  • Olive oil (to drizzle on top before serving)
  • Finely chopped fresh herbs (to garnish - you can use any herb you like including coriander or parsley)

For the Hummus

  • 720 g large chick peas in a jar (drained weight approx. 400g)
  • 2 cloves garlic
  • Juice of 1 lemon
  • 4 tbsp tahini
  • 40 ml olive oil
  • 40 ml ice cold water
  • Salt and Pepper (to taste)

Instructions

For the Rose Harissa Aubergines

  • Place a large frying pan on a medium / high heat and add 2 tbsp of oil. Add the aubergines and cook until soft all the way through. After 5 minutes of cooking the aubergine, add the remaining 1 tbsp of oil. Stir occasionally to ensure all sides of the aubergine cook through.
  • Add the onions to the pan. The pan may be dry as aubergine has a tendency to absorb oil. Do not be tempted to add more oil as the rose harissa paste contains oil. Stir and cook the mixture until the onions are translucent. Add the garlic and stir until evenly distributed.
  • Add the rose harissa and stir into the mixture. Then add the tomato purée and stir in. Follow with the water, then the fresh coriander and finally the balsamic vinegar. Cook and stir until the liquid reduces and you have a lovely sticky mixture - some of the aubergine chunks will be mashed into the mixture and that is absolutely fine. Reduce the heat to the lowest setting and season to taste. You can turn the heat off and leave in the pan until ready to serve the dish. Alternatively you can leave it on a low flame but make sure the mixture does not dry out / burn - add more water if necessary.

For the Hummus

  • Add all the hummus ingredients, except the water, salt and pepper to a food processor / nutribullet. Blend until it is smooth. Then add the water and blend further until you have creamy texture. Season to taste.
  • Spoon the hummus onto a serving dish and top with the rose harissa aubergine mixture. Drizzle with olive oil and a sprinkle of fresh herbs. Serve as part of a mezze-platter with bread.

Sholeh Zard Overnight Oats

This healthy overnight oats recipe, inspired by a Persian dessert, is made with chia seeds, almonds, pistachios, strawberries and is flavoured with cinnamon, saffron and rose water.

Inspiration for this Recipe

Sholeh Zard is a Persian rice pudding dessert flavoured with saffron, rose water, sugar and decorated with almonds, pistachio and cinnamon. It is a delicious and comforting dessert and loved by Iranians.

After a light bulb moment, I decided to experiment with the flavours of Sholeh Zard with the concept of overnight oats. Overnight oats have become very popular over the last decade. A quick, healthy and delicious way of preparing rolled oats. With no cooking required, it is prepared by mixing rolled oats, liquids and other ingredients and leaving them in the fridge overnight.

How to Make this Breakfast Delight?

The process is simple. Soak oats and chia seeds in milk, Greek yogurt, saffron, rose water and honey. Leave in the fridge overnight. Add flaked almonds and some strawberries the next day and give it a good stir. Serve it in a bowl topped with more strawberries, crushed pistachios and a sprinkle of cinnamon. The resulting breakfast dish is fresh, light and delicious. My family love it and it is one of our regular breakfast options. It’s so low maintenance to knock up and washing up is easier than the mess cooked porridge creates!

I have included chia seeds in the recipe due to the nutritional benefits including adding fibre and protein. Feel free to leave them out if you are not a fan. You can also make this with non-dairy milk and yogurt and replace the honey with maple syrup if you are vegan. If you would prefer to substitute the honey / maple syrup with a wholesome way to sweeten the oats, then grate pear or apple into the oat mixture prior to leaving in the fridge overnight.

Other Breakfast Recipes


Sholeh Zard Overnight Oats

Overnight oats flavoured with saffron and rose water
Prep Time10 minutes
Total Time10 minutes
Course: Breakfast
Cuisine: Persian, Iranian, Cross-cultural
Servings: 1
Author: Mersedeh Prewer

Ingredients

  • 50 g rolled oats
  • 1 tsp chia seeds
  • 200 ml milk or non-dairy alternative
  • 1 tbsp Greek yoghurt or non-dairy alternative
  • 2 tbsp rose water (use only 1 tbsp if you want it less floral)
  • 1/8 tsp ground saffron
  • 2 tbsp honey or maple syrup
  • 2 tsp flaked almonds
  • Strawberries (to mix through and garnish when ready to serve)
  • Small pinch of cinnamon (to garnish)
  • 1 tsp ground pistachios (to garnish)

Instructions

  • Mix oats, chia seeds, milk, yoghurt, rose water, saffron and honey in a bowl. Cover and leave in fridge overnight to soak.
  • Prior to serving, add and stir through flaked almonds and some chopped strawberries. Spoon into your bowl and top with more chopped strawberries, a sprinkle of cinnamon and ground pistachios.

Persian-Style Dal with Persian Mixed Spice & Dried Limes

A deeply comforting dal cooked in a rich tomato sauce with warming spices. The combination of the dried limes and Persian mixed spice creates an incredible savoury dish. A great vegetarian dish to eat with rice and or flatbread.

I discovered a love for dal over the last ten years. My husband introduced me to the world of dal during one of our early dates. He is a big fan of Indian cuisine and always orders a dal dish to accompany his meal. I was reluctant at first but, after a spoonful, I fell in love with the creamy texture and the aromatics of the dish. I wanted to make a dal dish with a Persian twist so I started experimenting!

Ingredients in this Dish

This dish is made with yellow split peas (Channa Dal) using the holy trinity of Persian cooking – onion, turmeric and saffron. I also added other familiar flavours from our cuisine during the recipe development including limoo amani (dried lime), advieh (Persian mixed spice) and nigella seeds. The resulting dish is deliciously savoury, packing an umami punch and satisfying even the die-hard carnivore.

Limoo amani can be bought online or from most Middle-Eastern food shops. It adds a musky and citrusy flavour to the dish. Be careful when piercing a hole into the dried lime as you do not want the seeds to fall out while it is cooking as it can make the dish bitter – just a gentle shallow poke into the lime with the end of a sharp knife.

Advieh can also be bought from most Middle-Eastern food shops – I buy mine online from Freshly Spiced on  Etsy. The combination fo spices are nutmeg, rose petals, cardamom, cumin, black pepper, goriander, and cinnamon.

I like a little heat in my food so I add red chilli to my dal, but feel free to leave it out.

How to Serve This Dish

Serve it with roti or naan, rice if you want a hearty meal with fresh herbs, torshi or a yoghurt dip on the side such as Maast o’Moosir (yoghurt and Persian shallot dip) or Maast O’Khiar (Persian yoghurt and cucumber dip).

Leftovers

This dal dish will last in the frisge up to 5 says if kept in an airtight container. Always cool dishes completely before refridgerating.


Persian-Style Dal with Persian Mixed Spice & Dried Limes

Prep Time15 minutes
Cook Time1 hour
Total Time1 hour 15 minutes
Course: Main Course
Cuisine: Persian, Iranian, Fusion
Keyword: vegetarian, vegan option, dhal, dahl, daal
Servings: 4
Author: Mersedeh Prewer

Ingredients

For the dal

  • 250 g chana dal (split yellow lentils) (rinsed with water until it runs clear and left in a bowl of water to soak overnight)
  • 2 tbsp vegetable oil
  • 1 onion
  • 3 cloves garlic
  • 1 whole red chilli (finely chopped - please feel free leave out / reduce amount or deseed if you would prefer it less spicy)
  • 1 tsp coriander seeds
  • 1 tsp turmeric
  • 900 mls vegetable stock
  • 1 bay leaf
  • 1 to 2 limoo amani (dried lime)
  • 200 g fresh tomatoes (chopped)
  • 1/8 tsp ground saffron (bloomed in 2 tbsp of water)
  • Juice from half a fresh lime
  • Salt and pepper (to taste)

For the temper and garnish

  • 2 tbsp ghee (non dairy alternative, if vegan)
  • 1 tsp black mustard seeds
  • 1/4 tsp advieh (Persian mixed spice)
  • 1 tsp nigella seeds (to garnish)

Instructions

  • Blend onion and garlic into a paste in a food processor or equivalent.
  • Take a large saucepan and add 2 tbsp oil and place on medium-high heat. Add chilli and coriander seeds. Toast lightly for 30 seconds to release flavours. Be careful not to burn otherwise it will be bitter. Add onion and garlic paste to the pan and cook for 5 minutes. Add turmeric and cook for a couple of minutes.
  • Drain channa dal and rinse. Then add to the pan with stock, chopped tomatoes, bay leaf and bloomed saffron.
  • Pierce imoo amani 3 to 4 times around the lime gently with the tip of a sharp knife and add to the pan - only a shallow piercing is required. Bring to a boil, then turn the heat down, add a lid and let it simmer for 45 minutes.
  • When the channa dal has cooked, remove from heat and remove the bay leaf and limoo amani. Stir to break down. Squeeze some fresh lime juice and season to taste. Leave the mixture to thicken.
  • To make the temper, place a small frying pan on high heat. Add ghee and fry mustard seeds for 30 seconds. Turn heat off, add advieh and mix and then pour into the dal mixture and stir. Sprinkle nigella seeds to garnish.
  • Serve with chapatis or roti and/or rice with yoghurt or torshi.

Zeytoon Parvardeh (Persian Marinated Olives)

Green olives are marinated in a herb, garlic, walnut and pomegranate paste to create an incredible and deliciously tangy appetiser.

Origins of Zeytoon Parvardeh

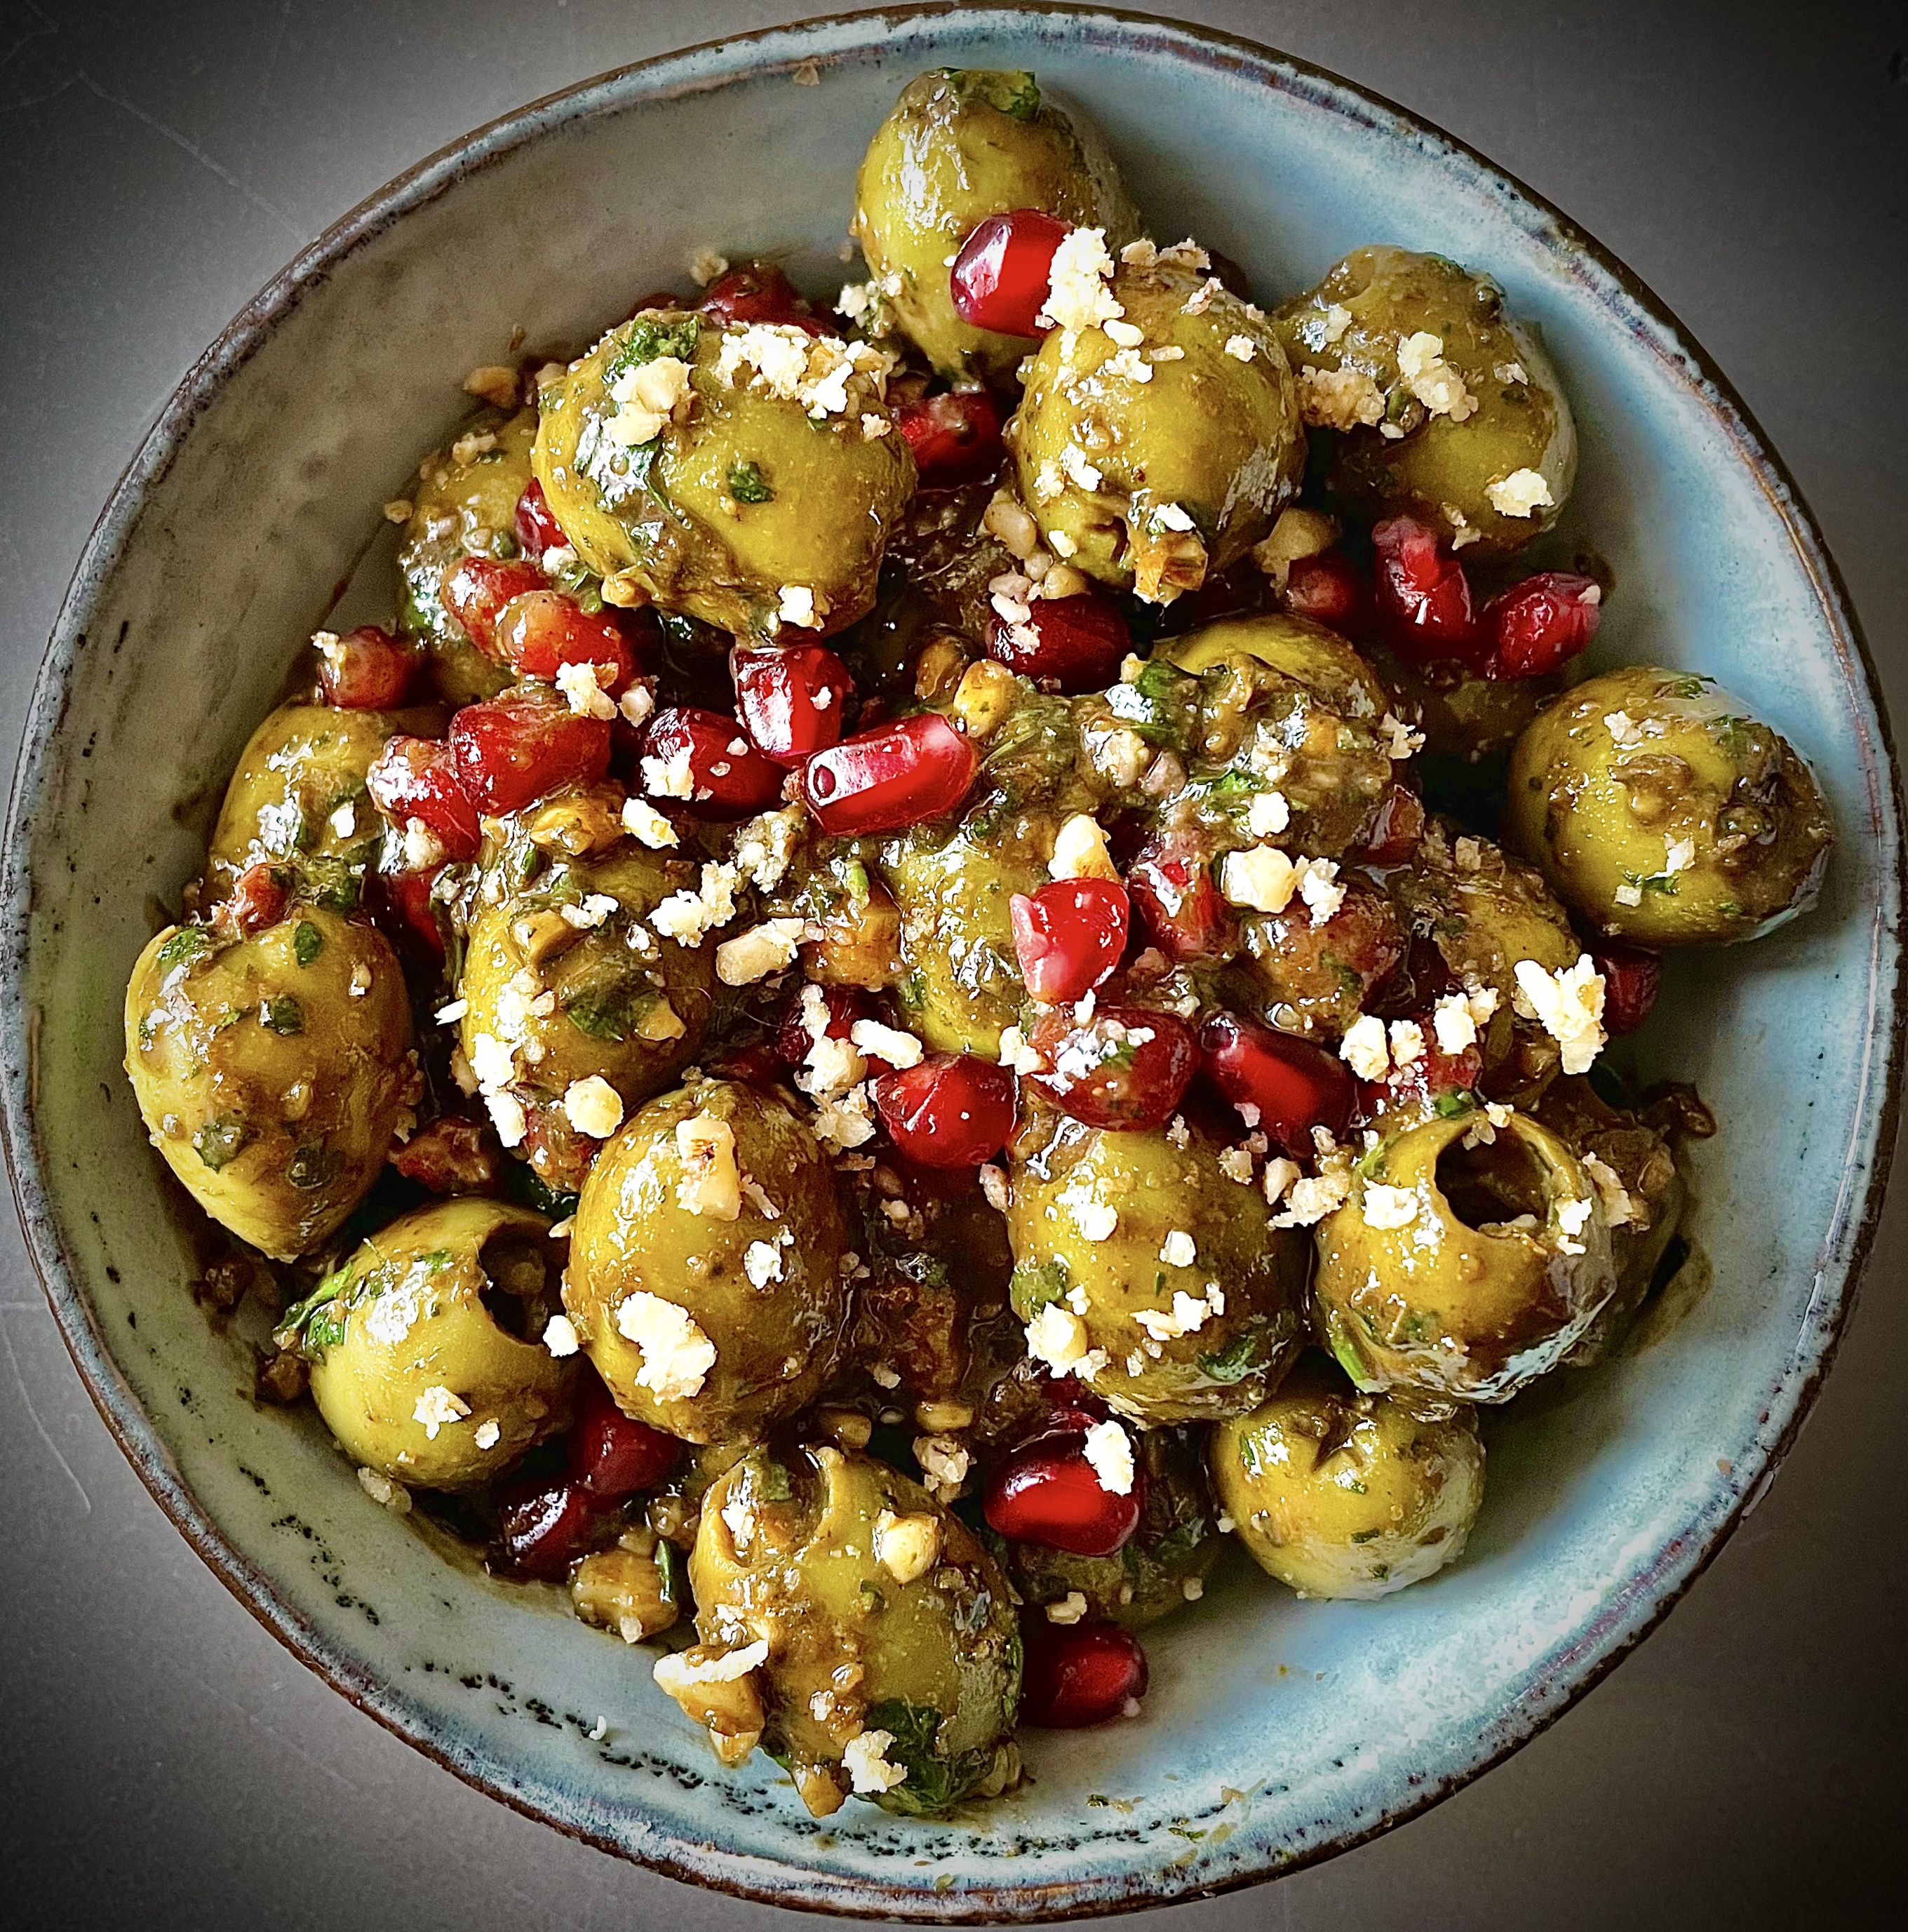
This delightful appetiser heralds from Gilan Province in the North of Iran, a region I visited in my mid twenties and one my family has become more familiar with over the last 20 years. Gilan Province lies along the Caspian Sea bordering Russia. The Province is lush and green with many delicious dishes, particularly vegetarian, originating from the Province, including Mirza Ghasemi (smoked aubergines and eggs) and Baghali Ghatogh (eggs with broad beans and dill).

What are the Ingredients?

The North of Iran loves walnuts and pomegranates and a number of their dishes use this combination including Zeytoon Parvardeh.

The ingredients are olives; pomegranate juice, molasses and arils; walnuts; garlic; and a herb called chuchagh. Chuchagh is a rare herb and is found in certain areas In Iran. In order to emulate its flavour for this dish we replace it with mint in the UK. I have also added a bit of coriander and parsley to my recipe.

I use large pitted green olives like gordal  or karyatis olives. By using pitted olives, it allows for the marinade to seep into the olives and also makes it easier to eat them.T he flavour profile of this dish is sweet and sour and incredibly moreish.

How to Serve Zeytoon Parvardeh

It is an easy and quick dish to prepare and ideally made the night before so that the flavours blend and intensify. I often make a small bowl of this appetiser and slowly work my way through it with cheese and crackers – I hasten to add that eating it as an accompaniment with cheese is not authentically Iranian but it works!

Zeytoon Parvardeh can be eaten with pre-dinner drinks (wine, cocktails or hard liquor – whatever you fancy), as part of a mezze-style platter or array of dishes, or with cheese and crackers which is my favourite way to eat it.
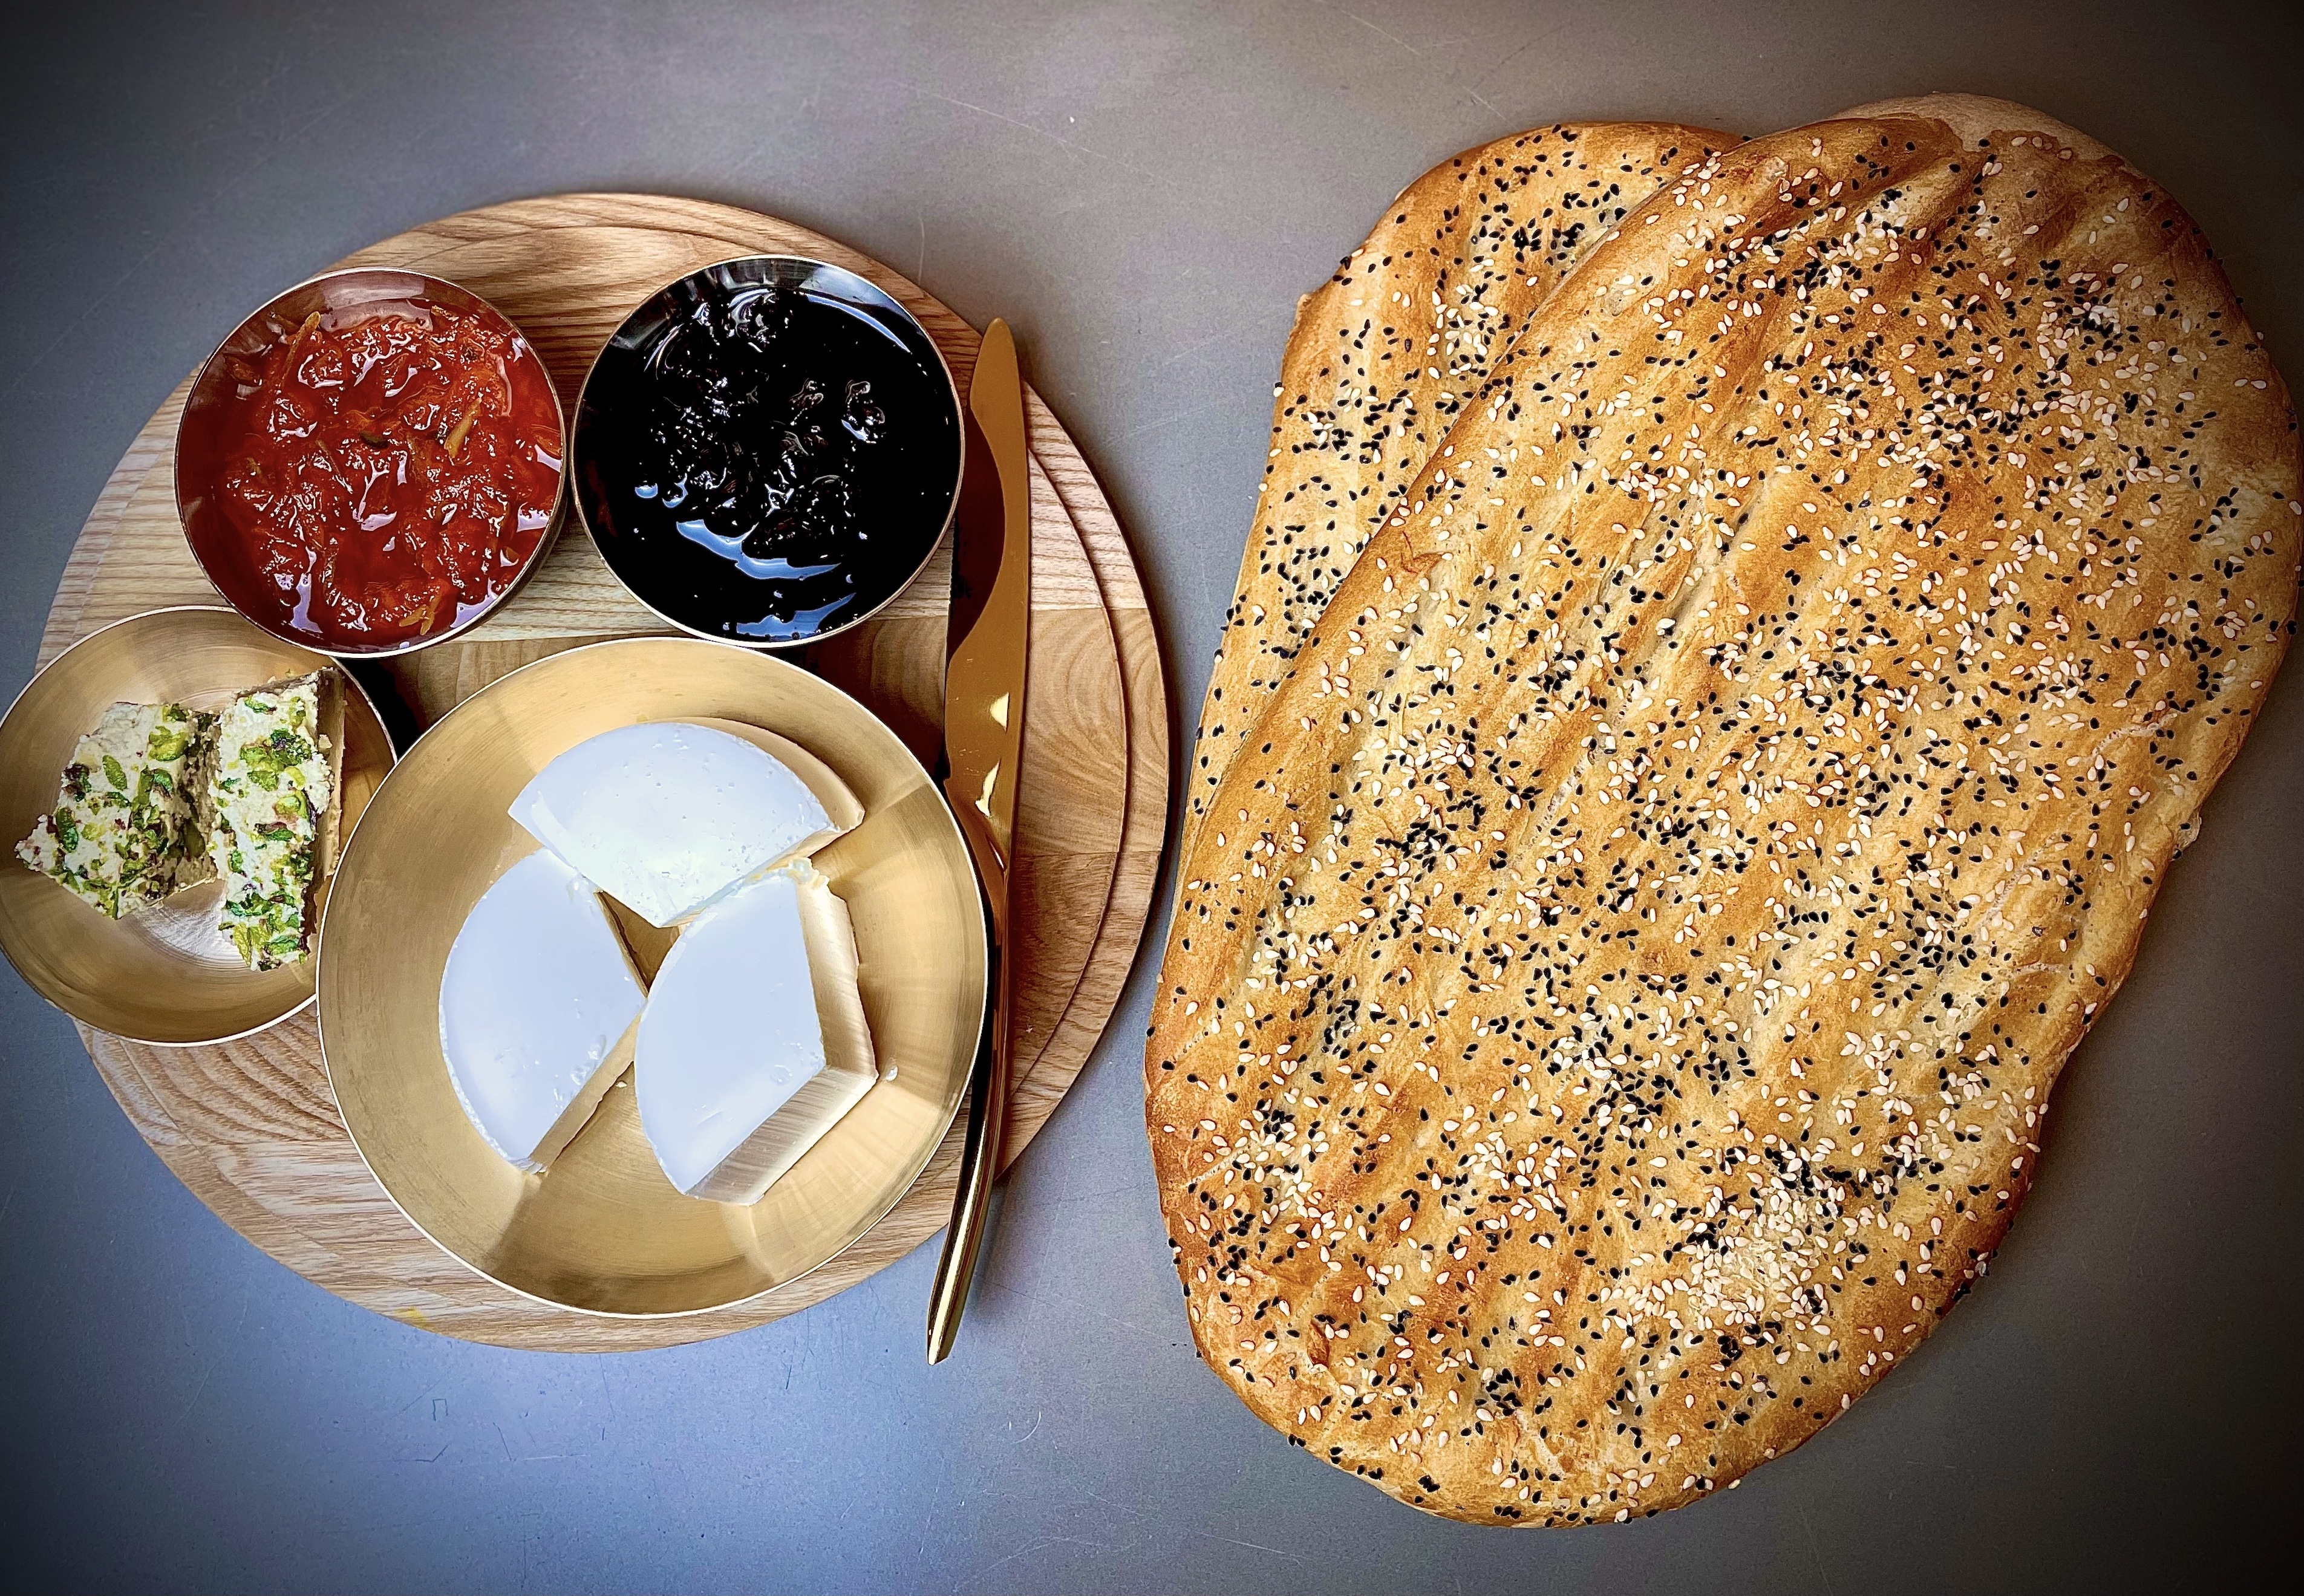

Zeytoon Parvardeh

Prep Time15 minutes
Course: Appetiser
Cuisine: Persian, Iranian
Keyword: vegetarian, vegan
Servings: 4
Author: Mersedeh Prewer

Ingredients

  • 7 whole walnuts (or 14 halves)
  • 2 cloves garlic
  • 10 g fresh mint
  • 10 g fresh coriander
  • 10 g fresh parsley
  • 2 tbsp pomegranate molasses
  • 1 tbsp olive oil (extra virgin preferably)
  • 2 tbsp pomegranate juice (squeeze this out of the pomegranate or use 2 tbsp of the arils)
  • 350 g large pitted green olives (drained weight approx 160g)
  • 1 to 2 tbsp pomegranate arils (to stir through and garnish)
  • Ground walnuts (to sprinkle as a garnish)

Instructions

  • Add walnuts and garlic to a food processor and blitz until walnuts are finely ground.
  • Remove mint leaves from the stems. Remove the tougher parts of the stems from coriander and parsley. Then add herbs to walnut and garlic and pulse in the food processor until finely chopped.
  • Add pomegranate molasses, olive oil and the pomegranate juice. Pulse in the food processor until it is a coarse paste.
  • Mix the paste with the olives in a bowl. Stir through some pomegranate arils, reserving some for a garnish. Cover and leave in the fridge to marinate (preferably overnight).
  • Serve with ground walnuts and pomegranate arils sprinkled on top.

Garni Yarikh (Stuffed Aubergines in a Tomato Sauce)

A vegan version of a dish cooked by both the Turkish and Iranians. Aubergines stuffed with lentils cooked in a tomato and saffron sauce.

Origins of this Dish

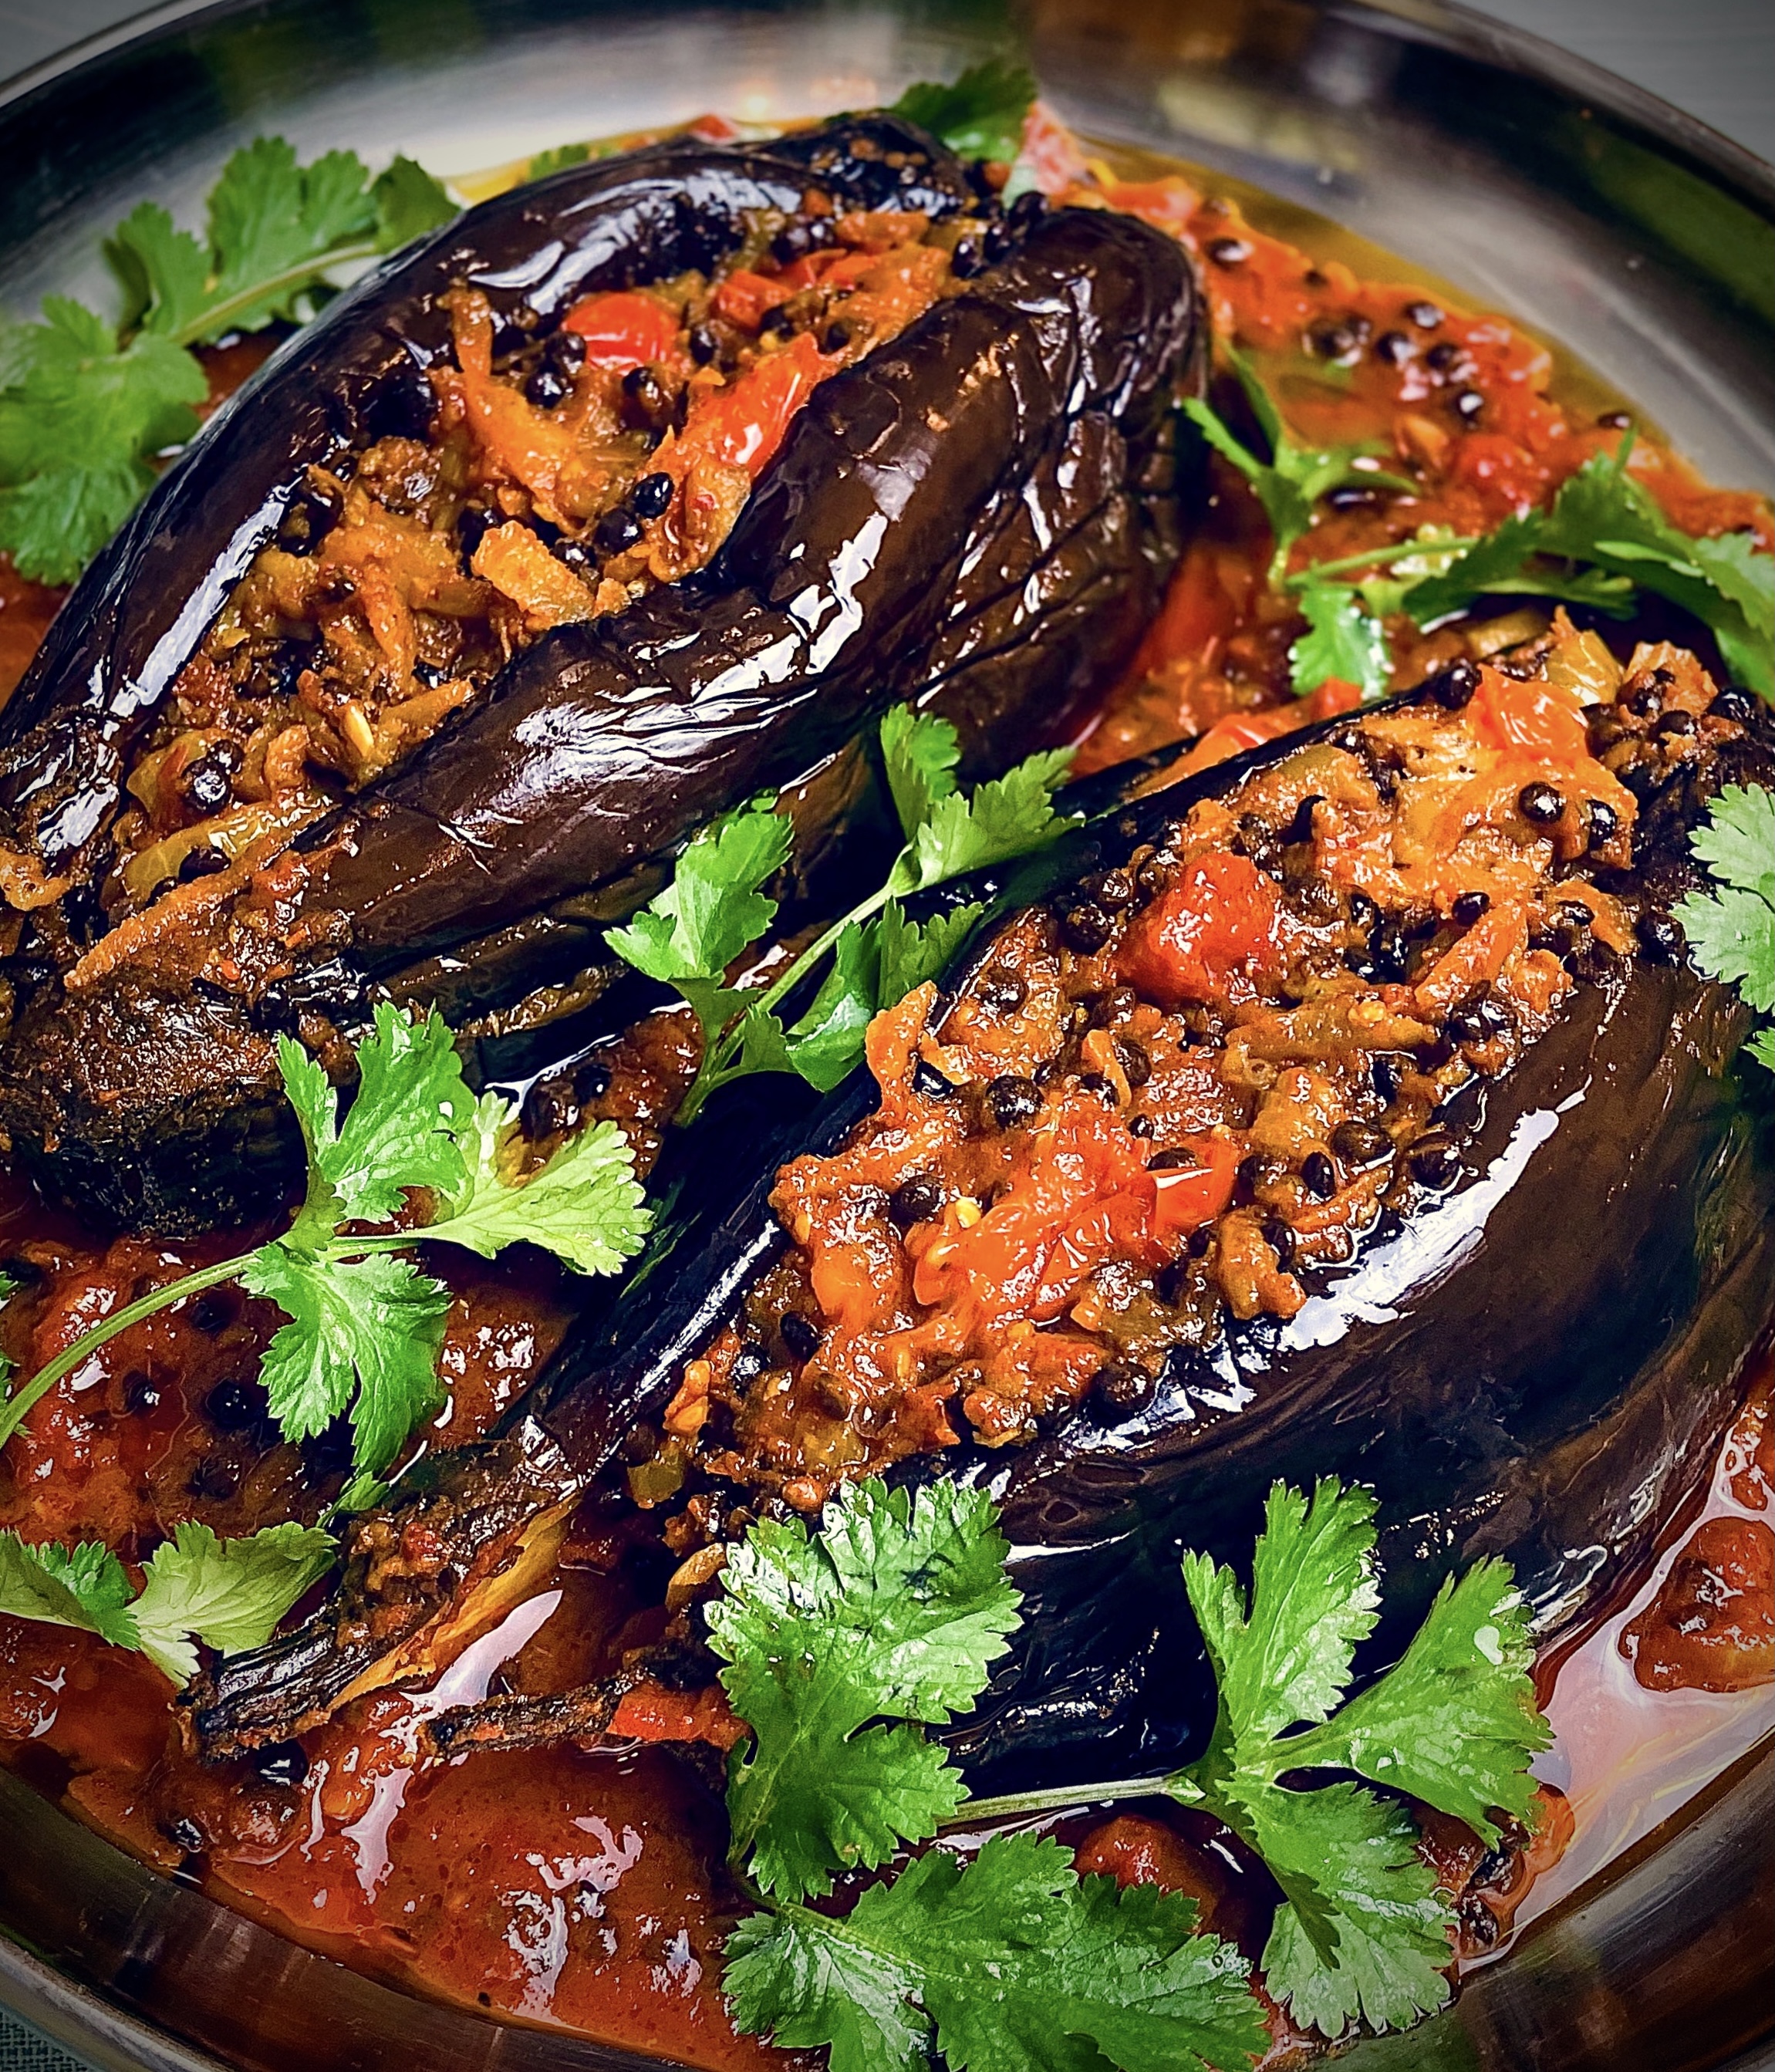
Garni Yarikh comes from the Azerbaijani province of Iran (northwestern Iran bordering Iraq, Turkey, Armenia, and the Republic of Azerbaijan). The region is mostly populated by Azerbaijanis also known as Iranian Azeris, who tend to speak Azerbaijani (a Turkic language) as their first language.

Garni Yarikh translated is ‘torn belly’ with the Persian equivalent being ‘Shekam Pareh’. Traditionally the aubergine is stuffed with a mixture of mince meat and then simmered in a rich and tangy tomato-based sauce. The Turkish version, and where it originates from, is called ‘Karnıyarık.’

A Vegan Version

The recipe below is a vegan version, as Iranian food can be quite heavy on the meat. Where an opportunity presents itself, I like to adapt a recipe to be plant-based. To make the recipe vegan, I have replaced the mince meat with lentils and added vegetables to the stuffing mixture. You can use any lentils you want. I buy pre-cooked lentils as it reduces the preparation and cooking time.

My go-to lentils for this dish are Merchant Gourmet Beluga Lentils. They absorb the sauce brilliantly and have a lovely texture.

If you have time, I recommend salting and leaving the aubergines for 30 minutes to draw out some of the water. Aubergines can afford to lose a little water pre-cooking but it isn’t an issue if you just want to launch into the recipe as per the steps below.

What to Serve with this Dish

Eat Garni Yarikh with a salad like tabbouleh and hummus on the side. This dish can also be served with rice (kateh or chelow). Also flatbread is a great accompaniment. 
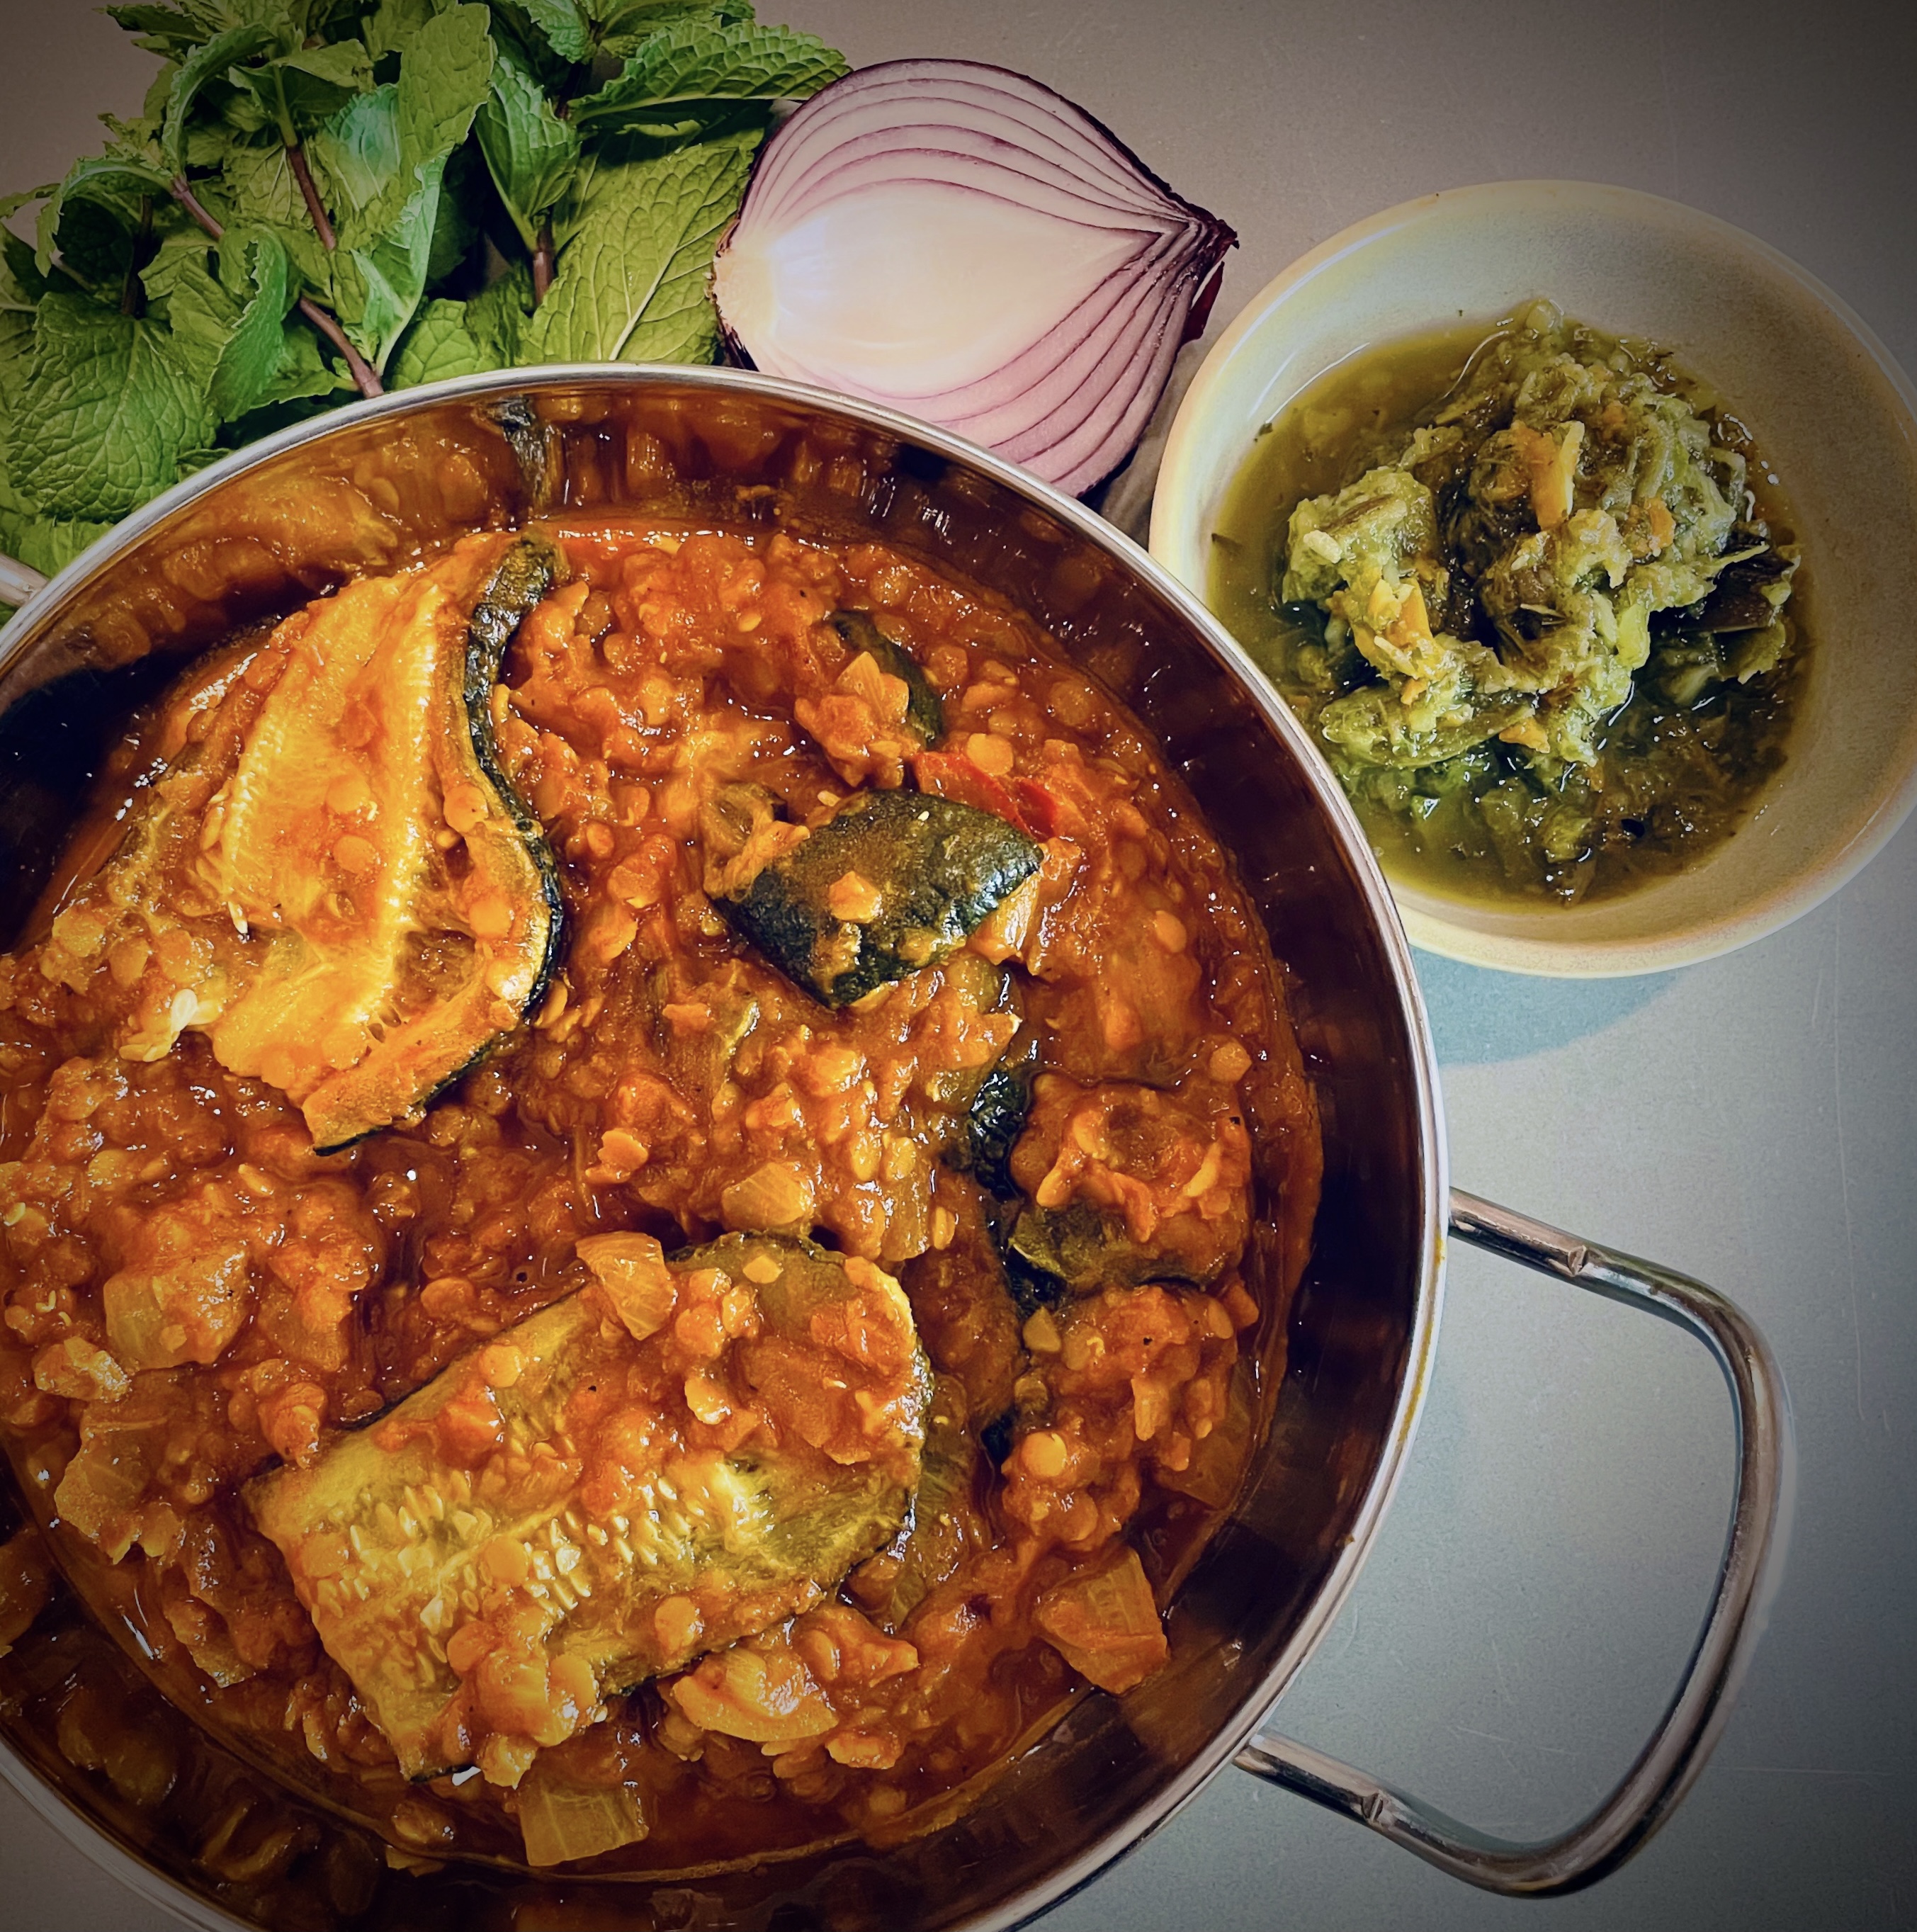

Garni Yarikh

Stuffed aubergines in a tomato sauce
Prep Time10 minutes
Cook Time1 hour 20 minutes
Total Time1 hour 30 minutes
Course: Main Course
Cuisine: Iranian
Keyword: tomatoes, vegetarian, vegan, aubergines
Servings: 4
Author: Mersedeh Prewer

Ingredients

  • 4 tbsp olive oil
  • 2 large aubergines
  • 1 onion (finely diced)
  • 1 carrot (grated)
  • 1 celery stick (finely sliced)
  • 4 garlic cloves (crushed)
  • 1 tsp turmeric
  • 1 tsp smoked paprika
  • 1/2 tsp dried red chilli flakes
  • 2 tbsp tomato purée
  • 1 pack Merchant Gourmet Beluga Lentils (250 grams cooked weight)
  • 250 ml water
  • 1 tbsp maple syrup
  • 150 g cherry tomatoes (halved)
  • 400 g tin of chopped tomatoes or passata
  • 1/8 tsp ground saffron bloomed in 2 tbsp of water (optional)
  • A few sprigs of fresh coriander (for garnish)
  • Salt and pepper to season

Instructions

Prepare and Roast the Aubergines

  • Pre-heat oven to 180°C (fan) / 200°C (conventional) / Gas Mark 6.
  • Slice aubergines lengthways. Then take a knife and criss-cross the flesh. Brush aubergines with olive oil and some of the crushed garlic and season well. Place on baking tray and roast in oven for 30 mins or until flesh is soft and cooked through.

Make the Lentil Stuffing Mixture

  • In the interim, take a frying pan, add 2 tbsp olive oil and place over medium-high heat.
  • Add onions and fry until they turn golden. Then add carrot, celery and garlic (reserve a little garlic for the tomato sauce) and cook until vegetables have softened.
  • Add turmeric, smoked paprika and chilli flakes. Follow with tomato purée and stir until evenly distributed in the mixture for a few minutes.
  • Add lentils, cherry tomatoes, water and maple syrup. Reduce the heat to low and let it cook for about 5 to 10 minutes until water has been absorbed and the cherry tomatoes have softened.
  • Remove aubergines from the oven. Scoop out some of the flesh, gently taking care not to tear the aubergine cases. Add flesh to the lentil mixture, stir and season to taste. Let the flavours of the mixture combine by gently cooking for a few minutes, stirring now and again.

Make the Tomato Sauce

  • Take a shallow casserole pan with a lid, place it on medium-low heat and add 1 tbsp olive oil and remaining garlic. Let it infuse with oil, being careful not to let it burn. Add chopped tomatoes / passata, the bloomed saffron and season. Let it simmer gently for 10 mins.

Assemble the Dish and Simmer

  • Take one aubergine half and gently place it on the tomato sauce. Fill it with half the lentil mixture and then place the other half of the aubergine on top. Repeat with the other 2 halves. Don't worry if some of the lentil mixture falls into the sauce - it will add to the overall flavour. Leave to simmer with the lid on the pan for approximately 20 mins.

Serve the Garni Yarikh

  • Serve aubergine garnished with fresh coriander accompanied by rice or bread and salad with a citrus dressing. If you feel confident serve the aubergine with the split facing upwards like I have in my picture so it looks like they have been stuffed.

Chelow and Tahdig (Persian Rice – The expert way)

Create rice with perfectly tender, separate and fluffy grains with a crunchy layer of crispy rice called Tahdig. This is the beloved way Iranians make rice. Once you master the skill, you are unlikely to make rice any other way!

What is Chelow?

Chelow is the name given to the white fluffy grains of rice either served with our kebabs or khoresh (stews) in Iranian cuisine. We also have Kateh, which refers to our version of easy-cook sticky rice, and polo, which refers to our rice cooked with vegetables,  herbs and/or meat (similar to the Asian biryani).

Polo follows the same cooking procedure as chelow but has the added stage of preparing and cooking the ingredients to be mixed in to the rice. Kateh is simple as you boil and steam the rice without draining the water by letting it evaporate in the saucepan. Kateh tends to be reserved for family weekday meals.

What is Tahdig?

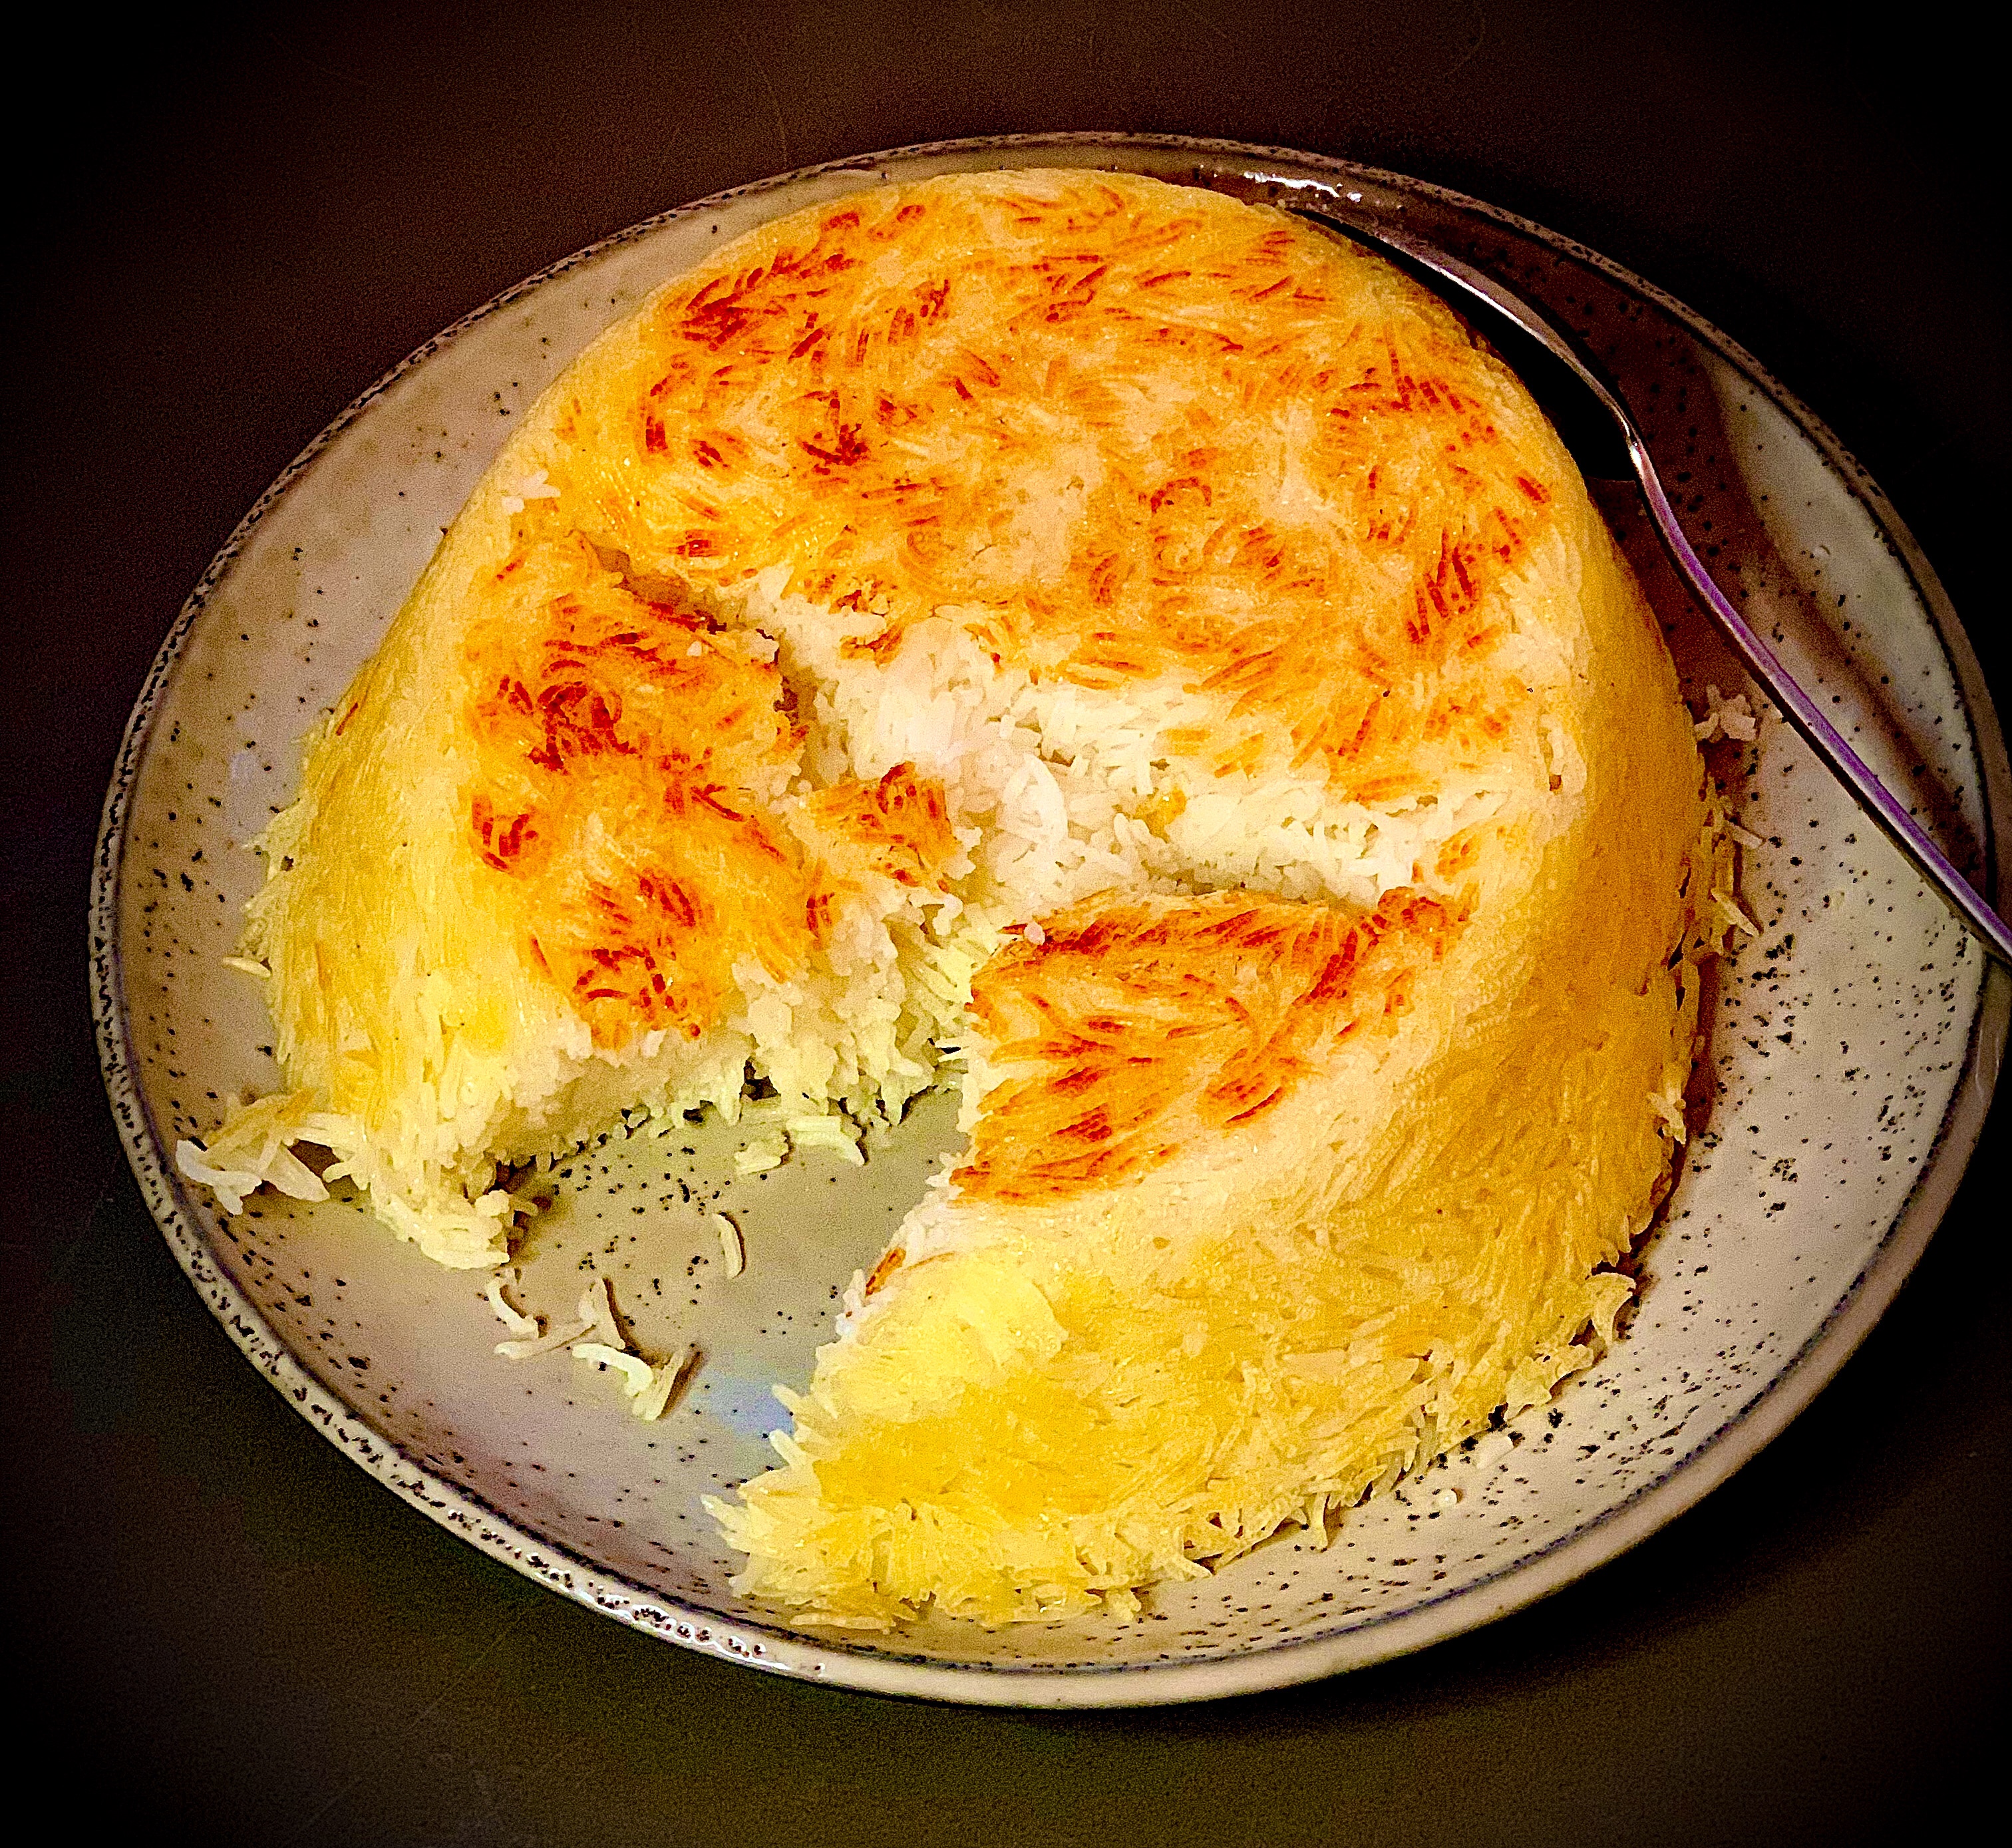
The common feature in the various Persian rice options is that they all yield the crispy rice, which forms at the bottom of the cooking pot, called ‘Tahdig’. Tahdig literally translated means ‘bottom of the pot’ and is the most cherished part of our meals. I don’t think I have ever met someone who dislikes tahdig!

Although kateh is the easiest way of cooking Persian-style rice it does not yield a tahdig as superior as chelow or polo. Therefore you are rewarded for going the extra mile with the slightly more complicated way of cooking rice.

To achieve the perfect fluffy rice and golden tahdig is a commitment. Despite this, even the veteran chelow and tahdig cooker sometimes has an off day with rice coming out a bit mushy and the tahdig burnt. So don’t be hard on yourself if you commit to this journey and it takes a while to master it. 

Tahdig Varieties

Now while chelow has a standard set of preparation and cooking steps, tahdig has a number of different options available. The most common are rice, potato or flatbread options. See the pictures above for examples.

As with the evolution of many cuisines, experiments have been undertaken to explore new ways of reinventing a classic. In the case of tahdig people have experimented with ingredients to see if they can create a new type of tahdig as good as the originals. I’ve seen tahdigs made with lettuce, fish and chicken. 

Ingredients and Equipment to Make Chelow & Tahdig

Ingredients
  • White long grain basmati rice – if you want to cook authentic Persian style rice this is the perfect rice to use. You can buy this from your local supermarket or local Middle-Eastern or Asian food shops. I recommend Tilda.
  • Saffron – is needed for the Tahdig layer and potentially for serving it (see ‘How to serve Chelo & Tahdig’ below). Always grind your saffron strands into a fine powder after purchasing. For utilisation in Persian cooking, always bloom in water as directed in recipe.
  • Salt – try not to baulk at the amount of salt used. Rice needs a lot of salt as it can be quite bland and the boiling stage washes a lot away. Taste a grain or two of your rice at step 6 of the recipe below. If it tastes too salty just pour a little cold water over your parboiled rice to wash some away. 
  • Neutral flavoured oil – used to create the Tahdig layer. 
  • Butter / ghee / or vegan equivalent – used for the Tahdig layer but also to drizzle over the rice pre steaming to create fluffy separate grains.
Equipment
  • A good quality non-stick saucepan with a glass lid – essential kit to make the perfect chelow and tahdig, particularly if you want to flip the rice out as a contained cake-style rice encased in tahdig.
  • A small-hole colander or sieve – to drain the rice.
  • A clean tea towel – an absolute must as it aids the steaming of the rice by absorbing the water droplets, which would otherwise form on the lid of your saucepan and fall back on to the rice making it mushy.

Steps to Make Chelow

Chelow has a 6-step-process to follow, summarised below:

  1. Wash the rice. Removes the starch from the rice in order to assist in producing a tender fluffy grain. It also assists in the rice being more nutritious.
  2. Soak the rice. Not all consider this stage is necessary any more in light of the quality of long grain basmati rice available, however it is of note that some famous brands recommend soaking their rice for 30 minutes pre cooking. Soaking the rice promotes more thorough cooking by allowing moisture to reach the centre of the rice grain, it further improves its final texture, makes the grain less brittle and assists the rice to become more digestible.
  3. Par boil the rice until al dente. The first stage of the cooking process, which partially cooks the rice.
  4. Drain the rice. The rice does not continue to cook in the cooking liquid but is steamed with the water already absorbed into the rice from step 3 and an additional small amount of water.
  5. Prepare the Tahdig layer and then layer remaining rice on top. The tahdig layer is placed at the bottom of the pot on a little saffron water and oil and / or butter before the rest of the rice is layered on top. A little water and melted butter is poured over the rice to assist with the final cooking stage.
  6. Steam the rice. The rice is steamed with a lid covered in a tea-towel to create our beloved chelow and tahdig.

How to Serve Chelow & Tahdig

The recipe below sets out steps to serve the chelow and tahdig as a cake-style, tahdig encased rice as seen in the first set of pictures above.

For larger quantities, once the rice has cooked, I recommend spooning the rice out and serving it on one plate and then serving your tahdig separately on another dish. The latter is usually garnished with saffron coloured rice sprinkled on top (see picture). In my family we use a little rose water when blooming the saffron for the rice garnish as it adds a delicate floral note to the chelow, so if you want to present your rice this way then it is worth getting your hands on some rose water from your local Middle-Eastern food shop.

Simply mix a little cooked rice with saffron bloomed in a little water and rose water until it takes on a golden hue. Then sprinkle the saffron rice on top of the plain white rice and then serve.

 
As a final note, the primary recipe below is to make chelow with rice tahdig. Refer to the ‘Alternative Step’ sections below for guidance on how to make potato or flatbread tahdig.


Check out my Reel on How to Cook Chelow and Tahdig


Chelow and Tahdig

Persian Rice - the expert way
Prep Time10 minutes
Cook Time1 hour
Total Time1 hour 10 minutes
Course: Rice Dish, Accompaniment
Cuisine: Persian, Iranian
Keyword: basmati rice, tahdig
Servings: 4 to 6
Author: Mersedeh Prewer

Ingredients

  • 2 cups white long grain Basmati rice (standard UK measuring cup capacity 250 ml - approx 400 grams of rice)
  • 2 tbsp salt
  • Water (as directed below)
  • 1/8 tsp ground saffron bloomed in 2 tbsp of water for the tahdig
  • 2 tbsp vegetable oil plus extra if you are making potato or flatbread tahdig as per 'Alternative Step' sections below
  • 2 to 3 tbsp ghee / butter / vegan equivalent

Instructions

Wash and Soak the Rice

  • Wash rice in cold water until water runs clear. Be gentle, otherwise you will damage and break the grains.
  • Place rice with 1 tbsp of salt in a bowl and pour in cold water to cover up to 2 inches above the top. Leave to soak for a minimum of 30 mins (I leave mine overnight and cook the rice during the afternoon of the day after).

Parboil the Rice

  • Fill a large non-stick saucepan (minimum capacity 2.5 litres) with approximately 1.5 litres of water and 1 tbsp of salt. Place over high heat and bring water to a boil.
  • Drain the rice and then add to the saucepan. Gently stir to make sure it does not stick to the pan.
  • Stay with the saucepan and do not leave it at this stage. It is crucial that you remove the rice and drain it at the right time. Every minute give it a gentle stir and take a grain and check the texture - either between your fingers or using your teeth. What you want is the grain to be soft on the outer layer but still firm in the centre. It can take any time from 3 to 7 minutes with the quantity in this recipe.
  • Once the parboiled rice reaches the correct texture, turn your heat off and drain in a colander or sieve. Sprinkle a little cold water to halt the cooking process. Taste the rice - if it is very salty then rinse it further with a little water.

Prepare the Tahdig Layer

  • Place the empty saucepan on your stove.
  • Add 2 tbsp of oil and 1 tbsp of butter / ghee / vegan equivalent to the pan and place on a low heat to melt. Then turn the heat off. (See * below for alternative tahdig layers - potato or flatbread).
  • Add your bloomed saffron to the saucepan and mix with the oil to distribute evenly (this will give a lovely golden colour to your tahdig).
  • To make your tahdig spoon about a 1-inch layer of rice into the saucepan and gently stir to mix with the saffron oil to ensure colour is distributed evenly. Be careful not to break the grains. Then pat down flat with the back of a spoon.
  • Then layer the remaining rice and gently pat down to the shape of the saucepan. Take the end of a tablespoon and gently poke about 5 small holes in the rice to allow steam to escape while cooking. Then pour over 2 tbsp of cold water.
  • Drizzle 1 to 2 tbsp of melted ghee / butter / vegan equivalent over the rice.

Steam the Rice

  • Place your glass lid on the saucepan and turn the heat to the highest setting. Once you start to see steam rise from the rice (your glass lid will start to get clear from the steam and droplets of water will start to form on the lid - it is perfectly fine to have a little look under the lid now and again to check the steam situation) lower the heat to the minimum flame or equivalent on your cooker. Cover the lid with a tea towel (making sure it is not a fire risk) and replace the lid on the saucepan.
  • Allow to steam for a minimum of 45 mins to get a crunchy and thick layer of tahdig.

Serve the Chelow & Tahdig

  • When the cooking time is over turn off the heat and remove the lid from the saucepan. Take a serving dish that covers the opening of the saucepan and place it on top. Flip the rice out onto the dish and serve with either a khoresh, kabab, curry or any other dish.

*Alternative Tahdig - Potato Tahdig

  • If you are making potato tahdig, you will need 1 medium-sized potato peeled and sliced into 1.5 cm thick discs. Place the sliced potatoes into a bowl of water to wash off excess starch - this will help during the crisping process while the rice steams. It will also stop the potatoes turning brown as you get the rice ready to steam.
  • For preparing a potato Tahdig layer - add an extra tablespoon of vegetable oil to the bottom of your pot then layer your potatoes at the bottom of the pan on top of the saffron oil (try not to overlap them so they all cook through evenly and crisp up) and then layer your rice on top and pat down to fill any gaps between the potatoes. Then follow subsequent steps of the recipe.

*Alternative Tahdig - Flatbread Tahdig

  • If you are making flatbread tahdig, you will need 1 medium Middle-Eastern style flatbread like lavash or 1 medium white tortilla. 
  • For preparing a flatbread Tahdig - use the flatbread to cover the bottom of the pan  or you can cut shapes into it and layer the bottom surface of the saucepan only. Either way, before layering your flatbread, take a pastry brush and coat your flatbread generously with vegetable oil and then lay it on the saffron oil. Then layer your rice on top and follow the subsequent steps of the recipe. If you are using the whole flatbread to cover the bottom of the saucepan, without cutting shapes, be a little cautious with the timing on lowering the heat to steam the rice as the flatbread can burn quite quickly. As soon as you see steam creeping round the edges of the bread, then turn down the heat and place the lid wrapped with a tea towel on the saucepan. Follow the subsequent steps of the recipe.

Salad Shirazi (Cucumber, Tomato & Onion Salad)

Often referred to as the National Salad of Iran, this juicy lime-dressed salad is a happy accompaniment to all Persian mains from kebabs to koresh (stews).

The National Salad of Iran

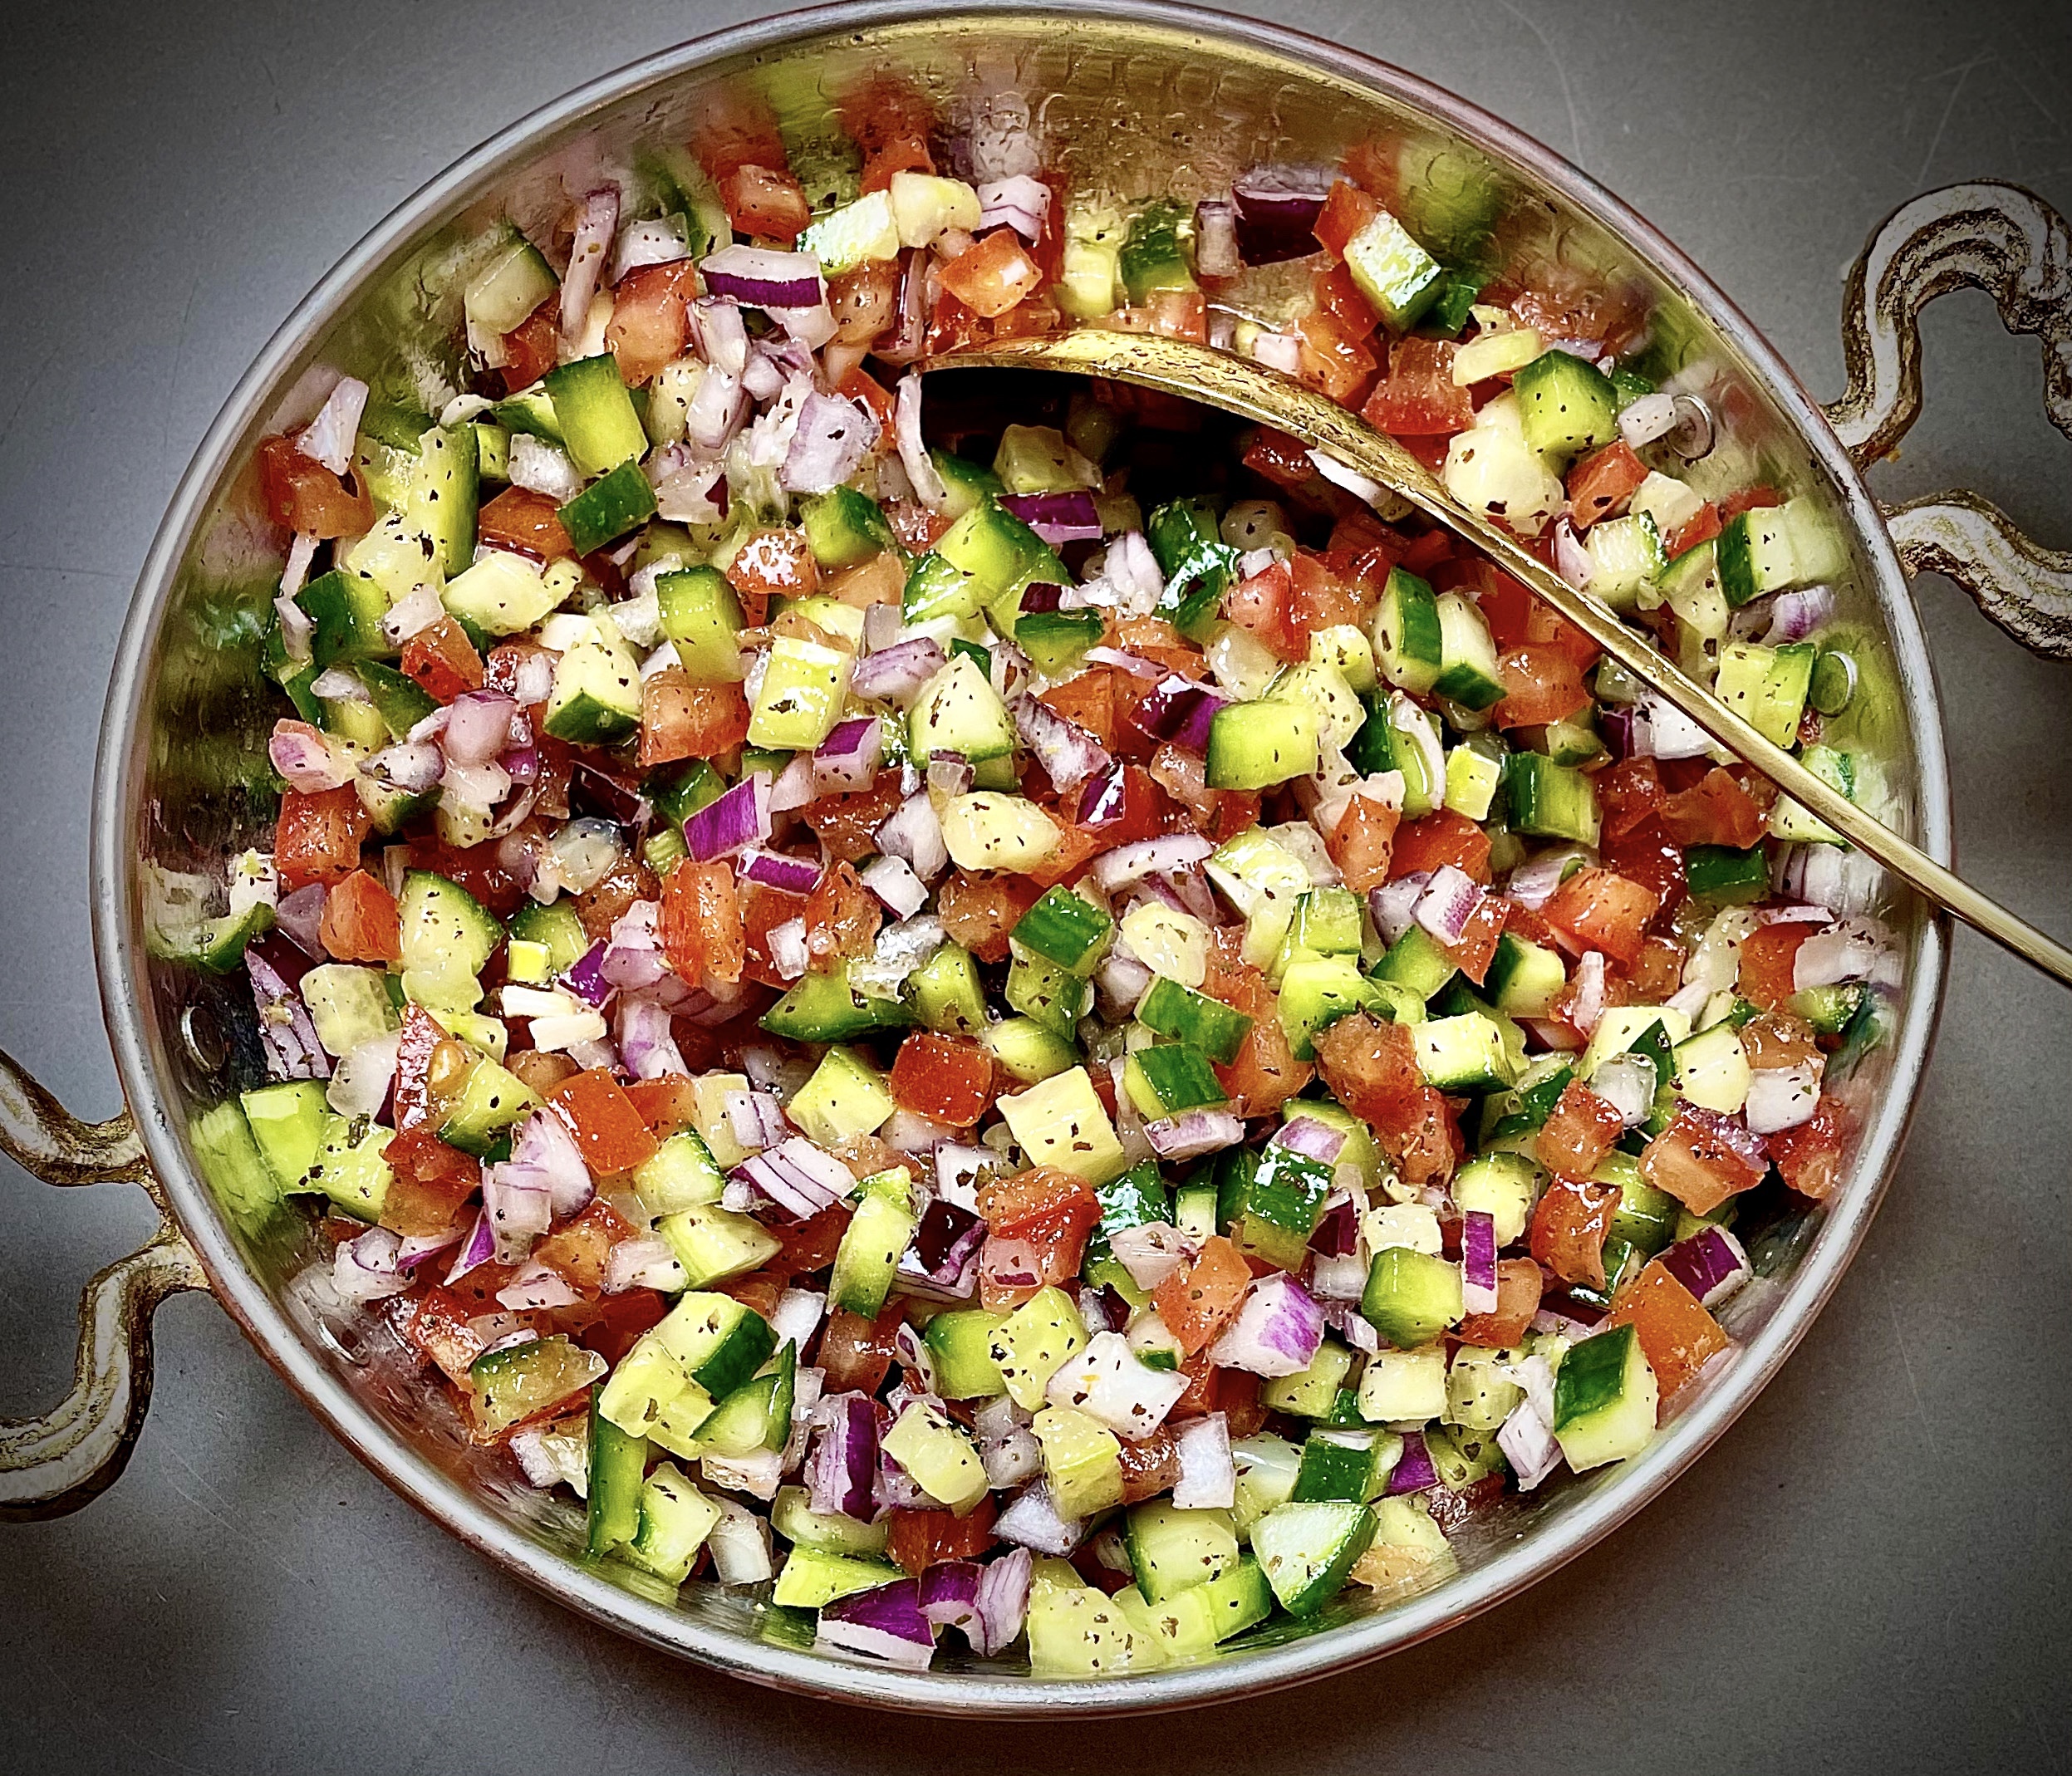
As the name gives away, Salad Shirazi originates from Shiraz, which is located in the South West of Iran. The reason it is called the National Salad of Iran is because it is our only salad recipe! It is similar to the Indian Kachumber and Israeli chopped salads. 

Ingredients in Salad Shirazi

Use fresh and high quality ingredients to get maximum flavour from your Salad Shirazi.

  • Cucumber, tomatoes and red onion: are diced into small chunks, as pictured above. You can chop it into bigger chunks, if you prefer.
  • Dried mint, salt, pepper, fresh limes and good quality salad oil, such as extra virgin olive oil or toasted argan oil: create the dressing. I sometimes add sumac to the dressing, which gives another layer of citrus to the final salad.

Tips for Making Salad Shirazi

Scrape some of the the seeds out of both the cucumber and the tomatoes before dicing the salad ingredients. Although you want a juicy salad, you don’t want a water-logged one. Don’t be too obsessive about seed removal because the salad is meant to be juicy. You want to have some delicious dressing to spoon over the other elements on your plate.

Serving Suggestions

Serve it as a side salad with all Persian mains from khoresh to kebabs. Here are some suggestions.

This salad can be eaten with any cuisine so no need to limit it to a side salad for Persian mains only.

How to Store Salad Shirazi

Keep in an airtight container in the fridge and it will last up to 2 days.


Salad Shirazi

Persian cucumber, tomato and onion salad - the National Salad of Iran
Prep Time15 minutes
Total Time15 minutes
Course: Salad, Appetiser
Cuisine: Persian, Iranian
Keyword: vegetarian, vegan
Servings: 4
Author: Mersedeh Prewer

Ingredients

  • 1 medium cucumber
  • 3 medium tomatoes
  • 1 medium red onion
  • 3 tbsp extra virgin olive oil or toasted argan oil
  • 2 limes (zest of one lime, juice squeezed from both for the dressing)
  • 2 tsp dried mint (fresh mint can also be used as an alternative or in addition to the dried mint)
  • Salt and pepper (to taste)

Instructions

  • Halve tomatoes and scrape some of the seeds out. Do the same with cucumber. Finely dice onion, tomatoes and cucumber into small chunks.
  • Make a dressing out of olive oil, lime juice and zest, salt, pepper and mint. Drizzle over salad.
  • Toss salad and taste - adjust seasoning if required and then serve.

Torshi Soorati (Red Cabbage & Onion Pickle)

An easy pickle made from red cabbage and red onion. Ready to eat in 5 days, this vibrant pink pickle is a perfect accompaniment to a range of dishes.

What is Torshi?

Torshi is derived from the word ‘Torsh’ in Farsi, which means sour. Torshi is used to describe vegetables pickled in vinegar. They are often eaten as accompaniments to dishes and / or aperitifs. On a Persian sofreh (spread) you will always find some Torshi.

The sour taste of the pickles perfectly complements many of our dishes, particularly those containing lamb, as it brings a balance to the richness of the flavours.

How to Make Torshi Soorati

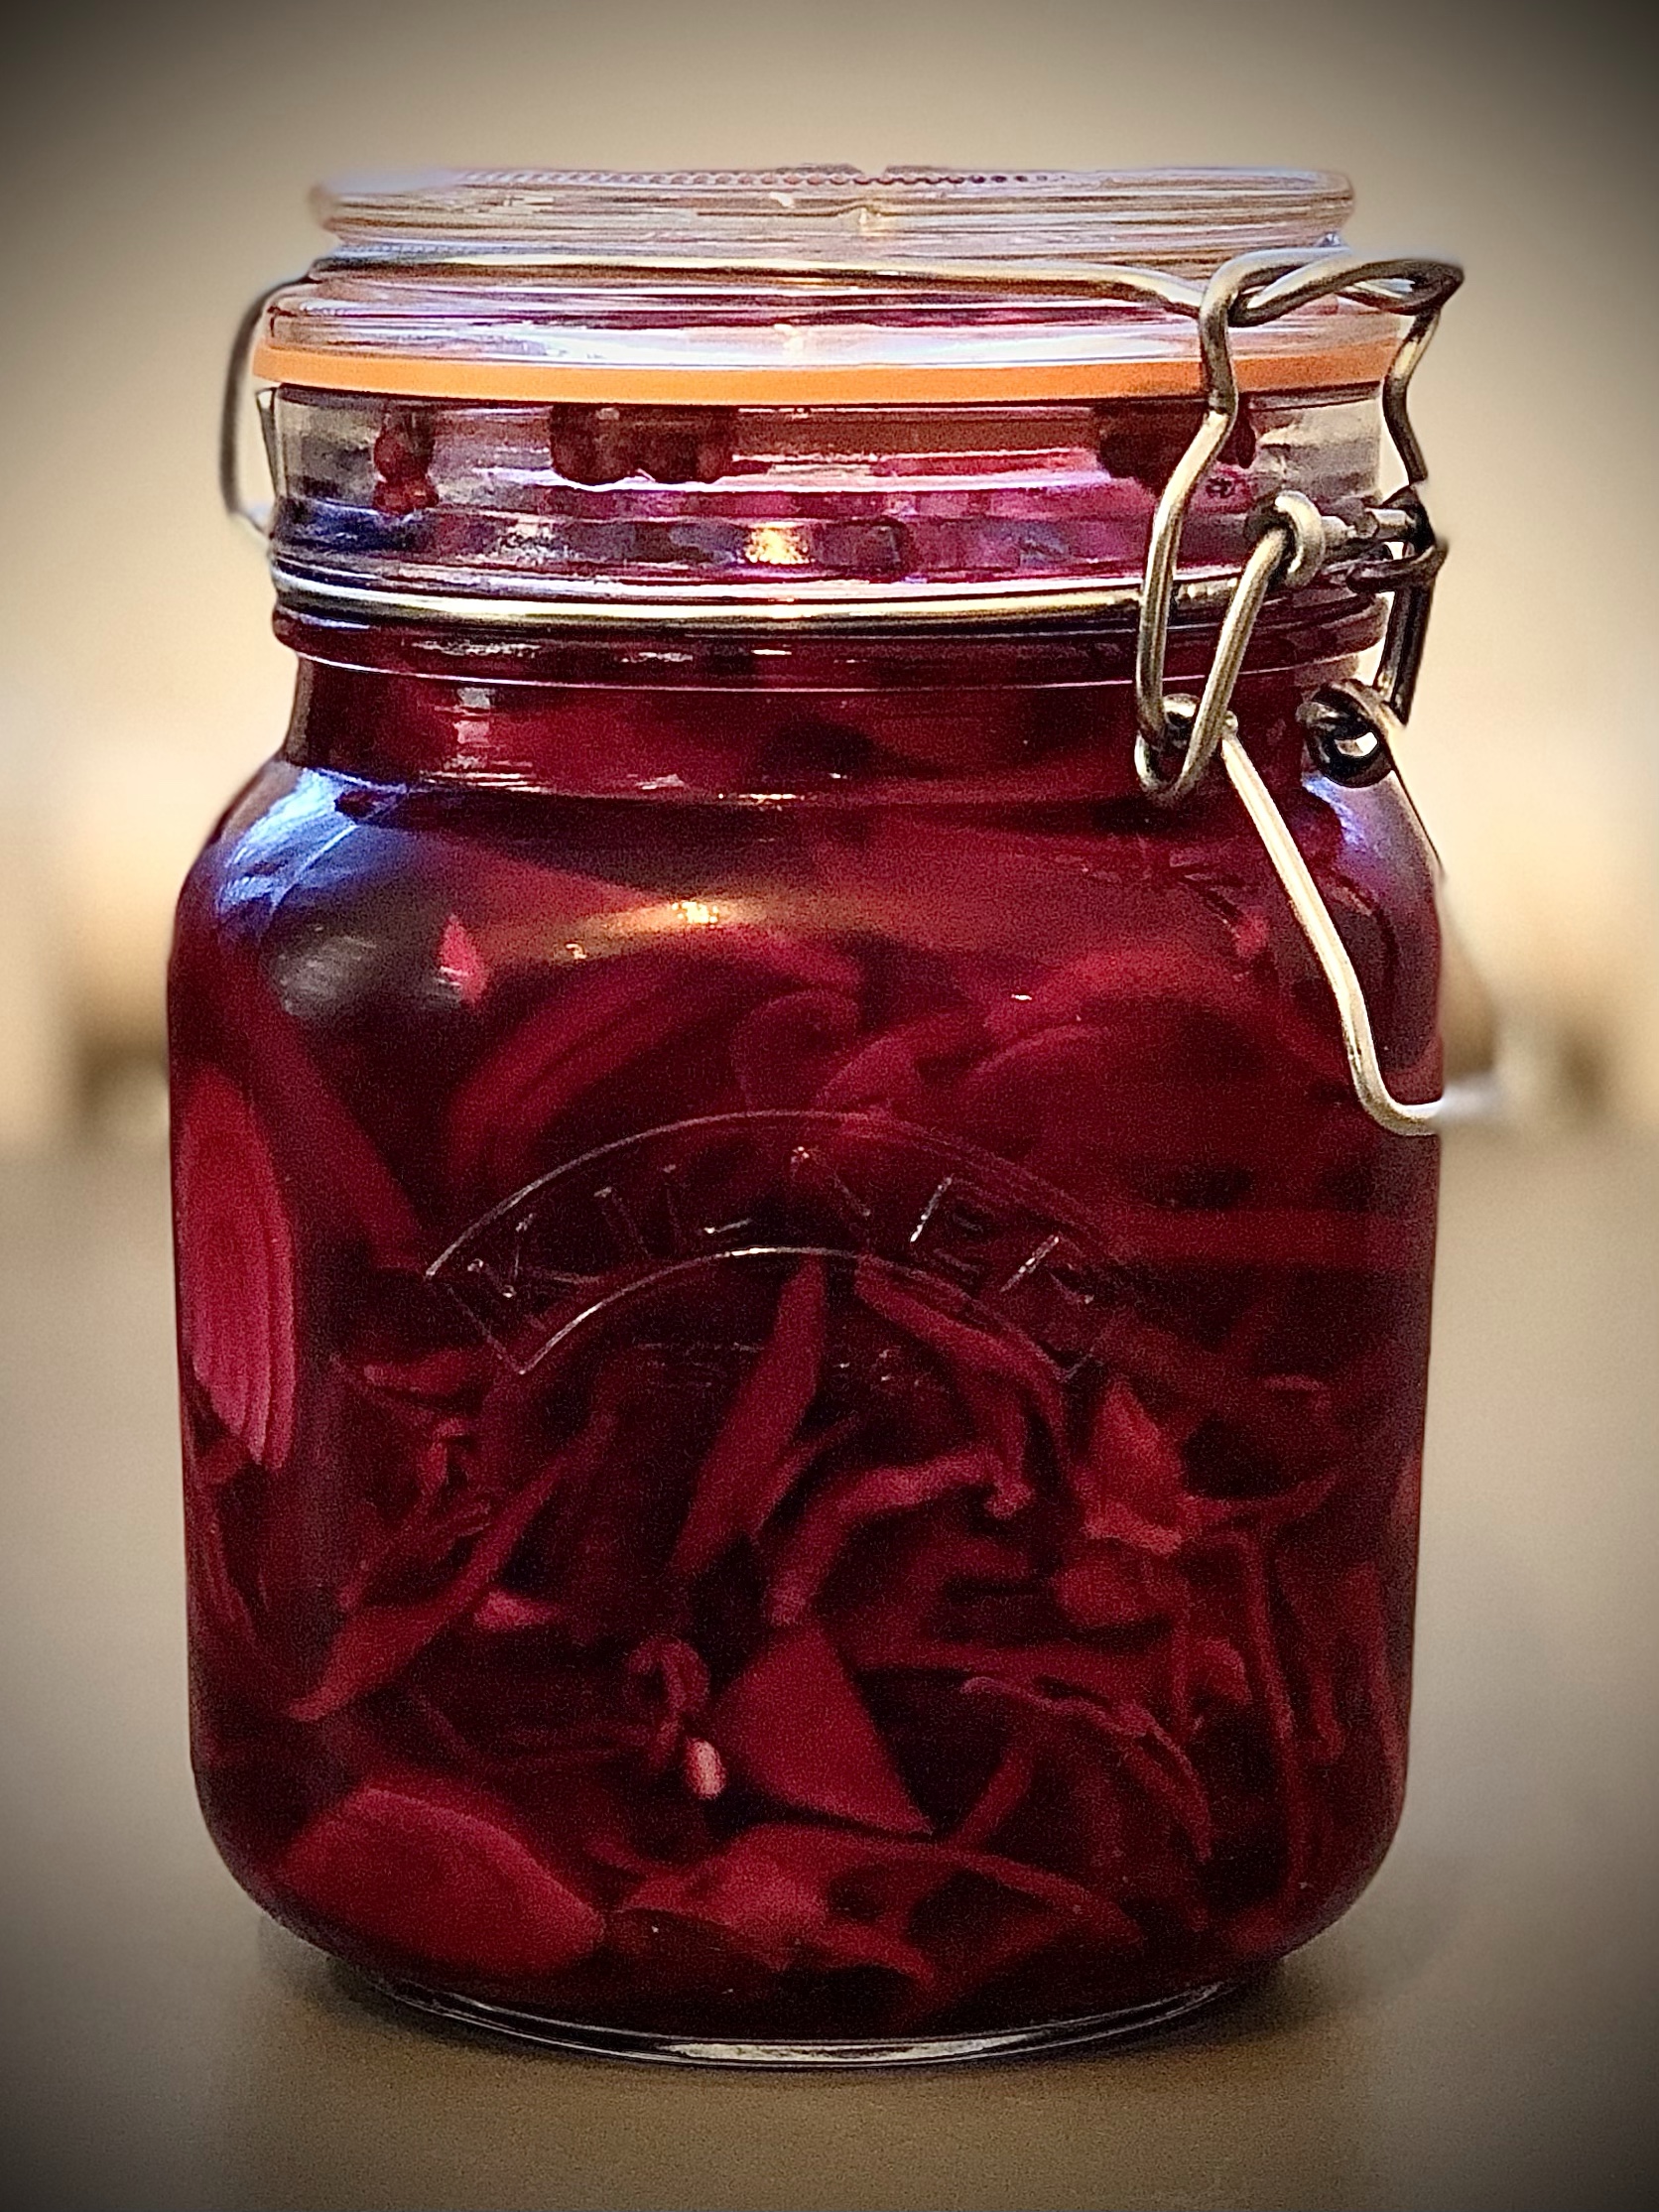
Thinly slice red cabbage and red onion. Place in a pickling jar (I am a fan of kilner jars) with coriander seeds. Dissolve the sugar and salt in white vinegar and pour into the jar. Leave for a minimum of 5 days to pickle. It is as simple as that!

‘Soorati’ means pink in Farsi and the pickle has been given this name as the resulting colour is a vibrant pink. A very versatile pickle suiting many cuisines, including Indian and Asian style dishes.

Eat Torshi Soorati With…

This pickle is delicious with so many dishes. Add to fried egg sandwiches, eat with kebab, burgers and wraps such as my sticky pomegranate chicken wraps. A perfect side to noodles too!

The Pickling Liquid

You may be left with some pickling liquid once the pickles are finished. Use it as a basis for a salad dressing. Just add olive oil and adjust with other flavourings such as a bit of lime juice and / or honey.


Torshi Soorati

Red cabbage and red onion pickle
Prep Time20 minutes
Pickling Time5 days
Total Time5 days 20 minutes
Course: Appetiser, Accompaniment
Cuisine: Persian, Iranian
Keyword: torshi, pickle
Servings: 1 litre jar of pickles
Author: Mersedeh Prewer

Ingredients

  • 1 red onion
  • 1/2 small red cabbage
  • 500 ml white wine vinegar
  • 1 tbsp granulated sugar
  • 1 tsp salt
  • 2 tbsp whole coriander seeds
  • 1 litre pickling jar (sterilised)

Instructions

  • Finely slice red onion and red cabbage and mix in a bowl.
  • Place into jar and add a sprinkle of coriander seeds after each layer of the mixture until you reach the top of the jar. Make sure you pack the vegetables tightly in the jar by pressing each layer down.
  • Dissolve sugar and salt in vinegar and pour in up to the neck of the jar. Push the vegetable mix down to pack and squeeze in more of the veg, if you can. Pour in more vinegar if required.
  • Close the lid tightly and leave the jar in a cool dark place like a pantry for 5 days. Once opened store in fridge.